
Most of the time, the processors in a typical computer generate a great deal of heat, necessitating active cooling to maintain stability.
Today’s high-performance equipment, such as the GeForce R.T.X. 3000-series graphics cards from Nvidia and the AMD Ryzen 5000 CPUs, generates far more heat than previous generations of technology.

Even though the CPU and power supply will be mounted on their respective components, case fans can be mounted virtually anywhere in the chassis. In HVAC systems, intake fans are commonly found near the bottom of the system, typically at the front, drawing in the coldest air. This is because they can pull in the most frigid air.
When it comes to computer cases, exhaust fans, used to expel hot air from the case, are often found at the back or on the top of the case.
It is essential to double-check that each fan is still connected if one of them has ceased operating. If the fan is connected but is not spinning after being connected for an extended period, it will need to be replaced.
Do I need to change case fans?
To keep the temperature of a computer consistent, system builders frequently rely on heatsinks and fans. In some cases, installing new or additional fans may be essential when upgrading or building a new computer or when your present computer is overheating and need cooling.
- When a fan is reaching the end of its useful life, it is common to begin making strange grinding noises or vibrating abnormally. There is no warning on rare occasions, and a fan will come to a complete stop silently without notice.

- Make your way into the computer case with a flashlight and have a peek around (but try not to touch anything while the computer is on).
- A heat exhaust fan is installed at the rear of the casing and is in charge of exhausting the hot air from the system. Alternative placements for exhaust fans include the top of the case, whereas intake fans are often located towards the front or sides of the case. Unless they are among the lowest-power, passively cooled systems, the vast majority of systems will have a minimum of four fans: one for the intake air and one for the exhaust air; one for the CPU cooling fan; and one for the power supply unit (P.S.U.).
What you need to know before installing a fan?
The great majority of cases and computers on the market today will have fan mounting slots that are not being used. Even if all of your fans are working, there is a good possibility that you will have adequate room for at least one more fan.
Consider installing more fans if you find that your system is still running hot or unstable despite all of the fans functioning correctly on your system. If your case is too small to accommodate any extra fans or if your fans are getting too loud, liquid cooling may be an option.
This procedure will be assisted by our articles on how to adjust your P.C.’s fans for best system cooling, as well as how to detect the direction a P.C. fan blows. Make sure that if you need to replace a fan, you select an adequate size and have the appropriate connection before proceeding.
Choose the right fan
Fan sizes, shapes, and colors are available, ranging from small barrel-type fans used to cool chips on occasion to enormous axial fans, which are found in the vast majority of power supply units. Typical fan diameters range from 70mm to 140mm, although as the industry expands, more giant fans, such as those measuring 230mm in diameter, are becoming more commonplace.
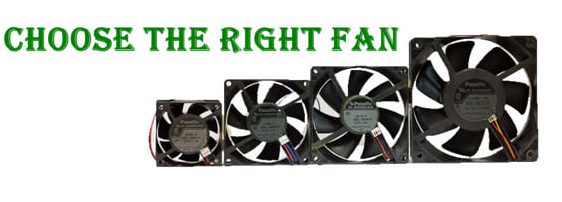
Fans having a diameter of 120mm or more are generally seen in newer cases. When selecting a humidifier, it is crucial to examine the amount of airflow (measured in cubic feet per minute, or C.F.M.) and the amount of noise it produces (measured in decibels or dBA).
This information may be found on the product’s packaging and the product’s information page on the company’s official website. Fans are available in different sizes, speeds, blade shapes, and colors. Several fans, such as this Noctua Chromax fan, are equipped with built-in L.E.D. Lights. Others, such as this Noctua Chromax fan, are designed to deliver high-performance levels.
Even though more giant fans spin at slower speeds, they can move a substantial volume of air without making a lot of noise—the L.E.D. As shown in the photos below, lighting built into sure fans is an additional feature offered by some manufacturers.
Maintain positive pressure
When installing fans, the use of positive pressure within the case can help prevent dust from being sucked into any open holes or crevices in the computer case, which can be detrimental. If positive pressure is to be maintained, the total combined C.F.M. of the intake and exhaust fans must be larger than the total combined C.F.M. of the intake and exhaust fans, respectively.
Most fans have little arrows engraved into their frames to show how the air is moving to facilitate operation. When installing the computer, the intake arrow should point towards the inside of the computer, and the exhaust arrow should point towards the computer’s exterior, as shown in the illustration.
Power connections
When it comes to connecting to a computer, most cooling fans will use a conventional connection. Modern systems frequently make use of specialized fan headers with three or four pins and normal MOLEX four-pin peripheral connectors, which are also common. From left to right, a 3-pin connection, a 4-pin connector, and a MOLEX connector are seen on the board.
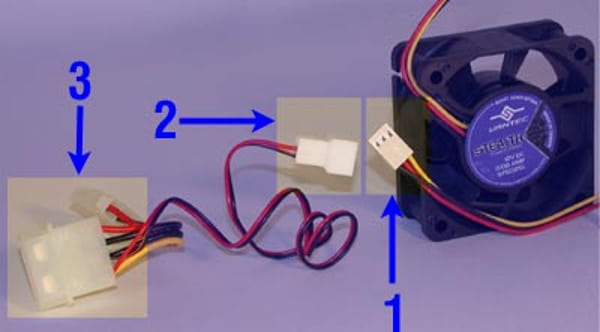
Before purchasing your fan, be sure that you understand the type of fan connection that you will want. The fan is powered via the analog 3-pin and MOLEX connectors on the back of the fan. 4-pin connectors are digitally controlled and allow for dynamic adjustment of fan speeds by the system.
The majority of motherboards (as well as specialist fan controllers) are equipped with an abundance of 3-pin and 4-pin fan headers that are dispersed across the board.
Install a new fan
Before installing any component in your computer, make sure it is turned off. A Flathead screwdriver is necessary for the removal of a faulty fan and the installation of a replacement fan. If you’re replacing a fan, remove it from the chassis and then unhook the power cable from the Motherboard (or MOLEX connection). If your new fan does not come with screws, you can utilize your existing screws.
Lift the fan to the mounting position and match the screw holes with the holes in the casing to complete the installation. Tighten the four screws that hold the fan in place with the other with one hand. When installing a case fan, use one hand to hold the fan in place while securing it in place. Four screws, on the other hand, should be used to fix the fan in place securely.
It is sufficient to unsnap the plastic friction clips holding the fan in place before removing it and replacing it with a new one if the fan is only held in place by plastic friction clips. After that, connect the fan to a fan header that is not already in use. The headings are keyed to ensure a reliable connection. Four-pin headers will work with three-pin fans, but the ability to regulate fan speed will be lost. Ensure that your case fans are transported to the Motherboard.
Using a Motherboard-to-Fan connection will ensure that your fans run at their peak efficiency and performance levels.
If you connect your fans to the Motherboard, you will be able to control the fan speed through the Motherboard’s BIOS. However, it would help if you connected it using a 4-pin connector to use that option. Most motherboards include at least two fan headers, if not more. However, if you have a motherboard with four-pin headers, such as the B450m, you will be OOK. Now, on your Motherboard, look for the pin headers that are listed below:
- SYS FAN (System Fan)
- CHA FAN (Chassis Fan)
- PWR FAN (Power Fan)
- EXT FAN (Extension Fan)
Check the bottom left corner of your Motherboard if you’re having problems distinguishing them. You’ll receive a single Header in a short period. It is now necessary to link the Header that has been located.
- To keep the connector aligned above the Motherboard, each connector will include two tabs simulating a bump (at the beginning and end of the port).
- Carefully lower and lower the connection down the Header until it reaches the MOBO entirely. That’s all there is to it; you’re done with the snaking. Attempt to connect the fan to the nearest fan header to organize the cable management system.
Connect the Case Fans to the Power Supply Unit
Before attaching anything, you should double-check the model number of your power source. It is necessary to have the following equipment to connect your case fans to your power supply unit.
- Four-pin MOLEX connector for a more secure connection (Comes with the P.S.U.)
- Three pins are used for the MOLEX connection (Comes with the fan)
Remember that not all power supply units (P.S.U.s) or fans come with the connector. The most up-to-date units, on the other hand, will contain connections. You may connect your fan directly to the P.S.U. Through a connection. What if your fan does not have a Molex connector, on the other hand?
Alternative options include purchasing the P.S.U. to Fan Pin Header Adapter. As a result, you may establish a link between your followers and the P.S.U. It is true that tying your followers to the P.S.U. Generates some negative backlash. Consider the fan speed, for example, which you have no control over. The fan will run at its most excellent capacity continuously.
When installing case fans, there are two things to keep in mind. Please consider the following before we begin: the method by which the case fans will be attached. You should be familiar with the fundamentals of fans. It is pretty likely that when you open the shell of your computer, you will see four different types of fans, which are as follows:
- CPU Cooling fan.
- Intake fan.
- Exhaust fan.
- U. Cooling fan
By simply looking at them, you may quickly detect fans that are not working correctly. Their only option is not to rotate at all or to do so while emitting that weird grinding noise. Additionally, if you have any fans blocked with dust, please drain them as soon as possible to avoid the heating issue. The following section will go through how case fans work now that you’re familiar with the many types of fans available.
The intake fans will provide initial cooling, which will suck cool air from your room or wherever your computer is housed, cool its internal components, and then expel the heated air with a helping hand from the exhaust fan. To properly install the Fans, you must understand how to position them.
Direction Of Case Fans
You must ensure that your case fans are correctly configured. The supporters will inflict more harm than good if they do not do so. A marking on the body of some new Intake fans will indicate which way the fan should be pointed as a result of this decision. The fan label or sticker on the body must be visually inspected to do this. Typically, the sticker side would be on the front of the package.
As a result, organize the fan in the following manner. If, on the other hand, there is no sticker. If this is the case, it would be wise to look for the fan’s spokes or the mesh grille. The sticker or spokes that are used to attach intake fans, for example, will be oriented inwards toward the computer case. Check out our selection of the best Corsair keyboards, highly recommended by industry experts.
Mount Your Case fans
Most of the time, intake fans should be installed on the front of the case to draw in cold air from the outside, while exhaust fans should be installed on the back of the case to exhaust warm air. A vent will be included on the top of some of the new casings. However, you should avoid making the mistake of placing an intake fane at that location.
That vent should be used for exhaust fans, which would allow for more outlets for the hot air to be released.
Before installing the fan, you must first determine the most appropriate position for the fan to reach the Motherboard or Power Supply Unit when it is mounted. Easily. This will make cable management much more accessible. Once you’ve determined the best placement for the fan, align the fan with the four holes in the case and screw it into place.
When using four-pin fan connections, your computer may dynamically modify the fan’s rotational speed. Typically, a system will run at a reduced rate to reduce noise, then at a faster pace to provide more cooling when necessary. The purchase of a fan controller results in additional fan headers.
Alternatively, 3-pin/4-pin to MOLEX adapters can connect the fans directly to the power supply unit. (Keyed connections are also used for MOLEX connections.)
Use cable management or zip ties to route the cables from your fans (and other devices). Using this method, you may avoid wires from hitting the fan when rotating and producing a buzzing sound. The interaction of cables with fans can cause the fan to shut down entirely or, in the worst-case scenario, cause the line to be destroyed.
FAQ
Where do you connect case fans?
Connect the case fans to the Motherboard in the following order: CPU FAN label on the Motherboard to the CPU fan. As a result, your BIOS may block your computer from booting if no CPU fan is detected. Your graphics card probably has its fan.
Should I connect case fans to the Motherboard or power supply?
It is recommended that modern fans be connected directly to the Motherboard. The preferred configurations are a four-pin connection on the fan and a four-pin header on the Motherboard.