
You went out and bought a whole new set of computer case fans so you could have more control over how fast they spin. Your computer would be much quieter after you did this. You were surprised to find that you couldn’t just plug in the new fans after replacing the old ones.
The PWM cable and the Motherboard are now connected directly. Most people put the PWM cables in the wrong Header, making it impossible for them to install the wires in their devices correctly.
On the other hand, most case fans are connected to three-pin headers, while the PWM cable has a four-pin connector. Since Intel’s first i7 central processing units came out, there are many more fan controller cables on the market.

PWM, which stands for pulse width modulation, has become the most common business term in recent years. It refers to the way the fans in the central processing unit work. Users who have fans connected to their motherboards should pay special attention to this because the type of cable used will determine whether the fans are controlled by the Motherboard or directly by the CPU.
If a user’s fans are connected to their Motherboard, they should pay extra attention. This is very important for people whose fans are hooked up to their motherboards. PWM control is the best way to change the speed of your fans and pumps these days.
You can read about this topic here if you want to learn more. Before leaving the factory, all modern mainstream motherboards must have at least one pulse width modulation (PWM) header with four pins.
Most high-end motherboards have four to six or more of these four-pin connectors for fans and pumps.
The Pulse Width Modulation (PWM) system controls the fans because it is an innovative and effective way to do so. But even though PWM was first made available to the public in 2003, there are still many people who don’t know about the many benefits of using it, even in this day and age.
Even worse, some companies carefully make high-tech fans but still use the standard 3-pin connectors.
Different Fan Types and How to Recognize Them
There are three basic kinds of connections, and we can tell them apart by counting how many wires or pins a fan has. When there are only two wires, there are only two connectors: a + connector and a – (ground) connector.
The second version has three wires: two to power the Fan and one to carry the Tach or tachometric signal. There were only two wires in the first one. The Tach signal shows how fast the engine is going (in English: the wire that gives a readout of the current fan speed). At a specific rate, a signal is sent through the third wire.
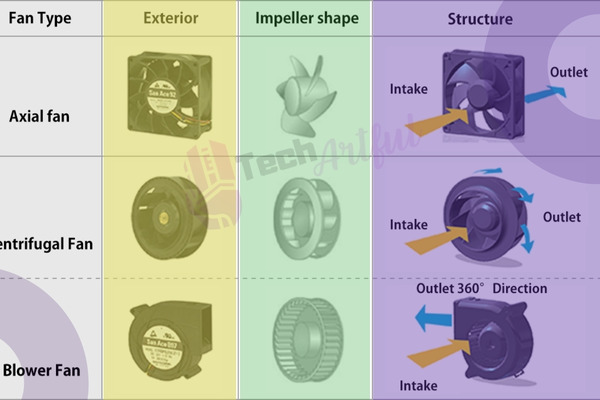
This frequency is related to the speed of the Fan, which is measured in revolutions per minute (RPM) (revolutions per minute). This article will talk about PWM fans and PWM fans, both four-wired fans. PWM fans are the third type of Fan with four wires.
PWM, which stands for pulse-width modulation, is how PWM fans control the Fan speed.
- Supporters can be put into three main groups right now. You can still buy one of them, even though it’s almost entirely out of date.
- Each of the two-pin connections has only one positive and one negative connection. There is only one link between them. That is the last thing that can be said about it.
- The headers with three pins are: You are right; this package has three-pin headers. You will need one more pin than the two required for the connection if you want to keep track of how fast your Fan is turning. It would help if you had both a positive and a negative pin for the link to work.
- The PWM fan cable is sometimes called a four-pin header because it has four separate pins.
Keep in mind that some connections with three pins look like they have four plugs, but if you look closely, you’ll see that only three of the wires go to your Motherboard. This is something to keep in mind when working with specific connections. It would help if you kept this in mind as you go.
If you want to buy PWM fans, you should test them before putting them in your system. Next, you need to make sure that all of your PWM fans are connected to your Motherboard correctly. Also, if you have some free time, my research on the best Ryzen 9 5900x motherboards might be interesting to read.
What is PWM, and how does it work?
PWM is a common term in the field of electrical engineering. It stands for pulse width modulation or modulation with the width of an impulse. It is used in many places, like the telecommunications industry, audio equipment, servo motors, and more.
Using PWM to control voltage is an exciting challenge for those who like this sort of thing. PWM is a method for controlling the speed of a motor, like the one in a fan or a pump. Even though some of you may already know how PWM works, we will still explain what it does.
Pulse width modulation (PWM) is, in a nutshell, like a switch that keeps turning on and off to control how much power goes to the Fan or pump motor. Fans and pumps are run by Pulse Width Modulation (PWM) system. It works with the motor to give either full power (12V) or no power (0V) (no power).
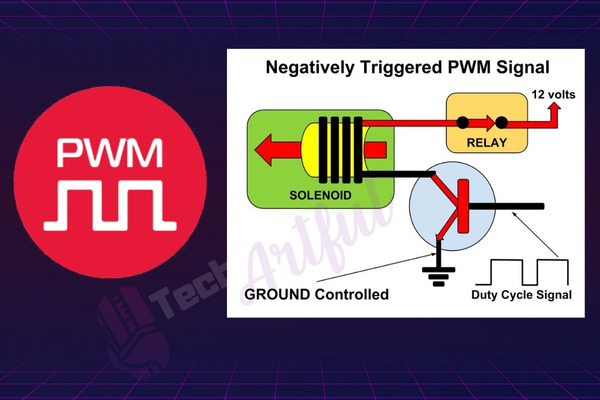
Take a look at the image below to see how this works. So, the motor is getting short bursts of energy. Think of it as if you were turning the wheel with your hand. In the same way, this is the same as well.
Pushing the wheel with the same force every five seconds will keep it going. You can also change how long it takes between each push. For example, you could give the wheel a little push every three seconds. If this were true, you would have noticed that the wheel is turning a little faster, which is precisely how Pulse Width Modulation works.
How vast the pulse width modulation (PWM) signal is or how long the device is on controls the speed of the motor, which could be a fan or a pump. A 10% duty cycle only gives a few short bursts of power over time, based on the chart above.
The motor will spin slowly because of this. On the other hand, a duty cycle of 100% means that the Fan or pump will run at full speed and stay on.
It is essential to know that there will be no voltage control here and that PWM will control the motor to get a constant 12 volt supply. Because of this, the 4-pin motherboard header should only be used for one Fan at a time.
If two fans are needed, the Y-splitter should be used. Because water cooling pumps use more power than other pumps, most of the power supply is connected to the Molex connector. The other two tach and PWM wires connect to the motherboard header. These wires are used to measure speed and control PWM.
Why is PWM so important?
Almost all fans will stop working if the voltage drops below 5V, but fans can run at speeds as low as 300-600 RPM with PWM control and still work typically. They don’t die in the usual way; instead, they stop spinning and turn off.
Because of this, PWM control is often the only way to get the Fan to run in the speed range it says it can. At these speeds, the fans are completely silent, and with PWM control, some of them can even be turned off.

Another cool thing about PWM regulation is that you can control all of your fans with a single PWM signal. Because fans always get 12 volts, you can use special fan hub splitters to send one PWM signal to all linked fans or pumps.
These splitters can be bought on the Internet. So, your pumps and fans will all work together. Let’s look at some of the software that motherboard makers offer to control PWM. Because almost every motherboard maker takes PWM regulation very seriously, we can use settings with a lot of detail, which is a good thing.
All of your “noisy” parts can run at low speeds, and the PWM duty cycle curve can be changed based on the temperature readouts. In the Gigabyte EasyTune example that was just shown, the PWM profile is set up so that the fans run at about 55 percent of their maximum speed when the CPU temperature is at or below 60 degrees Celsius.
When the temperature goes above 70 degrees Celsius, the fans speed up to a full-duty cycle, 100 percent.
How to Install PWM Fans into The Motherboard
Few new Motherboards don’t have a Four pin Header, but most do. So, if your Motherboard is relatively new, the process should be pretty simple for you. Almost every MOBO comes with at least two fan headers. But you’ll find four-pin headers on MOBOs like the B450m.
Now look for these pin headers on your Motherboard:
- SYS FAN (System Fan)
- CHA FAN (Chassis Fan)
- PWR FAN (Power Fan)
- EXT FAN (Extension Fan)
Look in the bottom left corner of your Motherboard if you can’t find them. You will quickly get one Header. After seeing the Header, it’s time to plug it in.
- Each connector will have two bump-like tabs, one at the beginning of the port and one at the end. Connect the plug to the Motherboard.
- Push the connector down the Header until it is fully connected to the MOBO.
You’re done putting it back together now. To keep the cables neat, try to plug the Fan into the fan header that is closest to it.
How to Control PWM Fans Via BIOS
We had to do everything on our Desktop back in the day, right? Those days are done. Since there have been so many changes to bios, you can do anything there now. So let’s talk about how to keep the fans under control.
- To get to the System Utility Screen, press F2 at the boot screen. The key is F2, F1, or Delete most of the time.
- Once you’re in BIOS, click Fan Info.
- CPU FAN and SYSTEM FAN are the names of the two FAN settings.
- Click Settings and make sure Smart Fan Mode is turned on.
Then set your Fan’s speed to just what you want.
Connect PWM cable to system fan & Motherboard:
If you open your CPU to connect a new system fan or build your CPU, you might not know which pin on your PMW cable goes to the end of your cable. You can use the manual that came with the CPU or looks for the words SYS FAN or CHA FAN on the Motherboard.
Even though PWM cables are small and don’t weigh much compared to the rest of the system, they can break if they aren’t put in, and no one knows about it. Keeping an eye on how the system fan works and how hot the core gets is essential.
FAQ
Where does PWM cable go on the Motherboard?
Pulse Width Modulation is the abbreviation for this feature, which enables the motherboard bios to adjust the speed of your fans in response to changes in temperature. PWM headers are positioned directly on the Motherboard, and the PWM connection at the end of the fan cable is inserted into those headers. The Header for the PWM connection will contain a total of four pins.
Where do I connect the PWM connector?
It is necessary to connect the 4-pin Fan to a 4-pin header on the Motherboard to use the PWM capability. If you connect the four-pin connection for the Fan to a three-pin header, the Fan will operate at its highest possible RPM.