
Are you trying to join a meeting in Microsoft Teams, but you got a popped-up error saying, “Sorry we couldn’t connect you.” Pretty frustrating and irritating error, isn’t it?
Don’t worry, because, in this post, we are going to show you some of the most useful and effective ways to solve Microsoft Teams’ “Sorry we couldn’t connect you” problem while joining a meeting.

So there is no reason to be concerned about it. You are in excellent company here. My experience as a heavy user of Microsoft led me to do extensive study on the topic. As a result, I discovered a variety of straightforward solutions that may assist you with this.
So, please read all the way through till the finish. During this whole response, many of your problems will be addressed and resolved.
Let’s get this thing started.
Why Couldn’t Microsoft Teams Connect You?
There are several situations that might be the reason why Microsoft Teams is unable to connect with the other members of the team. There is always the potential that perhaps the network connection of your pc and the computers of the other members of the team isn’t really strong enough. There is also the potential that the configurations on either your device or the devices of the other members of the team are incorrect.
Let’s say you choose to use Microsoft Teams to have a virtual meeting. You have already sent the invitation link to the meeting to those who will be attending. However, once you launched the conference, a few of the attendees felt frustrated after repeatedly attempting but failing to join there.
This kind of thing happens rather often. Imagine for a moment that precisely this will take place at the annual general meeting of your corporation. Isn’t it absolutely terrible!
So, what causes Microsoft Teams to refuse your attempts to connect a meeting?
Unfortunately, Microsoft Teams is unable to connect you or gives you an error message that says, “Sorry, we couldn’t connect you.” This is most likely the result of an unreliable internet connection, backdated software, problems with the installation of Teams, technical glitches, or a restriction caused by antivirus software, among other potential causes.
It is vital, before arriving at any solutions that are both effective and practicable, to first determine the various causes for the failure. Because of this, we made an effort to shed some light on the situation.
Now then, let’s move on to the main topic of this guide, where we will give you the best ways to fix the “Microsoft Teams sorry we couldn’t connect you” problem.
How to Fix Microsoft Teams’ “Sorry, We Couldn’t Connect You” Problem
You may put your faith in the fact that there will always be a solution to the problem, regardless of how difficult the situation may seem to be. Now, we will devote a significant amount of time to fixing the problem with Microsoft Teams.
After you’ve finished reading the whole post, finding the solution to the issue will be as simple as a piece of cake for you. Now then, let’s get going.
The following are the solutions available to fix the “sorry we couldn’t connect you” problem in Microsoft Teams:
1. Restart Your Microsoft Teams App
It’s possible that the problem might be solved by just restarting the Microsoft Teams application that’s running on your system. My years of experience and competence in diagnosing have led me to the conclusion that you can cure the vast majority of trivial issues simply restarting the system or the program in question.
In most cases, issues are resolved after a fresh restart. This is a somewhat simplistic approach to finding a solution to the problem. Therefore, I do not wish to go any farther, and let’s carry out this solution.
You may restart Microsoft Teams on your PC by following these steps:
- If you have opened the MS Teams window, then close it by pressing the X button in the upper right corner. Then search for the Teams icon in the System tray and exit it by right-clicking on it.
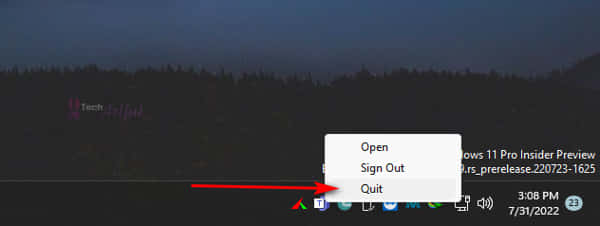
- Open the Start menu and search for Microsoft Teams and open it.
After closing the app and reopening it, check to see whether you are faced with the error notice once again. If it still exists, go to the next step in the process.
2. Check Your Internet Connection
In most cases, seeing this error notice means that the request could not be fulfilled within the given amount of time. To be specific, the request has timed out. To put it another way, the servers that makeup Microsoft Teams were unable to react immediately to the connection request that you sent.
To ensure a seamless experience when using Microsoft Teams, you will need a reliable internet connection. This is because the application’s meeting and conferencing functions run online and in real-time. When you are in an area with a weak signal, the device will not be able to connect you to the other person.
You just need to look at the network icon that is located in the system tray at the bottom of your computer screen to verify this. If you discovered that it was free of any weird icons, then the connection should be OK.
If, on the other hand, the indicator displays a red cross signal or a yellow triangle indication, this indicates that your connection is unstable. Therefore, there will be no access to the internet as a consequence of this.
Instead, you may proceed with the steps that are listed below:
- In the Taskbar, right-click on the network icon.
- Select Open Network and Sharing Center from the context menu.
You will be able to determine the current condition of your network by going there. If you see anything on your network that looks like a cross icon, it indicates that you do not have a connection to the internet.
In regard to the matter at hand, the following is a suggestion for you:
- In order to make extra bandwidth available for Teams, you should disconnect any other devices that are utilizing the Internet connection.
- You should shift to a wired connection if you are currently utilizing a wifi connection. Use an alternative connection, such as a mobile hotspot, if you choose.
- Restart the Router to reset the connection and delete any temporary files that may have been created.
3. Update Your Microsoft Teams App
Install the most recent version of Teams as soon as one becomes available, especially if an update is released. There are several instances in which problems with apps occur as a result of them being out of date.
Now let us look at how to detect whether there are any new updates and how to install them:
Consequently, updating the application will assist you in resolving any problems, including the inability to update the status of MS Teams while it is offline.
In most cases, the Microsoft Teams app will automatically update itself when an update is available. However, the following actions need to be followed in order to update it manually:
- Launch the Microsoft Teams application.
- Simply go to the Settings and More
- Go to the About Teams option and choose the option to Check for updates.
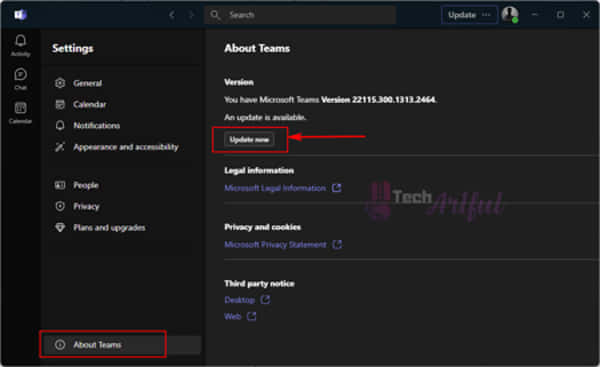
After that, MS Teams will check for updates and download and install them immediately if there are any available.
4. Try The Microsoft Teams Web Version
It is possible that you may solve the issue by switching to the web service if you are currently using the desktop version.
If you are unable to control the pop-up problem on the Teams desktop program in any manner, the only option left is to use the web-based version of MS Teams. The functionality of this is identical to that of the desktop version, and there are no known bugs or issues associated with it.
Using Microsoft Teams through the web can be done by following these steps:
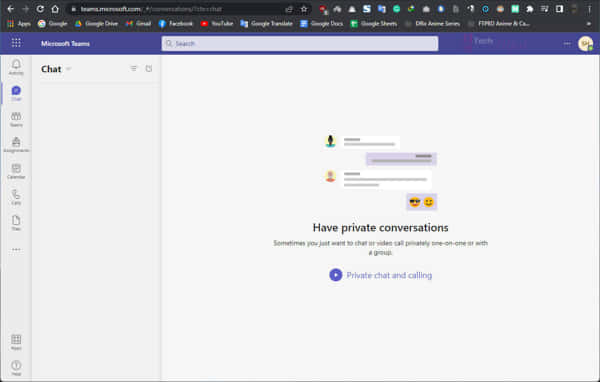
- Open your preferred browser and enter this URL in the address bar: https://teams.microsoft.com/ and hit the Enter button on your keyboard.
- Sign in using your Teams credentials and try joining a scheduled meeting.
5. Delete Microsoft Teams Cache Files
If this issue is happening due to the cached files of Microsoft Teams, then removing every one of those cached files from Teams could be beneficial in getting rid of this “Microsoft Teams, sorry we couldn’t connect you” issue.
Before you proceed with that, make sure that the Microsoft Teams application on your Windows 11 or Windows 10 machine is entirely closed.
This will guarantee that the Microsoft Teams program is not operating in the background. After that, remove the cache by following these instructions for Microsoft Teams:
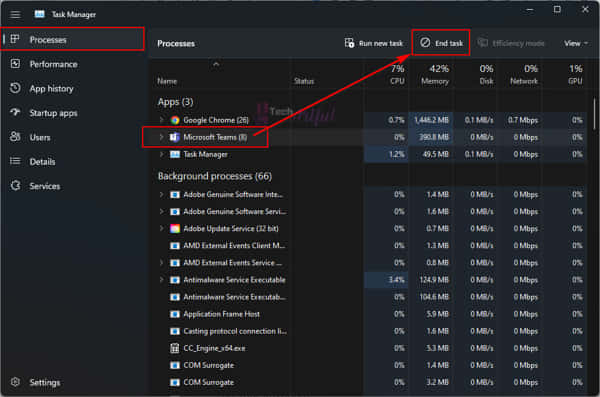
- Click the right mouse button on the Taskbar.
- Select Task Manager from the menu.
- Search the Microsoft Teams process, and then click on it.
- Click on the End Task button on the upper sanction if you are a Windows 11 insider preview user, or you can find the End Task button in the below right side corner.
- To launch the Run application, press the Win + R key simultaneously on your keyboard.
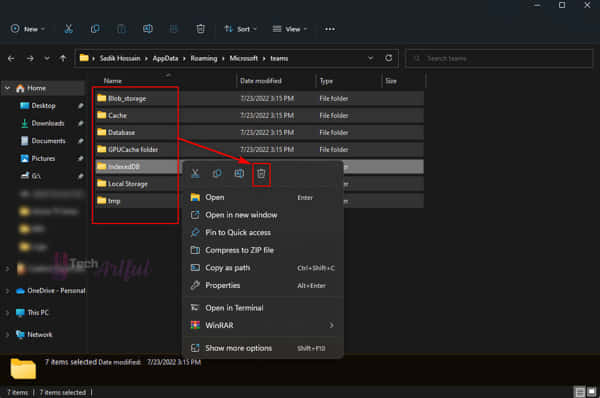
- In the box, type %appdata%\Microsoft\teams, and then click the Enter key on your keyboard.
- Delete the folders that have the following names: application cache, blob_storage, Cache, databases, GPUcache, IndexedDB, Local Storage, and tmp.
Launch Microsoft Teams once again and check to see whether the problem is still there.
6. Reinstall Microsoft Teams
If up to this point, nothing really has helped, it is time to try something more drastic. Uninstalling Teams from your Windows device and then reinstalling it will undoubtedly resolve the problem for you. This is a guarantee.
To remove the Microsoft Teams application from your computer, you will need to follow the given steps:
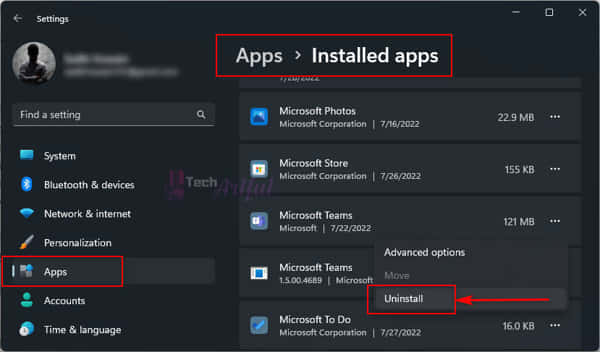
- Press the Win + I button on your keyboard to open the Settings Alternatively, you can click the Start menu and go to Settings.
- Navigate to the Apps > Installed Apps.
- Search for Microsoft Teams and click on the three-dot button on the right side.
- Now uninstall it by selecting the Uninstall
Now, launch Microsoft Teams once again, and check to see whether the issue still manifests itself.
7. Disable Any Third Party Antivirus Software
It has been brought to my attention that several clients were able to resolve the issue with MS Teams by turning off the antivirus software that they were using. In order to fix some of the other problems, they needed to turn off the firewall or the VPN apps.
Therefore, in the event that your issue has not been resolved at this point, you may want to try this. Allow the Microsoft Teams program to be used by your network by whitelisting it on your firewall, antivirus software, and virtual private network (VPN).
Conclusion
MS Teams is, without a shadow of a doubt, one of the greatest platforms available today for conducting business meetings, participating in video conferences, and even teaching. Because of this, even a single issue with it may have quite a negative influence.
So, as there are many people who are unable to join a meeting, we rounded up some of the best ways through which you can easily solve the “Microsoft Teams, sorry we couldn’t connect you” problem. Hopefully, you found this article helpful and solved your problem.