
Do not be concerned if you cannot see your SSD while navigating through the BIOS settings panel. There are a variety of approaches that may be used to remedy the problem of the BIOS not recognizing the SSD in your Windows PC.
Generally speaking, the most typical reasons for your SSD not being recognized by BIOS are an issue with your SATA driver or a problem with your BIOS configuration. Regardless of the method you choose, you can rectify the matter if your BIOS does not recognize your SSD. The BIOS on your computer may need to be updated if your machine is not operating correctly.
Updating the fundamental firmware on your computer is an excellent place to begin your troubleshooting process, whether you’re looking to upgrade to the best gaming CPU available or trying to figure out what’s causing your system’s instability.

The BIOS, which stands for Basic Input Output System, is a low-level interface between your motherboard, the components attached to it, and your operating system. It is essential for the proper operation of your computer.
In addition to initializing everything connected to the mobo’s I/O, this firmware is critical to the smooth operation of your PC, including everything from the best SSD for gaming to your CPU and even the best gaming RAM.
Consider it the system that governs the flow of information between all of the most critical components of your computer. Or, to put it another way, if something isn’t broken, don’t fix it. Alternative to that, here’s our instruction on how to upgrade your BIOS on the best gaming motherboards from MSI, Gigabyte, Asus, and Asrock in the shortest amount of time possible.
You should note any BIOS settings or overclocking values that you may have before starting the installation procedure since they will be wiped throughout the installation process.
You might also check to see any scheduled power outages in your area before starting with the Update if you want to be extra cautious about what you were doing. Depending on whether you are on the red or blue side of the AMD against Intel battle, the BIOS update method may be slightly different for you.
Maintaining AM4 motherboards in good condition allows you to improve memory support and compatibility with the most recent CPUs, which is especially important for gaming.
Troubleshoot faulty hardware
A defective piece of hardware may be preventing your SSD from being recognized by the BIOS. You should thus thoroughly verify your SSD hardware and the necessary ports to ensure that they are in excellent working condition before using them.

It’s also worth experimenting with a different port to check whether the BIOS recognizes the SSD.
Don’t be alarmed if your gear is in excellent working condition but you still encounter troubles. Then move on to the next best-possible alternative.
Use the ASRock BIOS update features
Simply connecting or installing the following components in or to the ASRock motherboard will allow you to access and update your motherboard’s BIOS from the BIOS, which is particularly useful if you are building a new system from the ground up. – A motherboard from ASRock that includes an integrated graphics card.
It is necessary to have the following components: the CPU, cooling, RAM (1 module is required), primary storage drive (SSD or HDD), graphics card (if the motherboard or processor lacks graphic capabilities), monitor, keyboard, and mouse, as well as the vital Ethernet Internet connection.
Note: If the system fails to boot into the BIOS when it should, check for problems with the connections and software installed on the system. Tip: While making a last check to ensure that cables and cards have been appropriately inserted or linked, remove them from their sockets altogether and reattach them again.
Because merely pushing them in does not always result in properly functioning if they have not been installed appropriately.
How to update ASRock BIOS
As soon as you restart your computer, keep holding down the Delete (Del) key until the ASRock BIOS shows on the screen.
After the computer has booted up, ASRock BIOS will display the hardware detected on the first page that the machine loads after starting up. Everything, from the CPU to the SSD to the RAM, and everything in between, is a component.
When a computer is connected to the internet, the BIOS automatically updates the time and date, even if Windows is not installed on the computer in question. However, it is crucial to remember that updating the BIOS using the following procedure is fail-safe, provided that there is no power breakdown during the whole process.
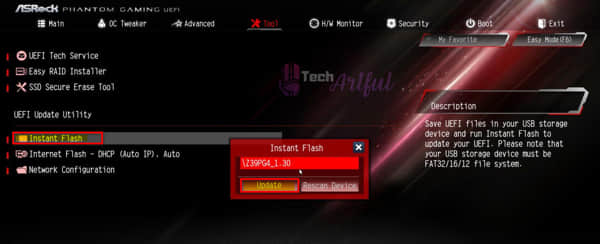
Advanced Mode may be accessed by the F6 key or by selecting it in the top right corner of the screen. Select Tool from the menu bar at the top of the screen to open a new page in your browser. The page that emerges as a result of this is seen in the following image.
This is accomplished by selecting the middle option in the UEFI Update Utility, Internet Flash – DHCP –. Auto brings up the Internet Flash window seen at the top of this page, which may then be adjusted.
On the toolbar, click on the Update option to enable you to begin using your Internet connection. If you cannot get an IP address after numerous attempts, repeat the process. Automatically, the BIOS file will start to download as soon as this has been accomplished.
Configure the SSD settings in BIOS
You can have a problem with the SATA controller mode being set correctly, and as a result, your SSD is not recognized by the BIOS system. The SATA controller settings in the BIOS can be customized due to this change.
Because the BIOS configuration processes differ from manufacturer to manufacturer, we will utilize Lenovo laptops as an example in this section.
- To escape, restart your computer and press the F2 key on your keyboard
- when the first screen shows.
- You can enter Configuration by pressing the Enter key on your keyboard.
- Then, from the drop-down selection, choose Serial ATA and press the Enter key.
- Following that, the SATA Controller Mode Option will be shown. From the drop-down option, select the IDE Compatibility Mode to be used.
- To view the BIOS setup screen, restart your computer once you have saved your modifications.
- Hopefully, your SSD will now be recognized by your computer’s operating system.
Update available drivers
If a device driver for your SSD is missing or out of date on your computer, the BIOS may not recognize your SSD. This is especially true if your SSD driver and your motherboard driver are out of date. Maintaining your device drivers regularly is therefore essential. Manually upgrading your device drivers is one method, while automatically updating your device drivers is another.

It is possible to manually update your driver by going to the manufacturer’s website, identifying your hardware device driver, and downloading the most recent version from the manufacturer’s website.
The next step involves manually installing it on your computer. Make sure that you get the software version that is compatible with your operating system. As a result, it is necessary to use both time and computer abilities.
Using Driver Easy, you may get your drivers updated automatically if you don’t have the time or patience to do so manually.
- Automatic detection of your system and the retrieval of the most suited drivers for it are provided by Driver Easy. Using our service, you no longer have to guess what operating system your computer is running or worry about installing the wrong driver or making a mistake while the installation process is in progress.
- You can keep your drivers up to date regularly using either the FREE or PRO editions of the software. It takes only two clicks to activate the Pro edition (and you’ll get full support and a 30-day money-back guarantee): click here to start the Pro edition.
- Driver Easy is available for download and installation.
- Open Driver Easy and click Scan Now from the menu bar at the top of the screen. Once this is complete, Driver Easy will perform a diagnostic on your computer to find any malfunctioning drivers.
- To have the most recent version of their driver downloaded automatically, click on the Update icon next to the device that has been marked in the previous step (you can do this with the FREE version). After that, you’ll need to put it on your computer and run it.
- With the Pro version, you may have it automatically download and install the correct version of all the drivers that are missing or out of date on your system if you have it set up that way (you will be requested to upgrade when you select Update All).
- It is necessary to restart your computer to take effect the modifications.
- Make your way into BIOS and check whether the system has detected the SSD.
When experiencing complex hardware diagnostic issues, frustrating system instability, or simply having trouble getting your memory to run at peak performance, it is recommended that you check your motherboard’s BIOS firmware to ensure that it is up to date with the most recent release from the appropriate manufacturer.
It has the potential to influence the performance, stability, and compatibility of your system – yes, you read that correctly, it has the potential to boost the frame rate of your game if used appropriately. Simply having an internet connection, a USB flash drive, and 10 minutes of your time is all that is required to finish the process.
If your system is in good health and performing as intended, it is advisable to leave it alone for the time being rather than making changes. Suppose your system encounters a sudden loss of power in the middle of the BIOS update process (even though it is now faster and more reliable than before).
In that case, your motherboard may be rendered completely ineffective.
FAQ
How do I update the BIOS on my ASRock motherboard?
Keep pressing [F2] during the POST process if you wish to enter the BIOS setup menu while it is running. The Instant Flash tool may be opened by selecting it from the [Tool] menu, found in the [Start] menu. When you use ASRock Instant Flash, it will automatically detect all of your devices and only display you the BIOS versions compatible with your motherboard. The BIOS must be flashed. Choose “Yes” from the drop-down option and select the correct BIOS version from the drop-down menu.
How do I fix a failed BIOS update?
The BIOS code on your computer will be rendered worthless if your BIOS update approach fails, and you will be needed to replace the BIOS code on your computer. The following are the two alternatives available to you for consideration: The problem will be resolved by replacing the BIOS chip with a new one (if the BIOS is located in a socketed chip). You can use the BIOS recovery option if necessary (available on many systems with surface-mounted or soldered-in-place BIOS chips).
What happens if my BIOS update fails?
The BIOS code on your computer will be rendered worthless if your BIOS update approach fails, and you will be needed to replace the BIOS code on your computer. The following are the two alternatives available to you for consideration: The problem will be resolved by replacing the BIOS chip with a new one (if the BIOS is located in a socketed chip). You can use the BIOS recovery option if necessary (available on many systems with surface-mounted or soldered-in-place BIOS chips).