
The most recent version of Windows, Windows 11, is quite similar to the performance that came before it, Windows 10, except for a few minor improvements that have been made here and there.
Ultimately optimizing a new edition of Windows can take anything from a few months to a full year, just as it did with earlier incarnations of Windows.
Consequently, it really shouldn’t come as a surprise that a large number of users are having problems with Windows 11. One of the most widespread and infuriating problems that end users are currently forced to contend with is the blue screen of death.
What is the blue screen of death?
The blue screen of death is a screen that appears on a computer rather frequently when the health of the Windows operating system is exceedingly bad or when the machine is going close to the end of its existence.
The same, however, cannot be said for people who are now using Windows 11, as this issue is more of an optimization issue than it is connected to your hardware.
How to Reboot in Safe mode
Before attempting to repair the problem with the blue screen of death, you should first boot Windows 11 into safe mode. This will help you prevent any issues that might arise. The most current iterations of Windows are equipped with a mode known as safe mode, which may be activated by selecting it from the Start menu.
It provides the user with the capability to log into Windows with particular capabilities enabled, which is lovely for avoiding any undiscovered challenges that may have been the cause of the problems in the first place.
Resuming safe mode is relatively straightforward, so take it easy, put your feet up, follow the directions presented below, and you should be good to go in no time. The steps that need to be carried out are outlined in the following paragraphs so that Windows 11 may be restarted in safe mode:
- Select the Windows icon situated on the desktop of your computer so that you may have access to the Start menu.
- Pick the Power icon from the menu to turn the power on or off.
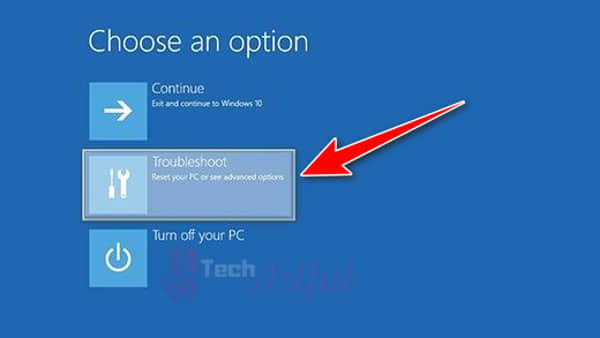
- When you press the Restart button, be sure to keep your finger on the shift key. Your computer will now restart, and when it has finished doing so, you will be presented with a new menu.
- Troubleshoot > Advanced options > Advanced options > Startup Settings should be where you end up after completing this navigation.
- By selecting the relevant button, you will be allowed to run the program in the Safe mode. Your computer will restart and begin operating in safe mode by default.
Therefore, once you have completed the steps described above, your personal computer will restart in safe mode. You will be able to start carrying out the tasks related further down in this section.
How to fix the blue screen on Windows 11 quickly
Fixing the iconic blue screen of death on Windows 11 may be done differently. Many other things might be causing the blue screen, but unfortunately, not all of these solutions will work. If it’s because of corrupted files in Windows 11, you’ll have to reinstall Windows 11 to fix the problem.
Use Windows Memory Diagnostic Tool
A memory diagnostic tool is a piece of software that is pre-installed in Windows and can be used to assess whether or not there are any problems with the hardware or software of your computer.
This can be accomplished by running the software. Your home computer is vulnerable to a broad array of different issues. This tool’s mission is to figure out the underlying problems that are causing the issues.
It is not at all difficult to use the Windows Diagnostic Tool, so keep your calm and follow the directions that are supplied in the paragraphs that follow this one:
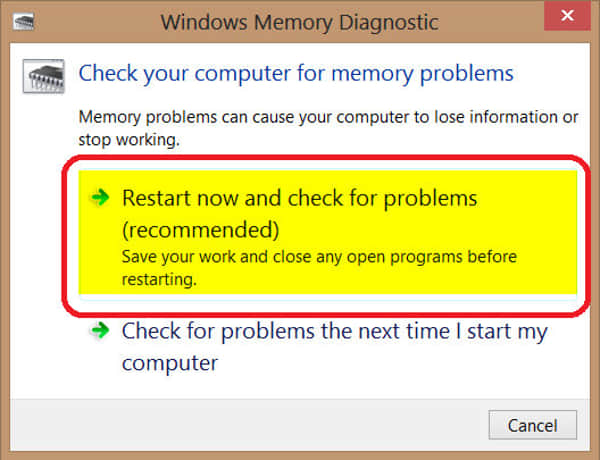
- To run the Windows Memory Diagnostic tool, go to the Windows search box, type Windows Memory Diagnostic, and hit the Enter button.
- To determine whether there are any problems, use the option to restart the computer at this time. Your system will soon undergo a reset. Please wait.
- Kindly be patient while the utility finishes performing its function.
You might try restarting your computer and checking if the dreaded blue screen of death still appears.
Rollback after an update or Update Drivers
Some customers have reported that their computers have been unresponsive or displayed a blue screen after installing updates for their graphics cards or any other type of hardware. This is an issue that affects many people and is still happening today.
Even if the circumstances are pretty dire, there is still room for cautious hope. You may quickly revert to the drivers loaded on your computer before the most recent hardware upgrade was installed since this process is straightforward.
First, wipe the sweat from your head, and then proceed with the directions that are detailed in the following paragraphs:
- To shut the currently active window while you are at the keyboard, hit the Window key and the X key simultaneously. You will see a menu materialize in front of you at this time.
- Make your selection and launch the Device Manager.
- Select a category for your devices, and then pick the proper drivers for that category.
- To select a driver, right-click on the one you want to use.
- Choose the properties tab from the menu.
- Go to the Driver tab, and then, depending on whether or not you have already updated the driver in the past, either click the Update Driver or Rollback driver options.
If this does not resolve the issue, I kindly ask that you go through the other remedies listed below.
Use SFC scan
The SFC scan command is available for use in the command prompt that Windows 11 offers and you have the choice to use it. If you have followed the steps mentioned in this article correctly, all that is required is to simply type a short and brief command line into the command prompt. Doing so should not take more than a few seconds.
The following is a list of the steps that need to be done to use the SFC scan command in Windows 11 to fix the blue screen of death:
- Try entering cmd into the search box on the Windows operating system.
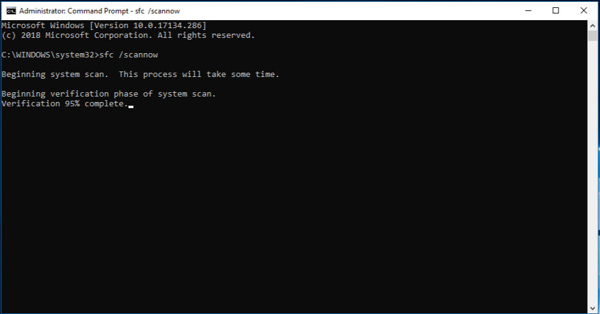
- After right-clicking on the Command Prompt icon, pick Run as Administrator from the context menu to launch the command prompt with administrative privileges.
- After typing in SFC/scannow, proceed by pressing the Enter key on your keyboard. This will complete the process.
- Please be there for the completion of the operation.
- After the activity has been finished, you will need to close the Command Prompt window, and then you must restart your computer.
- Determine whether or not the blue screen of death is still occurring.
There is no need for concern even if you gave this tactic a shot and found it did not work for you. It is common practice to try a range of different options if one attempts to find a remedy for an issue of this sort. Carry on with the other methods that have been discussed in this post.
Scan for viruses or malware
In a manner not entirely unlike the way maggots consume decomposing things, viruses and other types of malware will eat away at your system. You should make it a habit to regularly run scans on your computer to look for viruses and different kinds of malicious software to eliminate them if you discover that they are present.
It is always nice to have a clean computer since it lowers the possibility of problems such as crashes, slowdowns, and other unwanted hassles occurring. This makes having a clean computer a pleasant experience.
You may learn how to scan your computer for viruses and different types of harmful software by following the steps provided below. They are easy, so make an effort to keep your composure. The following is a list of the steps that need to be followed to repair the blue screen of death that occurs with Windows 11:
- Carry out a search for Windows Security, and after you’ve found it, pick it with your mouse.
- Within the settings of your computer, go to the Update & Security menu, then Windows Security, and then Virus & threat protection.
- Make use of the Quick scan option to ascertain whether there is an excessive quantity of viruses. It is strongly suggested that you reinstall Windows 11 on your computer if it has been contaminated with many harmful software packages or viruses.
- Simply follow the directions that appear on the screen is required to remove the malicious software or viruses.
- Check whether the blue screen of death is still occurring after you have restarted your computer.
If every other solution is unsuccessful, you should use the following method as your last alternative before performing a fresh installation of Windows 11.
Perform a System Restore
Using a process known as System Restore, you can revert your personal computer to an earlier point in time during which it performed its functions typically. For example, if the current date is the 11th of October, you may use system restore to take your computer back to the 1st of October when there were no issues, and it was regularly operating.
This will allow you to undo any changes that have been made since then. Since it is not necessary to reinstall Windows 11 in this circumstance, the solution that you have found is terrific. On a machine that is running Windows 11, the following is a list of the procedures that need to be carried out to do a System Restore:
- Find (something) (anything) You may make a restore point using the Windows search bar, and it will be available for selection when it has been made.
- Choose the option to restore the system to an earlier point.
- To proceed, you must hit the Next button two times.
- After selecting the point in time to which you wish to restore, click the box labeled Scan for programs that have been affected.
- After the current step in the process has been finished, you can go on by clicking the Next button.
- Click the button labeled Finish.
If this is unsuccessful, the only option left is to perform a clean installation of Windows 11, as nothing else can be done to fix the issue. Go to Microsoft’s official website, get the latest Windows 11, and then reinstall it on your machine. Ensure that a clean installation is performed, implying that no files should be stored when the process is finished.
Remember to create backups of your important files at regular intervals!
Windows 11 started with a black screen instead of the more traditional blue one. They chose to paint it blue once more for reasons that are still unknown to us; it’s possible that they meant to trigger unpleasant memories for us, but this information is unimportant.
If you took the advice given in this post and applied it, you ought to have been able to remedy the “blue screen of death” problem. If this is not the case, the issue is most likely connected to the hardware, and you should seek assistance from a local computer service facility if you cannot resolve the problem on your own.
FAQ
How do I fix the blue screen of death on Windows 11?
You will need to restart your personal computer, and then you will need to perform another restart of the device as soon as it displays the Windows logo on the screen. After you have carried out this procedure three times, go for automatic repair.
Why does a blue screen appear on Windows 11?
For example, a problem with the hardware, such as malfunctioning memory modules, is usually always to blame when you get the error code IRQL not less or equal. On the other hand, it might be brought on by faulty drivers or even antivirus software that has stopped working correctly. In addition to employing a QR code, the simplest way to check for errors is to enter the code into a search engine. This may be done instead of using a QR code. This is the approach that uses the least amount of time.