During the early pandemic, when Microsoft Teams’ adoption rate rose and the pandemic was still relatively new, participants could silence one another in real-time.
As a result of this design fault, students were constantly muting one another, even the professors themselves, resulting in a chaotic online classroom atmosphere for all participants.
The good news is that Microsoft responded swiftly and released an update that prevented meeting members from muting other participants in the meeting, effectively preventing the situation from repeating.
However, the mystery persists, and many Teams users are still perplexed whether or not there is a method to track who muted whom throughout chats. In this article, we will describe the muting system for your better understanding.
How To Check Who Muted You On Microsoft Teams?
At this time, it is not possible to identify who has muted you on Microsoft Teams because the information is not available. On the other hand, only the presenters can silence the voices of their audience participants. Furthermore, the number of people allowed to speak is generally restricted to a small number of individuals.
When giving a presentation, it is essential to remember that presenters can distract their audience members. If you are a presenter and you find yourself abruptly muted during a presentation, you should always ask your colleagues who pushed the Mute button on your computer.
If you deliberately muffle someone’s sound, they will be completely unaware that they are being silenced. The person whose voice has been muted will be aware that they have been hushed if you do so by accident.
Muting System On Microsoft Teams
Mute buttons are available in three distinct configurations in Microsoft Teams, each with its own set of settings options. Several choices are available when it comes to the muting system, including the following examples: Presenters, including themselves and their fellow presenters, command the attention of the whole audience at their discretion.
Meeting participants have the option of remaining silent throughout the meeting. Because of this, they cannot regulate the level of conversation among the other attendees at the conference.
Everyone has the power to de-mute themselves at any time without any ramifications on their persona. This did not occur, except for a brief period during which the speakers silenced the whole crowd. Also read, how to disable discord on startup.
Hard Muting Everyone
As described in the following article, an innovative function has been included in Microsoft Teams that allows presenters to mute all of the participants while simultaneously prohibiting them from unmuting themselves. This specific effect is referred to as a Hard Mute because of the way it sounds.
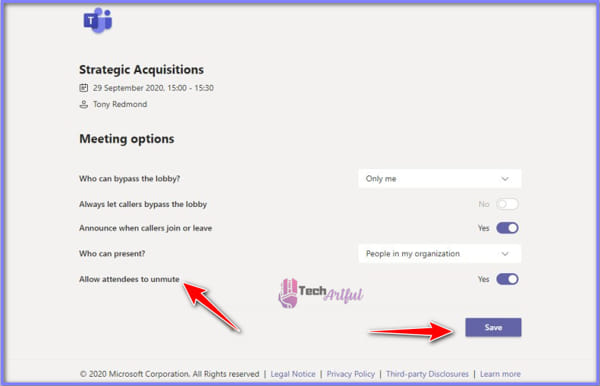
If you want to hard-mute your Microsoft Teams chats, follow the methods indicated in the following section. Even though this feature allows you to utilize it either before the meeting begins or while the session is still in process, using it is not advised in most cases. As soon as the meeting starts, go to Meeting Options and toggle the Allow participants to unmute option to the On position by selecting it from the drop-down menu.
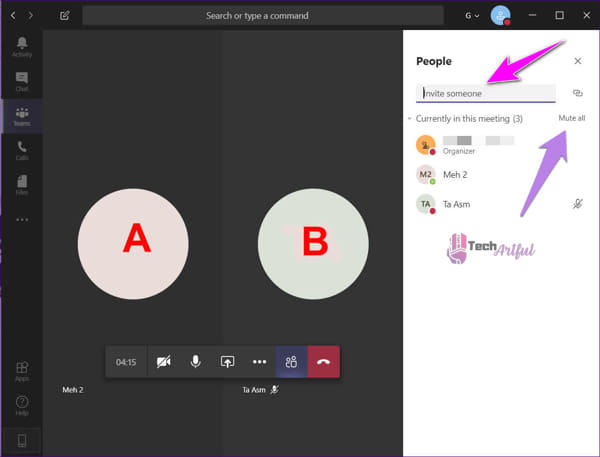
Attendees are allowed to turn on the mute button to hear what is being said during the presentation. Opening the list of participants and selecting Don’t allow attendees to unmute from the drop-down menu that displays are two ways to prevent attendees from unmuting themselves during a meeting.
How To Disable Unmute For Attendees In Meeting On Microsoft Teams
While in a meeting, Team members can choose to prevent others from using their microphones, which is available on both the free and commercial versions of Teams.
To prevent all participants from being able to use the silent option during a Microsoft Teams meeting, take the following actions during the meeting:
- To begin, launch the Microsoft Teams application on your computer.
- Access meetings using a drop-down menu located on the left navigation pane of the screen.
- If the Meetings option does not display in the left pane, click the More added applications button in the left pane and then select the Meetings option from the drop-down menu that appears.
- Using the drop-down menu, pick the Meet now option to set up a time for the meeting.
- To schedule a meeting, click on the Meet option in the drop-down menu.
- Make a note of your meeting preferences and bring it with you to the meeting as well.
- Select Join Now from the drop-down box that appears after selecting Join Now.
- To take part, navigate to the Participants option on the toolbar and choose it from there (if applicable).
- Click the More actions button located in the top-right corner of the screen.
- To prevent guests from unmuting themselves from the conference room microphone, choose the option that says No guests can unmute themselves.
- Selecting the Don’t allow option will prevent this from happening in the future.
As soon as the procedures are done, participants in the call will no longer be able to talk, and they will not be able to unmute the microphone from their end once the procedures have been completed.
Allow Attendees To Unmute During A Meeting On Microsoft Teams
Attendees will be permitted to use their microphones during meetings if they follow the guidelines outlined below :
- To get started, select the Participants button from the toolbar on the left.
- Using the drop-down menu in the top-right corner of the screen, select More actions from the list of options.
- Select the option that permits visitors to deactivate the mute from the drop-down menu that appears.
- To proceed, select the Allow option on the right-hand side of the screen.
If there are no technical issues, the participants will be allowed to mute and unmute themselves at their leisure once the process is complete.
Allow Only One Attendee To Unmute During Meeting
Additional attendees can request to speak during a team call by hitting the button to raise their hands and following the processes outlined in the following sections:
- To get started, select the Participants button from the toolbar on the left.
- This may be performed by selecting the Allow to unmute option from the context menu found in the right-click context menu.
- Choose the appropriate option. Allowing an attendee to unmute from the context menu of the other guests will prevent them from being able to talk from the context menu of the first attendee you selected (as necessary).
- Allow other visitors to unmute their mics by repeating the process a second time using a similar way (as necessary).
Only those participants who have been manually granted the ability to speak will be allowed to engage in the Microsoft Teams meeting once the meeting has finished after you have completed the steps.
If someone cannot talk on Microsoft Teams due to a microphone issue, you may diagnose and resolve the problem by following the procedures indicated in the following section.
Disable Unmute For Attendees Before Starting A Meeting On Microsoft Teams
You can also prohibit people from unmuting their microphones before a meeting by adjusting the scheduling settings in Microsoft Teams if you have a premium membership. When using Microsoft Teams, make sure you have a premium subscription.
Here are the steps to disable unmute for attendees before starting a meeting on Microsoft Teams:
- Open the Microsoft Teams program on your computer.
- Meetings may be accessed on the left navigation pane by selecting it from the drop-down menu.
- To access the Meetings option, if you do not see it in the left pane, click the More added programs button in the left pane and then pick Meetings from the drop-down menu.
- Select the New meeting option from the drop-down menu in the upper right corner of the screen.
- If you already have a meeting scheduled, you may skip the rest of this section.
- Make a list of your preferences for the meeting and bring it with you.
- Save it in the toolbar.
- Make your selection from the drop-down menu and hit the Edit button to begin editing the meeting calendar.
- To launch a new window, choose the Meetings options button from the toolbar on the left
- If you do not have adequate rights to make the following options available, they will be unavailable. As a result, you will need to seek assistance from the administrator of your Team account in this situation.
- The toggle option that permits visitors to unmute themselves should be turned off.
- To save your work, use the Save option from the toolbar.
- Participants will not be allowed to use their microphones when they join the meeting after you have finished the processes, and the option will be grayed out on the meeting screen after you have done them.
If you change your mind, you can always turn off the option by following the same procedures as described above, but make sure to turn off the toggle switch first to avoid any complications. People who arrive at the meeting unmute your microphone during the session so others can use it.
Hopefully, this article has helped you understand the Microsoft Teams muting system better and made meetings mute functions easier for you.
FAQ
Can Microsoft teams detect cheating?
Microsoft Teams cannot detect cheating.
Are Microsoft Teams free?
Microsoft Teams is free for all.


