
Do you want to Install Android On VirtualBox? Then this easy installation guide will help you out.
As a whole, Android is a fantastic mobile operating system – it’s adaptable, quick, and jam-packed with a plethora of helpful features that make it an excellent choice for the great majority of people who use smartphones.
In particular, There are, however, certain disadvantages to using Android as a mobile operating system, which is detailed in the following section.
If you want to use your computer rather than your phone for whatever reason, whether for testing reasons or merely for leisure purposes, you are free to do so without fear of repercussion.
It is possible to complete the operation by simply installing your desired version of Android on a standard virtual machine (VM), such as VirtualBox, and then rebooting your computer.
If you follow the instructions in this article, you will get started with Android in a relatively short period.
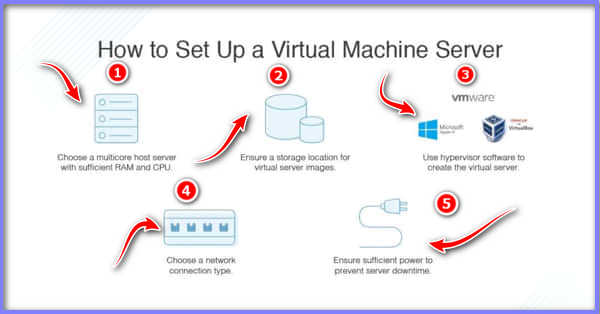
Install The VirtualBox And Launch The VM
The very first step is to download and install VirtualBox on your computer, which should go without saying at this point. Simply downloading the application from its official website and then following the easy installation instructions are necessary to complete this procedure.
You should only tackle the following tasks after you have finished the preceding level since they are more challenging to achieve: The first step is to obtain an Android ISO formatted disk image for use on your computer, which may be done by downloading it from the internet.
The Android-x86 project, which is formed by a group of open source developers that have committed their time to port Android code to operate on PC hardware, is one of the most reliable sources of this information.
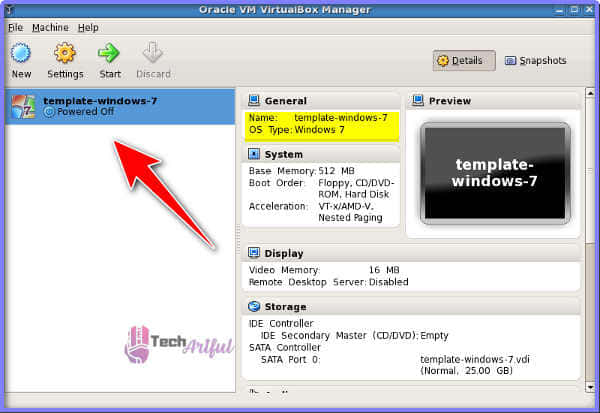
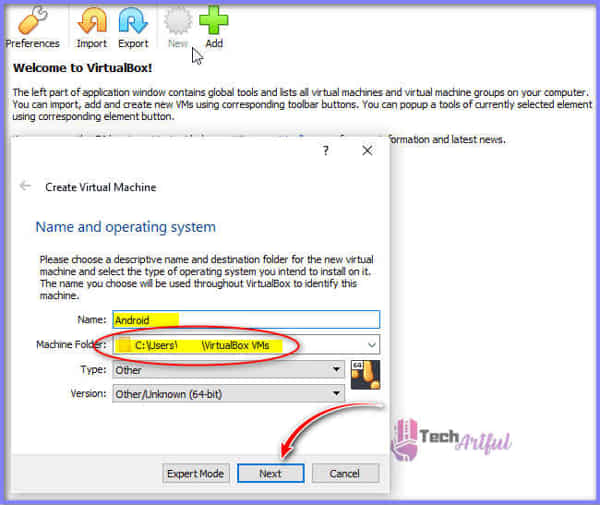
With the Android-x86 project, the Android project has reached its most current iteration. According to the Android-x86 project, which is the most credible source of information available, this information is correct. As soon as you have completed the installation of VirtualBox and have prepared your ISO for usage, you will want to open up Virtual Box and select New to begin the process of creating a new virtual machine on your computer’s hard drive (VM).
Also recommended is that you modify the type to Other and the version to”Other/Unknown (64-bit) to the appropriate values while configuring the file name and location of the resulting file (or the 32-bit version if you downloaded a 32-bit ISO). When it comes to preventing specific compatibility issues in the future, this information may be beneficial to you. also read how to fix discord stream no sound.
Configure The VM
The following process includes defining the quantity of memory (RAM) allotted to the virtual machine in the issue. Because the maximum amount of RAM allocated to a virtual machine is governed by the system resources available on your computer, you cannot use a 16GB computer to provide 32GB of RAM to a virtual machine on the same network.
Contrary to popular belief, even though 2GB of RAM is the absolute least quantity that should be assigned, it is recommended that you allow between 6 and 8GB of RAM. You should bear in mind that this VM requires the same amount of resources as a real-world mobile device and that more significant resources are generally desired in this case.
If you want your operating system to run smoothly, you should make sure that at least 4GB of RAM is accessible for use by the rest of the system; otherwise, you may experience system stability and stability problems.
Using its setup, create a virtual machine and allocate the amount of RAM that the virtual computer will use.
The final stage of establishing a virtual machine is creating a virtual hard drive for your new virtual computer, and this step is discussed in further detail below. Before proceeding to the next stage, please double-check that the option to rapidly create a virtual hard disk is chosen in the previous step.
Virtual Desktop Infrastructure (VDI) will support any file type, and the default setup will be completely operational. Making a second selection for the file type Fixed Size is performed by pressing the Next button on the keyboard. When that, choose the location on your hard drive where you want your new virtual drive to be saved, as well as how much space on your hard drive you want it to take up after it has been created.
The Android-x86 image must be installed on a hard drive with a minimum capacity of 8GB for it to function correctly. It is unlikely that you will need to perform anything particularly complex with the virtual machine, so a hard drive with a capacity of 16GB should be more than adequate and should not create an excessive burden on your computer’s processing capability.
- Ensure that the hard drive capacity that your virtual machine will utilize is configured correctly by entering the needed values in the appropriate areas.
- However, a few additional configuration changes must be done to the virtual machine before it can be used. After that, the virtual machine will show in your list of machines that are currently available. Right-click on the device and choose Settings from the context menu that displays after the right-click is completed.
- You may get to the device’s settings menu by pressing and holding the menu button.
- In the System area of the options, it is recommended that you begin by picking the Processor option if you are starting started. This section allows you to choose the number of CPU cores that will be used by the virtual machine when it is built when it is created. If it becomes essential, consider increasing this to at least two, preferably three or four, depending on the circumstances. Because this is the same as the RAM found on a standard mobile phone, having a large RAM is advantageous.
Always remember that giving a single virtual CPU core to the VM will increase the chance of a system failure, according to the Android-x86 developers.
A significant aspect of the number of CPU cores that may be given to your computer is the number of centers present in the computer’s central processing unit (CPU). It is suggested that your operating system has access to at least two CPU cores; however, four CPU cores are ideal for the best performance because they provide more processing power.
Because only physical CPU cores (not logical hyperthreaded cores) are authorized to be securely allocated to virtual machines for your protection, avoid falling into the red zone of the slider as much as possible if you don’t want to encounter any instability issues.
Configure the number of CPU cores that will be utilized by your application throughout its operation.
After that, it is required to go on to the next level of customizing the display, the Screen tab, which can be found under the Display heading. The amount of Video Memory that may be made available to the virtual machine should be increased from 16MB to 32 or 64MB. Furthermore, in this case, you must ensure that the Graphics Controller has been set to VBoxVGA at the appropriate location.
Install And Launch Android On Virtualbox
Before continuing, you must first choose the file system format for your new partition. Ext4 is generally preferable. However, NTFS and FAT32 are other options. When asked, click Yes to format the hard drive.
Then you’ll be asked to install the GRUB boot loader. If you wish, you can use GRUB to boot Android from your PC.
You must change the disk from GPT to MBR if you want to use GRUB. Then you’ll be prompted to designate the /system directory read-only, which you should do.
Depending on how many system resources you give your VM and how many resources your underlying OS has available, this procedure may take some time. After installing the program, choose Launch Android or Reboot (the VM) to start your Android VM.
You should now set up your Android VM like any other Android device. It’s totally up to you to pick. After the installation, you may use your Android device as usual.
After the first shutdown of your Android VM, delete the ISO. If you don’t, the VM will keep asking you to install Android. Then choose Storage in the VM’s settings to delete the ISO. Then select the two-CD/DVDs and click Remove from Virtual Drive and save the change.
An Android VMware virtual machine is used for software testing and development because Android is built for smartphones and tablets; it’s usually not possible to use on a desktop computer. Today we showed you how to get Android on VMware ESXi.
Download the ISO file, create a new virtual machine (VM), run the Android installer from the VM’s mounted ISO image, create a new bootable partition on the virtual drive, and install Android. Hopefully, now you can install Android on your Virtualbox.
FAQ
Can we run Android in a VM?
You can run Android in a VM by following these steps: 1. Create a virtual machine called Android-x86 in VirtualBox, 2. Run Android-x86 within it.
Is Virtualbox safe?
Virtualbox is completely safe for your System. And it is recommended by us.