Is your SteelSeries Arctis 1 Mic Not Working properly?
Don’t worry here you’ll get the easiest step by step fix for solving this problem.
The SteelSeries Arctis 1 is an all platform wired gaming headset that works for your PC, PlayStation, Xbox, and more. It is equipped with a detachable Clear cast noise-canceling microphone and high-quality speaker drivers that let you enjoy the signature soundscape of the award-winning Arctis line.
The compact and portable design makes your on-the-go gaming experience smoother. But some users have been reporting about the SteelSeries Arctis 1 Mic problem, but there is nothing to worry about. If you are facing any issues with your SteelSeries Arctis 1 Mic not working, then just go through this post to see easy and quick fixes for your headset and get the groove back.
Try These Fixes To Solve SteelSeries Arctis 1 Mic not working issue.
- Unmute your Microphone
- Allowed access to the microphone
- Update your audio drivers
- Change the microphone settings manually
- Install the latest SteelSeries Engine software
Now let’s see how to go through these easy fixes and fix your SteelSeries Arctis 1 Mic not working problem in no time.
Unmute your Microphone
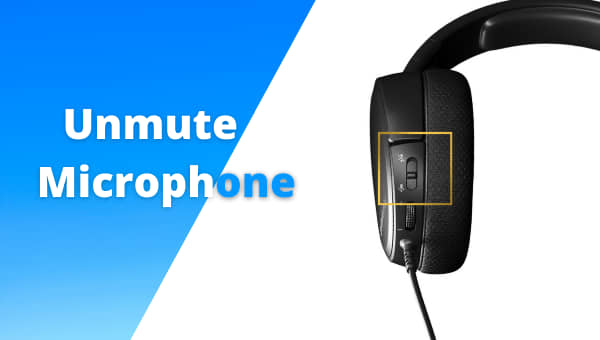
Initially, check if your SteelSeries Arctis 1 Mic is turned on or not. On the left earcup of your microphone, check if the button is pushed towards the mute end or unmute end. If it’s mute, then turn it on but if your microphone is unmuted and still not working, then check the following fixes to get more details.
And also, poor positioning can disconnect your headset or make it hard to detect your headset on the computer, so recheck if you have plugged in your headphones correctly or not.
Check out how to fix SteelSeries Arctis 3 Mic not working to know more.
Allowed access to the microphone
The SteelSeries Arctis 1 does not offer any factory reset option like the SteelSeries Arctis 7, 9, and 9X. So you have to manually check whether you have allowed access to the microphone or not. To do so, follow these easy steps.
- Open the windows key and search for the microphone.
- Then in the settings section, tap on the microphone privacy settings.
- There you will find the Allow apps to access your microphone option; turn the toggle in the On position to give access. This will let other apps use your microphone.
- By scrolling down, you can find the list of the apps that are allowed to use your microphone. Make sure that you have moved the toggle to ‘On’ for all the apps you use.
- Then check whether it has fixed your mic or not for different apps.
If this did not fix your SteelSeries Arctis 1 mic, then move on to the following steps below.
Update your audio drivers
For the SteelSeries Arctis 1 mic to work on your PC, you need to make sure that you have updated your audio drivers. It will not work if you are using incorrect or outdated audio or headset drivers. You need to update the Realtek audio driver and also your headphone driver. Then see if the issue is fixed or not. You update the drivers automatically and manually both ways. To get manual updates, visit the manufacturer’s website and download the latest version of the driver there. This manual installation process is time-consuming. This is also very technical and risky, so if you do not have excellent computer knowledge, you should not try it and just update the drivers automatically.
Here are the steps to update audio drivers on your computer:
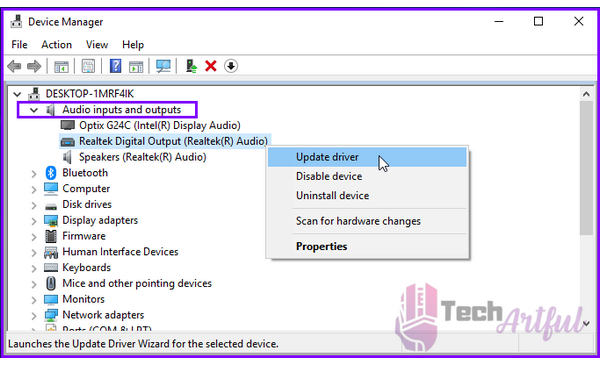
- Press Windows + S and search for Device Manager.
- Double-click on Audio inputs and outputs.
- Right-click on the driver names that comes under the drop down menu.
- Select Update drivers and then click on Search automatically for drivers.
- Install the newer version of driver and click on finish to end the process.
Hopefully, this will fix your SteelSeries Arctis 1 mic not working issue. If the problem is still there and you are not getting any audio on your SteelSeries Arctis 1 mic, then do not worry. There are more fixes below to help you with it.
Also check out how to fix how to fix SteelSeries Arctis 7 Mic not working to know more about audio drivers.
Change the microphone settings manually
Usually, windows detect your connected microphone automatically and set it as the default input device for allowed apps. But if that’s not the case, then after plugging in, you will need to set the SteelSeries Arctis 1 as the default device manually. Follow the following steps for this procedure.
- Find the sound icon and right-click on it. Select the sounds option from there.
- Find the recording tab, then choose your headset microphone as the default device. Or you can also select the headphone and click on to set default.
- Then make sure that it is displaying your headphone name correctly and showing solid signals. This indicates that your computer is appropriately recognizing your headphones. If it shows Wireless controller, then recheck your mic settings and re-connect your headset.
- And if your display name and signal are OK the select headset microphone and click properties. Find the levels tab there and drag the volume slider to the end or 100 value.
- Click OK to apply changes there and also on the last window.
This should be able to fix your microphone. To check if the SteelSeries Arctis 1 mic not working issue is resolved or not, connect your headset and match from different apps to see whether it is working correctly or not. If your problem is still there, move on to the following steps to find your proper fix.
Install the latest SteelSeries Engine software
The SteelSeries Arctis 1 mic not working issue does not just come from your computer or the drivers; it can also cause by your SteelSeries Engine software installed on your device. You need to have the latest version of this software installed on your device. With the outdated version, sometimes your software does not pick the SteelSeries Arctis 1 mic, so you need to have the latest version installed. Below you will find the procedure for updating the SteelSeries Engine software to the latest version.
- Tap on the windows key and R key on the keyboard simultaneously, and this will open your run box. There type appwiz.cpl and then press Enter there.
- Select the SteelSeries Engine and tap on uninstall.
- Download the latest version of SteelSeries Engine.
- Select the operating system you are using to start the downloading process.
- Run the file and follow through with the instructions to go through the process.
- Check your headphones, replug the SteelSeries Arctis 1 into your computer. Then run the software, and hopefully will now recognize your headset successfully.
SteelSeries Arctis 1 is a wireless microphone with a detachable 3.5mm mic that provides you the award-winning experience of the Arctis series. It’s an excellent choice for gamers. Just like other tech products, you will face some minor issues while using it. Hopefully, all these fixes will help you solve your SteelSeries Arctis 1 mic not working problem. Here we have given you different reasons why your mic is not functioning and the needed fixes. So if your audio is too low or there is no sound at all on your SteelSeries Arctis 1, then be patient and check these fixes out.
FAQ
How do I reset my SteelSeries Arctis 1?
You can find a hardware reset switch under the cushion on the left earcup. Use a pin to press on the pinhole and hold it down for 1 second.
Why is my SteelSeries Arctis 1 mic not working on PS4?
Check if your mic boom is loose or not. You can try and replug your headset to the PS4 controller again.
How do I connect my SteelSeries Engine with SteelSeries Arctis 1 mic?
If it is not picking up your microphone automatically, update the software to get the latest version and re-connect.


