
Ignored messages from your Gmail account’s Spam folder are sometimes not returned, and it is one of the folders that may not be shown first in your Gmail account at any moment.
So, do you want to Show/Hide folders on left menu on Gmail? Then you can learn how to do it from here.

People who use Google’s email service regularly may find it to be quite inconvenient. Do not be afraid because this problem can be remedied quickly and easily by simply modifying some Gmail settings that allow you to choose which folders are displayed in the left-hand menu.
Suppose you are the type of person who enjoys using many email labels and prefers that your spam folders remain in their existing position. In that case, this is a perfect setting to utilize for clutter reduction. Learn how to make folders visible or invisible using the following steps:
Make Gmail Folders Visible Again
Even though each label in Gmail has a distinct purpose and performs a specific function, you do not need to view titles that you do not commonly use.
Hiding labels in Gmail is a simple process, and retrieving them when you want to see them again is also a straightforward procedure, as is viewing them once more after hiding them. Gmail folders can be readily displayed in the panel by making changes in some default settings as frustrating as it can be. Follow the steps below to make Gmail folders visible once more in the folder panel :
- Select See all settings from the drop-down menu that appears when you click on the settings cog in the top right corner.
- Pick Labels from the drop-down menu in the Show in label list column, and then select Show for every folder that you wish to keep in the side panel from the Show in label list drop-down menu. It is possible to limit the visibility of a folder to only emails that have not been read yet, for example.
- You have the option to reveal or hide each label in the list for each item on the list. The Labels section of the Settings screen contains a comprehensive list of all of the titles. The tags for the various systems are grouped in the first group. Second, there are categories, which are the tabs that many people see at the top of their email inbox. The third group consists of the labels that you have defined for yourself in the previous group.
- Instead of being hidden behind the More button, these Gmail folders will now be readily accessible at all times. If you’re running out of room on the left panel, it’s possible to go even further and prevent the new Chat from covering your labels in Gmail.
Organize Gmail Folders
Another way to fix this disappearing folder issue on Gmail is to customize the folders panel according to your needs. Even though the process of arranging your Gmail account may appear to be a challenging problem, and it may take some time to master, it will help you reduce stress and better manage your time and priorities in the long run.
Listed below are five fundamental Gmail organization techniques that you may use to get your inbox down to zero and become more productive at work: Deciding on which layout you prefer for your Gmail account is the first step in organizing it. After clicking on the gear symbol in the upper right corner of your email, pick Settings from the drop-down menu.
To access the Inbox tab, click on inbox in the drop-down menu at the very top of the settings window. From this point on, Gmail will give you five alternative inbox layout options to choose from.
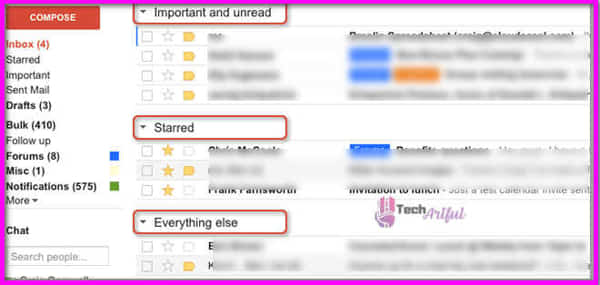
Default: In contrast to the other formats, this is the standard format for arranging your Gmail by the date that an email was received, as opposed to the others. This view allows you to organize your emails into multiple categories by selecting from the drop-down menus. Tabs show at the top of your screen and can be handy for evaluating which of your emails is most likely more critical than others.
- Important First and foremost, Gmail makes use of this view to try to predict which emails you will find most essential and displays those messages in a primary inbox to help you stay organized. A lower inbox, which is positioned at the bottom of your computer screen, contains less important messages than those displayed above it.
- Unread First: This view is similar to the Important First option; however, your full inbox contains messages you have not opened yet, while your bottom inbox contains everything else. Important First: This view is identical to the Unread First option; however, your top inbox contains only messages you have not opened yet.
- Important Last: This view is similar to the Unread Last option; however, your top inbox contains only messages you have not opened yet.
- Top View with Emails that have been starred: Your Starred First view divides your inbox into two fields and displays only the emails that you have flagged as necessary in the top view, while the rest of your inbox remains unchanged. Everything else is visible in the second view.
- Priority inbox: This is a collection of all of the views in one convenient location. Gmail uses predictive analysis to determine which emails you are most likely to connect with based on your previous behavior and the emails you have received. It then prioritizes these emails and moves them to the top of the list.
Finding a Gmail layout that works for you will help you keep your inbox more organized and less cluttered. You can also add a preview to make Gmail folders more accessible. In the default view of Gmail, the sender’s name, subject line, and a small amount of preview text are all displayed before the row runs out of space.
You will often need to open the email to determine whether or not it was genuinely worthwhile for you to read. The addition of a preview panel to Gmail could help you save time while also better organizing your inbox. When you click on the gear symbol, you will select Settings from the drop-down menu.
Then, from the drop-down menu of tabs that opens, select Labs. By scrolling down to the bottom of the page, you will see the Preview Pane. After you have saved your changes, you will be given the option of viewing a preview of each email that arrives in your inbox for the next 24 hours.
Customize Folder Labels On Gmail
On the left side of your inbox, labels allow you to categorize and arrange the emails that arrive there. Use them to categorize and organize the emails that come there. You can manage your emails by categorizing them and assigning them to labels, which will aid you in staying organized.
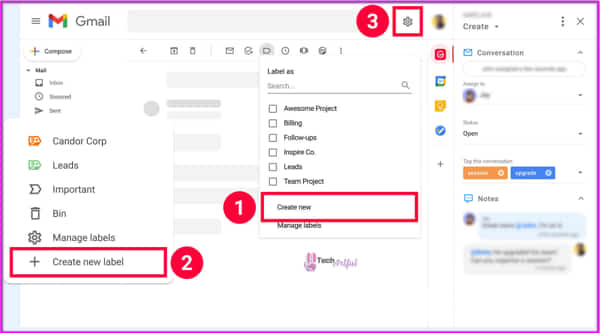
Labels that are specific to a certain product can be generated in this section as well. You can delete a message or a collection of messages from your inbox by clicking on the icon that looks like a shopping tag, placed at the top of the inbox. All of these messages can then be categorized and assigned to specific labels in Gmail, which will benefit you in the future in keeping your inbox more organized.
You may also create your custom labels in this area by selecting Build new from the drop-down menu and entering your information.
An additional feature is the ability to develop nesting label groups within other label groups, which is analogous to the ability to create subfolders when saving files to your hard disk. Also available is the option of color-coding your labels to make it easier to differentiate between different levels of significance.
To give you an example, if you have a VIP label, you might use the color red to indicate that you want to archive all messages from your most important contacts, as seen in the image below.
If you receive any new emails, it will automatically establish a folder on the left-hand side of your inbox and will add the label name next to the subject line of each new email that you receive. If you archive this email, it will now be relocated to the appropriate location on your system.
Given that Gmail allows you to modify the layout, it is much simpler to manage your folders and keep your inbox organized.
Create Filters On Gmail Folders
It is possible to apply customized labels to messages after they have been written, allowing you to send specific emails directly to their corresponding folders and avoid having them clutter up your general inbox altogether. Suppose you know that you will receive an internal communications newsletter at a specified time that you will not have time to read. In that case, you can use filters to direct that message into a specific folder so that you can review it – or delete it – later.
You can filter emails by selecting them and then clicking on the More icon that appears at the top of your inbox and selecting Filter messages like this from the drop-down menu that appears. The sender, subject line, keywords, and attachments are just a few of the factors you can use to narrow down your message inbox. As soon as you have narrowed down your search criteria, you can click Create a filter using this search, then select the action you want the filter to take – for example, assigning to a custom folder or label and skipping the inbox – and then click Save. After you have completed, click Create filter to end the process.
Please keep in mind that you can have this filter applied to all conversations that fulfill the parameters, which removes the need to create different filters for each chat session you participate in.
Hopefully, this article has helped you customize the folders on your Gmail account and fix your messy inbox.
FAQ
How do I keep my Gmail sidebar from collapsing?
By clicking the three bars in the upper left, you can toggle the column on and off.
How can I regain access to the Gmail sidebar?
To collapse the left sidebar, click the three horizontal lines in the upper left corner. After you have hidden the sidebar, you can restore it by hovering your mouse over any part of the collapsed portion. Select anything from the sidebar, and it will automatically disappear.