
Tired of the remote desktop not working on windows 11? Don’t worry, you’ll easily fix this problem after going through this helpful post.
The Remote Desktop Connection feature of Windows 11 allows you to connect to other computers via the internet.
When users attempt to connect with a distant computer, though, they may run into problems with their Remote Desktop connections on occasion.
Suppose, a connection issue occurs when you attempt to connect to a distant PC, preventing you from working on your personal or professional tasks. How frustrating that would be?
So, to solve your problem, we came here with this article where you will be able to fix this issue with ease. Therefore, keep reading this post until the end to learn in detail.
Reasons Why RDP Not Working On Windows 11
The issue of the RDP not working effectively is commonly brought on by several different setup issues or network issues. In most cases, a connection fault is to blame when the remote desktop application does not function properly. Whenever there is a problem with the connection, the remote desktop won’t function.
For Windows 11 remote desktop PCs, the most typical issue is an error that occurs with the connection. The following are some of the most prevalent causes of connectivity problems or other difficulties with RDP.
We have compiled a list of potential frequent causes that we have observed to be responsible for the problem when the remote desktop is not working:
Disabled Remote Desktop Access Server
Because the host computer and the remote desktop both have to connect and link with the remote server, one of the causes for the connection error that appears when you attempt to join with a remote desktop to your device is that the remote access server has been deactivated.
For such an instance, both your local computer and the remote desktop won’t be able to connect to the remote access server at the same time when the server is deactivated.
You will have to allow remote access to the server to fix the issue of an error connecting to the remote desktop or the connection will not be working.
Disabled Remote Desktop
If you can’t use the remote desktop feature of Windows, then maybe the service is disabled. If the Remote Desktop program or application functionality is deactivated on either the host computer or the client computer, this is yet another potential cause of the remote desktop connection issue or failure to operate.
Enabling the Remote Desktop program or application feature both on the host computer and the client computer may fix the situation where the Remote Desktop is not functioning.
Disabled RDP Service
If the Remote Desktop Protocol services on your computer are deactivated, you will not have access to the Remote Desktop.
To fix the issue where Remote Desktop was not functioning or there was a connection error, ensure all RDP services are turned on.
Network Blocked By Firewall
The Windows Firewall is also another further program that should be avoided. Windows Firewall is responsible for preventing access to the network. There are occasions when the Windows Firewall would inappropriately block the host or client network, which is what causes the problem of your Remote Desktop connection failing to operate.
To resolve the issue, you will need to log into the Firewall using the Remote Desktop.
Third-Party Antivirus Application
Another factor that contributes to the problem of the Remote Desktop not functioning on devices running Windows 11 is the presence of a third-party antivirus suite program.
Usually, software from third-party antivirus suites is incompatible with the system firewall, which might result in unwanted complications. To repair the issue with the Remote Desktop not functioning, you will need to deactivate or remove the antivirus suite.
How to Fix Remote Desktop Not Working on Windows 11 Problem
Changes made to the RDP settings or the local group policy security are the most typical factors that lead to the error message “An internal problem has occurred.” We have received many complaints suggesting that certain customers have been afflicted by this problem owing to the settings of their Remote Desktop Connections, issues with their RDP security, or an issue with the domain that the machine is affiliated with.
Alright, now let’s jump into the main debate to discover the method to solve the problem of the Remote Desktop not working on Windows 11 error, shall we?
The following is a list of the procedures that need to be taken to repair the problem with Windows 11 and Remote Desktop not working:
1. Make Sure Remote Desktop Is Enabled
It is necessary to properly establish a remote desktop connection to check whether or not Remote Desktop is enabled on both the client PC and the remote PC. Without first activating the Remote Desktop function, you will be unable to make the connection to the remote desktop.
To activate the Remote Desktop, please follow the procedures below:
- Open Settings by pressing Win + I keys on your keyboard simultaneously or by using the Start menu on your taskbar.
- From the left sidebar panel, click on the System
- Select the Remote Desktop option on the right-hand side of the window by scrolling down a little.
- If the toggle next to Remote Desktop is off, be sure you turn it On.
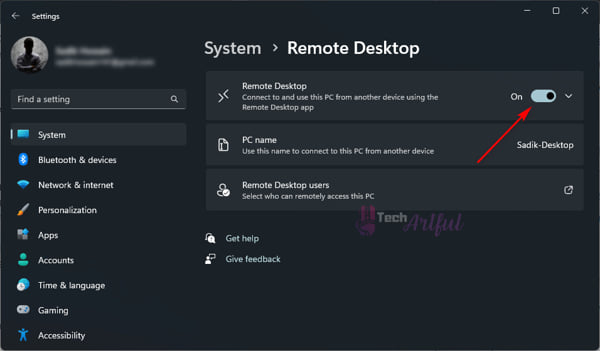
- To activate the Remote Desktop, press the Confirm
In this way, you will be able to enable the RDP. It would help if you now double-checked to see whether the issue is resolved. If it doesn’t work, go on to the next option.
2. Enable Remote Assistance & Remote Connection
Make sure that the two of Remote Assistance and the Remote Connection are turned on, not only on the remote computer but also on the client computer, if you want to effectively establish a connection to a remote desktop. It will not be possible for you to connect to the remote desktop if you do not activate these settings.
If you want to make sure that the Remote Assistance feature is turned on, follow the given steps:
- To launch the Windows Search Panel, click the Windows Search icon in the taskbar’s left-hand corner or hit Win + S keys on the keyboard.
- To access the Control Panel, type the control panel into the search box and hit Enter.
- Change the view mode of your control panel window to Category.
- Take a look at System and Security.
- Under the System heading, choose the option that says Allow remote access link and click it.
- Put a checkmark in the box labeled “Allow Remote Assistance to this computer” in the section titled “Remote Assistance.”
- Again, under the Remote Desktop section, make sure the Allow Remote connection to this computer option is checked.
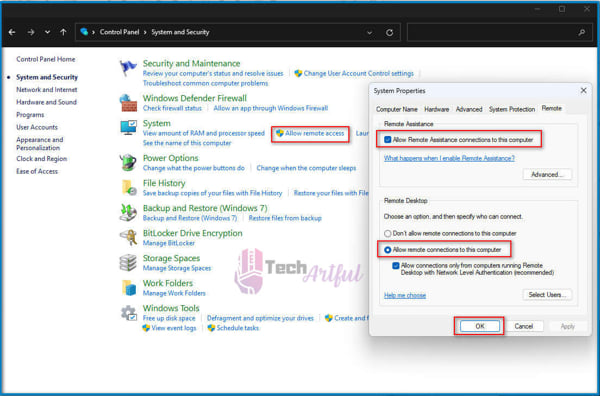
Now, check to see whether the issue has been resolved.
3. Enable The Remote Desktop Services
If you are using Windows 11 and you are seeing the error message “Remote Desktop connection failed,” the Remote Desktop services on your computer may have been deactivated. Additionally, you need to check that the Remote Desktop Services on the client PCs are turned on.
If you want to be sure that the Remote Desktop services are activated, follow the instructions below:
- To launch the Windows Run program, press the Win + R key simultaneously on your keyboard.
- When prompted, type msc into the Run box.
- Open the System Services window by pressing the Enter key on your keyboard or clicking the OK
- Keep scrolling down until you reach the option labeled Remote Desktop Services.
- To launch the Remote Desktop Services Properties window, first, choose the Remote Desktop Services, and then press the Enter key on your keyboard.
- Under the General tab, you’ll see a drop-down menu labeled “Startup type.” Click on it.
- If the service is currently deactivated, choose the Automatic option from the menu.
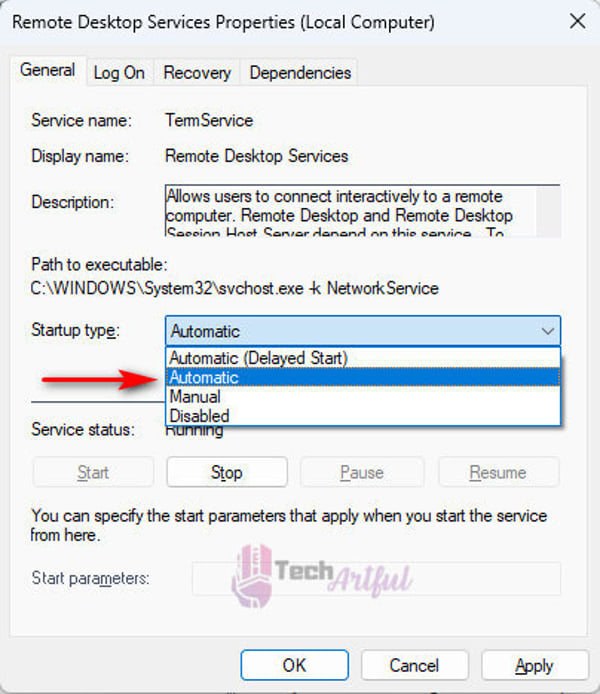
- To keep the changes, you’ll need to click the Apply
- If the service status is currently Stopped, clicking the Start button will begin the service’s execution.
- To close the window, use the Ok button from the toolbar.
- After you have completed the steps in the approach, repeat the same steps for the Remote Desktop Services UserMode Port Redirector
Now, check to see whether the issue you were having has been resolved. If there is a problem, then you may attempt the solutions that are listed below.
4. Allow Remote Desktop On Windows Defender Firewall
The problem of not being able to connect or function properly is caused by the fact that the Windows Firewall bans the Remote Desktop network without good reason.
If you’re experiencing problems connecting to Remote Desktop or the program just won’t operate on your Windows 11 computer, you’ll need to enable Remote Desktop to pass over the Windows Firewall.
To enable Remote Desktop access across the Windows Firewall, do the following steps:
- To launch the Windows Search Panel, click the Windows Search icon in the taskbar’s left-hand corner or hit Win + S keys on the keyboard.
- Write Firewall and click on the very first option that appears which is Windows Defender Firewall.
- Select the Allow an app or feature through the Windows Defender Firewall option from the left-hand sidebar.
- To make changes, hit on the Change Settings
- Locate the Remote Desktop option in the list by scrolling down a little bit.
- Now checkmark in the Private checkbox, as well as in the Public.
- To close the window, click on the OK
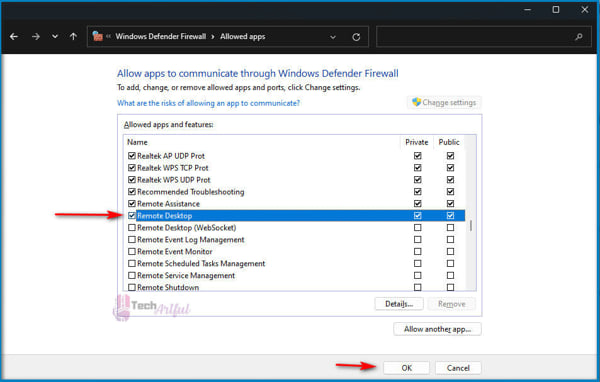
Now you are done. In this way, Windows Firewall will not again block your Remote Desktop connection.
5. Disable/Uninstall Third-Party Antivirus Software
Firewalls that are included in third-party antivirus products may also prevent remote desktop connections from being established. You need to turn off any additional antivirus software that may have been installed on your computer.
To do this, right-click the icon of the antivirus program that is located in the system tray, and then choose an option from the menu that allows you to deactivate (turn off) its shield.
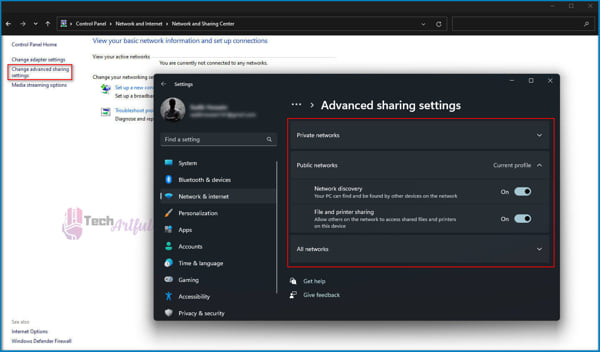
6. Enable Network Discovery
Check to ensure that the client computer, as well as the remote host Computer, has the network discovery feature switched on.
To do this, follow the steps below:
- To launch the Windows Search Panel, click the Windows Search icon in the taskbar’s left-hand corner or hit Win + S keys on the keyboard.
- To access the Control Panel, type the control panel into the search box and hit Enter.
- Change the view mode of your control panel window to Category.
- After clicking Network and Internet, go to the Network and Sharing Center by clicking on it.
- After that, choose the option that says Change advanced sharing options on the left sidebar.
- Make sure that the network discovery options for both private and public networks are turned on.
And in this way, you will be able to solve the Remote Desktop not working on Windows 11 problem pretty easily.
Conclusion
The Remote Desktop feature is surely a blessing for distant computer users. But for various reasons, you may not make use of this feature as you should. So, in this post, we gathered some of the most useful ways through which you can easily solve this Remote Desktop not working on Windows 11 problem without a sweat.