
Is your fix M.2 SSD not showing up in bios? Then you are in the right place. In this guide, we will be showing you some of the best possible ways to fix the M.2 SSD not showing up in the BIOS problem pretty easily.
The majority of modern motherboards come equipped with several SATA connectors as well as M.2 expansion slots; however, configuring your drives in such a way that they are visible in your motherboard’s BIOS and are acknowledged by your operating system is not always as simple as we would like it to be.
And sometimes, your M.2 SSD may not show up in your BIOS. If you are also one of those people who are facing this problem, then continue reading this post until the end to know in detail.
Why Is M.2 SSD Not Showing Up In BIOS?
Discovering the reason why the M.2 SSD is not showing up is the first step in finding a solution to the problem. You have to discover which of the many potential causes behind the vanishing of a drive is giving you the most difficulty to fix the issue.
I have included a list of the most likely explanations for why an M.2 drive might disappear from the BIOS menu to provide you with assistance in finding a solution to the problem.
Let’s go through them one at a time, starting with the easiest:
The M.2 SSD is Incompatible
There are many types of M.2 available in the market. So, it is essential to be aware of the many types of kinds of M.2 drives to have any hope of gaining a deep understanding of the compatibility issues that might result in M.2 solid-state drives (SSDs) failing to appear in the BIOS.
M.2 is just a form factor comparable to mSATA or storage disks that measure 2.5 inches or 3.5 inches in height. Both SATA and NVMe are access and transfer protocols, and M.2 SSDs may use any of them.
Not just do the protocols for SATA and NVMe vary significantly from one another, but the drives that are compatible with each of these protocols also have somewhat distinct physical characteristics.
M.2 solid-state drives (SSDs) have their pin configurations separated into a series of “keys,” as they are often referred to.
M.2 SATA SSDs won’t operate on your Motherboard’s M.2 NVMe slots and vice versa until they are certified for dual-mode operation, even though the physical differences between the two appear to be quite minor.
To cut to the chase, if you own a Motherboard with only M.2 SATA slots and you have purchased an NVMe M.2 SSD, you will not be able to attach the NVMe M.2 SSD to your M.2 SATA slots in any way. This is because the M.2 SATA slots on your Motherboard are not compatible with the NVMe M.2 SSD. Therefore, your mismatch will become obvious even before you reach the point when it does not show up in the BIOS.
In this particular scenario, the difficult solution is to purchase an M.2 SATA SSD rather than an M.2 NVMe SSD. Alternatively, you may get a replacement motherboard that already has M.2 NVMe expansion slots integrated into it.
So, let’s say that your M.2 solid-state drive (SSD) fits perfectly into the M.2 slot on your motherboard, but the BIOS still doesn’t recognize it.
The next step might be the cause for you.
Backdated Disk Management Program
Disk management is software that you may use on your system that will assist you in doing more complex storage operations. The primary purpose of this is to install a new drive and to expand an existing volume that is currently in use. If the utility’s mainframe has seen better days, showing up a new drive can be a little bit of a challenge for you.
Turned On Secure Boot
By verifying the digital signature of boot loaders, important operating system files, and illegal ROMs, secure boot can identify any attempts to tamper with these critical components of the system. When you install a fresh disk, the system will immediately disable the detection to prevent any assaults on the computer. This may be one of the factors contributing to the fact that your M.2 drive is not being shown.
Enabled Compatibility Support Module
The compatibility support module, often known as CSM, will stick to a BIOS environment that is compatible in sync with the operating system you are using. Because having enabled CSM prevents the majority of recent drives from being able to approve UEFI on the system, your M.2 SSD will not be identified.
Shared Bandwidth With Other Ports
M.2 ports are often shared with the other types of expansion slots, including PCIe slots and SATA slots, on most motherboards. This implies that the SATA ports on your motherboard will be blocked if you install an M.2 SSD, and the SSD itself will be deactivated if you add a SATA drive. If you want to prevent this problem, you should study the documentation for your motherboard before you purchase an SSD.
Conflicting Driver letters
Suppose that the new SSD you installed is likewise being indicated with the same drive letter as the old one and that the old driver is being signaled by the letter C. The SSD can disappear from your system as a result of this. Check to see whether all of the drivers are being indicated as the same letter.
So, these were the most likely explanations for why your M.2 SSD isn’t being recognized. It’s possible that these aren’t the only reasons; there may be others. Nevertheless, you shouldn’t jump to any conclusions just yet.
Simply put into action the solutions that I am going to demonstrate to you. I’ll let you know when it’s appropriate for you to start freaking out.
How To Fix M.2 SSD Not Showing Up In BIOS Problem
In the earlier part of this article, I went through the aspects that lead to SSDs not being detected by the BIOS. In the next section, I’ll explain how you may avoid dealing with this issue completely.
If you have determined which of the solutions described in the previous section was responsible for the issue, all you need to do is put that particular solution into effect. However, you do not have absolute certainty on the root cause, do you? Maintain a sequential and methodical approach throughout the curing process.
The following are the strategies that you may put into practice:
1. Configure your M.2 SSD
This is the most important step you need to take to ensure that your SSD is recognized.
The following is an explanation of how you may do that:
- Restart your computer, and when the PC is starting up, continuously press the Del or F2 button to enter the BIOS
- Expand the SATA Configuration menu.
- Choose the Configure SATA as IDE.
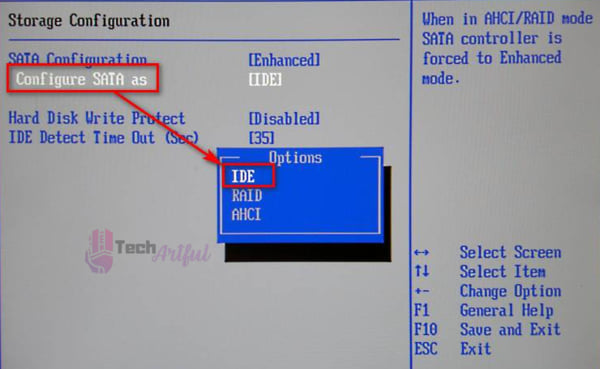
- Press F8 to save and exit.
Make sure to check your work as soon as you’ve finished with this procedure. This is a straightforward strategy, but it’s one that, for the most part, is successful.
2. Reconnect the SSD
I would recommend doing an SSD reinstallation if you are aware that the device in question does not have any physical faults, but you are still unable to locate the drive.
It may seem strange, but in the vast majority of situations, individuals become confused after purchasing a new solid-state drive (SSD) and putting it incorrectly. To tell you the truth, I was guilty of making that error in my younger years as well. It’s a simple slip-up that many people make.
Simply carry out the instructions that I have given you; the reinstallation shouldn’t require you more than two minutes. Simply power down the machine, remove the battery (or the whole thing, if you’re working on a laptop), and then open the casing. Remove the SSD, and then attach it again > Make sure it’s not going anywhere by using a screwdriver.
If it solves the problem, then you are OK to go with what you have done. What if it doesn’t? Now, I may not have all the answers, but I do have enough methods to handle the situation. Proceed by following the steps that are listed below.
3. Disable Secure Boot
By disabling the secure boot feature in the BIOS, further access can be granted to the system, and your computer will also be better able to identify any M.2 SSDs that you may have just added.
The following is the procedure to follow to deactivate it:
- Restart your computer, and when the PC is starting up, continuously press the Del or F2 button to enter the BIOS
- Navigate to the Security
- Disable the Secure Boot option by clicking on Enabled.
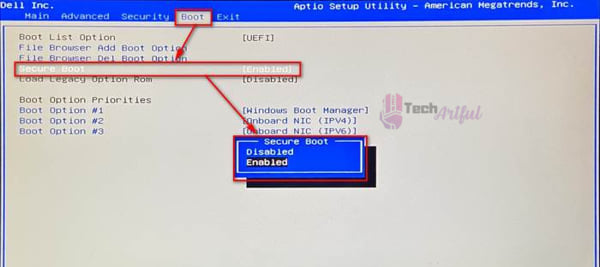
- Press F8 to save and exit.
- Next, go to BIOS again and navigate to the Security
- Click on Delete all secure boot variables and choose Yes.
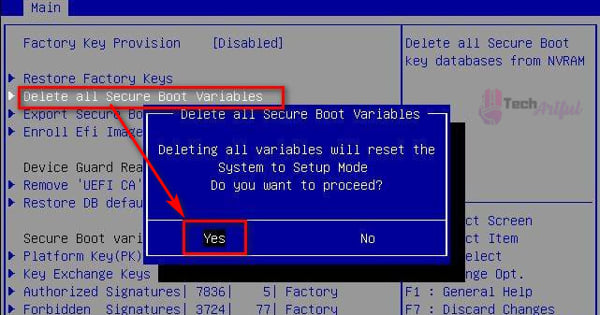
- Finally, click OK to restart your computer.
Be sure to carry out the steps in the same manner that I described. If you follow these steps, you will indeed be able to turn off the secure boot feature. Determine if your M.2 SSD is being detected or not. If this is not the case, go to the next approach.
4. Update BIOS
If you have an older version of the BIOS on your computer and you attach a newer piece of hardware to your motherboard, it is conceivable that the older BIOS will be unable to identify the newer item of hardware. Bringing the BIOS up to date is a helpful step in adapting the modifications; more specifically, this approach applies to older motherboards.
The BIOS may be easily kept up to date via a procedure known as updating. The answer might vary from manufacturer to manufacturer.
I would recommend that you read the user manual for your motherboard before installing the update. And if you’ve lost the handbook, you shouldn’t be too concerned about it. You may readily get instructions by going to the manufacturer’s website and downloading them from there.
Immediately after finishing the update, go to the next stage and carry it out. If you follow the instructions for the letter, you will get the desired good outcome right on time.
5. Check M.2 Setting in BIOS
You need to check to see whether the PCIe port settings in the BIOS have been set up to operate in M.2 mode. You also can manually change that to M.2 mode if it isn’t already, even if the default setting is usually Auto mode. However, if it isn’t already set to Auto mode, you can do that easily.
This is the procedure to follow to do that:
- Restart your computer, and when the PC is starting up, continuously press the Del or F2 button to enter the BIOS
- Go to the Navigation settings by clicking on the F7 button on your keyboard.
- Navigate to Onboard Devices Configuration.
- Look for PCI Express slot Bandwidth.
- Modify the 2 Configuration option to the M.2 if it’s not already selected.
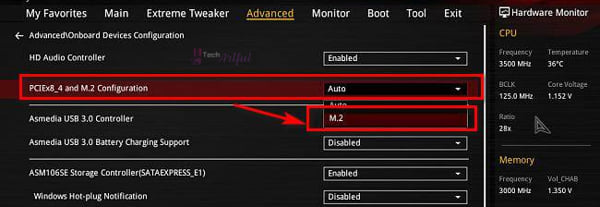
- Click on the F10 button on your keyboard to save and exit and confirm.
After you have completed those steps, you will need to restart the computer. Performing this procedure will unquestionably guarantee that your BIOS will identify your M.2 SSD.
After the M.2 solid state drive (SSD) has been identified by the BIOS, the further procedures consist of verifying that everything is operating normally with it.
6. Change Boot Priority to M.2
It is common knowledge that the default boot order for the personal computer places removable devices and then hard drives in the order of precedence throughout the startup process. It is in your best interest to modify the configuration of your boot so that it can identify the M.2 SSD.
The following instructions will walk you through the process step-by-step:
- Restart your computer, and when the PC is starting up, continuously press the Del or F2 button to enter the BIOS
- Go to Settings and select Boot.
- Here you can set the boot priority for your device.
- Select Boot Option #1 and choose your M.2 SSD here.
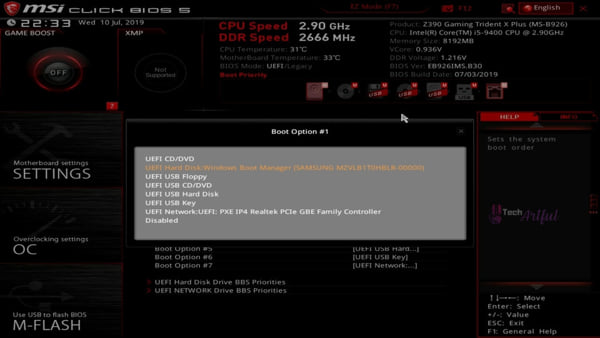
- Click on the F10 button on your keyboard to save and exit and confirm.
You may simply show your computer which M.2 SSD you desire to give priority to one thing over another by executing these steps.
Conclusion
In every single section of this guide, I did all in my power to provide accurate data and information about M.2 SSD not showing up in the bios problem. I do not doubt that it was instructive and helpful to you in achieving a deeper comprehension and solving the problem pretty easily.