
You have recently purchased a new Oculus Quest 2 headset, which you are now working to connect to a personal computer. Despite your best efforts, the headgear cannot connect to the personal computer. You have exhausted several options to link your headphones to your computer successfully but to no avail.

Countless people hailing from a wide variety of backgrounds have brought up the same issue in various conversations they’ve had. A few different tried-and-true processes can be used to solve the problem in which the Oculus Quest 2 headset could not connect to the computer.
Why is Oculus Quest 2 not detected?
Oculus Quest 2 may not be recognized on PC due to incompatibility between PC hardware and Oculus hardware, problems with the USB cable or port, or an older version of the Oculus application. Furthermore, the Oculus Quest 2 may not be recognized on a computer if the device drivers are out of date, if the wireless link is down, or if the power settings for the USB port are wrongly adjusted.
Please do not skip any of the discussed parts because we will go over the procedure of solving the problem step by step. Let’s look into this further to see your options for resolving your problem connecting your Oculus Quest 2.
How to Fix Oculus Quest 2 Not Detected on PC
The problem of an Oculus Quest 2 headset being unable to connect to a computer is one that many Oculus Quest 2 headset owners face. This problem was reported by several consumers when attempting to connect the headset to their PCs. Several other ways can be done when the Oculus Quest 2 cannot connect to the PC.
We will be able to determine the methods that will be most successful in resolving the issue after some research and a series of experiments. In the following section, we will walk you through several approaches to help you relieve the discomfort you are presently experiencing.
In this session, you will learn about some of the most excellent tried-and-true strategies for dealing with issues with your Oculus Quest 2 not connecting to your PC. Other individuals, just like you, have tried and tested these methods.
Check Hardware Compatibility
The most critical factor in making the most of your Oculus Quest 2 and maximizing its potential has compatible hardware. If your computer does not meet the hardware requirements of your Oculus Quest 2 headset, you will be unable to utilize the Oculus Quest 2 headset. The Oculus Quest 2 headset is only compatible with specified computer configurations.
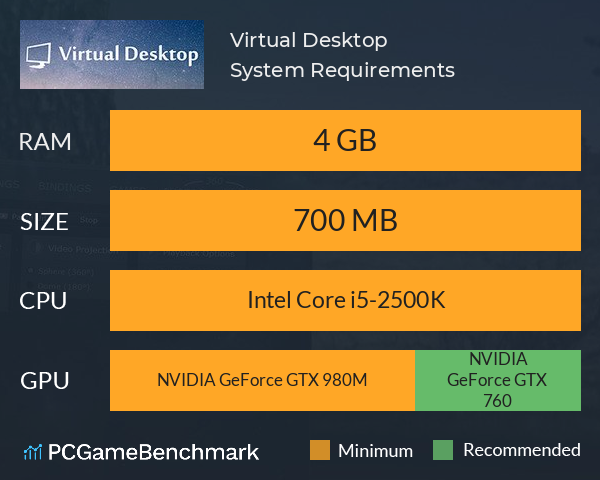
Because you must ensure that your personal computer is compatible with Oculus Quest 2, you must ensure that it can meet the requirements of your Oculus Quest 2 headsets. Put another way, and you must ensure that your computer can run Oculus Quest 2. Before purchasing an Oculus Quest 2 headset, you should establish whether your computer meets the minimum requirements. To support the Oculus Quest 2, the following pieces of hardware are required, all of which must be present and operational: Components.
- Requirements (Minimum) (Minimum) Microsoft Windows 10 is the operating system. Intel Core i5-4590 or AMD Ryzen 5 1500X processor Nvidia GTX 970, 1060 3GB or above, or another graphics card with a larger capacity- AMD RX 500, 600, 5000, and Vega series graphics cards.
RAM 8GB USB 3.0 Port.
To guarantee that the components of your computer are compatible with one another, you must review the technical requirements of the hardware.
Following these procedures will allow you to check the hardware characteristics of your computer:
- The DirectX Diagnostic Tool is a valuable program that displays your computer’s hardware info in one place and may be used to check your machine’s hardware requirements. This tool is available on the DirectX website. You can do this by opening the “DirectX Diagnostic Tool” window and selecting the “Hardware” tab.
- To finish the process of checking the hardware specs, the following steps must be taken:
- Enter the dx diag into your computer’s search box while holding down the Win key and the S button on your keyboard.
- The DirectX Diagnostic Tool can be launched by pressing the Enter key on your keyboard.
- Make sure you’re on the System tab.
- Under the “System Information” portion of the page, look at the Operating System, Processor, and Memory.
- To begin, select the Display tab from the menu.
- Ensure that your information regarding your GPU model, Total Memory, and other relevant facts is correct.
If the specifications of your computer can meet the minimum requirements for Oculus Quest 2, you can proceed with the rest of the troubleshooting procedures to address the problem.
Check your USB Cable / Port
Damage to the USB cable or the port on your computer is most likely the root cause of the Oculus Quest 2 headset’s failure to connect to your device. If your USB cable or port is damaged, or if you connected your Oculus Quest 2 headset to an improper USB connection, such as a USB 2.0 port, your headset may not connect to your computer when using the Oculus Quest 2 virtual reality system. This issue can also arise if you connect your headset to the wrong type of USB connection the first time.
If you connect your Oculus Quest 2 headset to a port that can only handle USB 2.0 connections, the headset will not communicate with your computer. This will only happen if you connect the headset to a port that can accept USB 2.0 connections. As a result, you should verify the USB port on your computer that is connected to the headset.
Make sure to plug in the device to a USB 3.0 port. After that, try to see whether the problem persists after you have connected your device to a different USB 3.0 port. If it does, you can assume that the problem has been resolved. If the offered method does not resolve the issue, the USB cable is most likely the root of the problem.
Suppose you have trouble connecting your Oculus Quest 2 headset to your computer. You must purchase a new high-quality data transmission cable or conduct the installation yourself.
Restart your Oculus Quest 2 Headset
Simply restarting any piece of electrical equipment can be an effective technique or treatment for various issues. The problem can be resolved by merely continuing your device to return everything to normal. As a result, the first step in resolving the point is to restart your computer and the Oculus Quest 2 headset.
This should bring everything back up to speed. If this works as expected, the issue with the headset not connecting to the computer should be resolved. Please follow the steps below to restart both your computer and your Oculus Quest 2 headset:
- Hit your smartphone’s Power button and select the Restart option from the available menu.
- Then, on your Oculus Quest 2 headset, locate the “Power” button and hold it to turn off the device.
- By pressing the “Volume” button, you can select to restart the device.
- You can also restart the device by holding the power button.
After restarting your computer and your headset, you should try to connect to your PC to see if the problem you were experiencing has been fixed. This can be done to identify whether or not the issue you were experiencing was fixed.
If the offered solution does not solve the problem, go on to the next available option.
Update Oculus Software & Device Drivers
The Oculus desktop software is no longer supported, so the Oculus Quest 2 headset cannot be linked to the PC. If your computer’s Oculus desktop software is outdated, your headset may not function properly. This may be the situation if your PC is not maintained up to date. If you want a good headset experience, ensure that the Oculus desktop software is regularly updated.
This will provide you with the most excellent possible experience when wearing your headset. You can update the desktop software that came with your Oculus headset by heading to the official Oculus website and searching for the most recent version of the software. Obtain the software and then use the download to ensure it is correctly installed.
You can manually update your device drivers by going to the manufacturer’s website for each device and searching for the driver that matches your specific module on that page. This allows you to keep your device drivers current. You can also use Driver Easy, which enables you to perform automated driver updates with just two clicks.
Driver Easy will automatically detect your machine’s configuration and search for drivers that are appropriate for it. You do not need to be an expert in the operating system used by your device. You do not need to be concerned about downloading and installing the incorrect driver, nor should you be anxious about making a mistake when installing the software. You are not compelled to do either of these things.
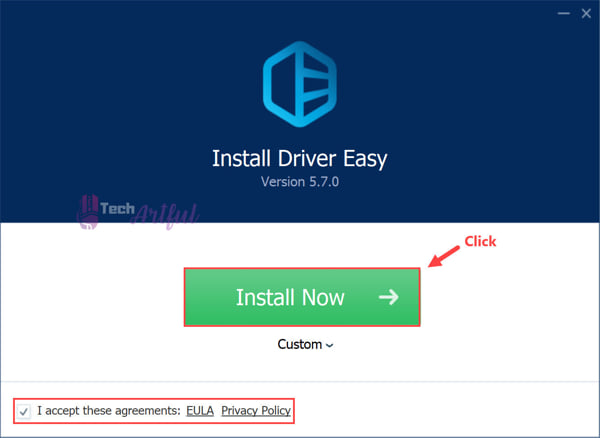
Download and install Driver Easy
Launch Driver Easy, then select the Scan Now option from the drop-down menu. Driver Easy will search your computer for any drivers causing issues. After clicking the Update button next to the required driver, you can install the driver manually by following the on-screen instructions. As a result, the correct driver version will be downloaded as soon as you click the button (you can do this with the FREE version).
Suppose any drivers are missing or are not the most recent version; select Update. In that case, All will cause your computer to automatically download and install the most current version of those drivers. This feature is only available in the Pro edition of the software and includes unlimited customer support. A money-back guarantee applies for the first thirty days following purchase. You have the option of completing it for free, but this will take some human labor on your part.
Note: It is vital to remember that purchasing the Driver Easy Pro edition includes full access to the company’s technical support. If you require assistance, do not hesitate to contact Driver Easy’s support team. You can do so by contacting support via email at support@drivereasy.com.
If you still have problems after trying the previous option, proceed to the next one below.
It’s also conceivable that your computer’s device drivers are outdated, which is another typical issue. To resolve the issue where your Oculus Quest 2 headset is not connected to your computer, you must update the outdated device drivers on your computer. You will need to upgrade your PC’s display and USB drivers.
Log Out of Your Account and Log Back In
Although it may not appear to be much, a substantial number of people have found success byLogginghat logging out of the PC software and then back in will provide a temporary solution to your Quest problems. If this is the case, sign out and then sign back in.
Power Cycle Your Device
Both the software on your computer and the environment on your desktop can be reset with a simple restart, which is often all that is required to resolve issues like the one that has been developed. You may test whether your computer recognizes your Oculus Quest by shutting off your computer and your Oculus Quest and then turning them back on. This will allow you to determine whether your PC can recognize your Oculus Quest.
Factory Reset your Quest 2 Headset
If none of the previous alternatives worked to resolve your Oculus Quest 2 not linking or connecting to a PC, you could try doing a factory reset on your headset. This option is accessible if none of the other alternatives successfully fixes the problem.
The following are the actions that must be done to perform a factory reset on your headset:
- Learn the layout of your Oculus Quest 2 controller, paying special attention to the Power and Volume buttons.
- Continue to press and hold the Power button while holding the Volume (-) button. Continue doing so until the “shut off” screen appears.
- Using the volume button, be able to restore the device to its original settings.
- You can choose to delete all of your user data and settings.
- Select Yes from the options to perform a factory reset on your headset. This will allow you to restore it to its factory configuration.
- Please remain seated so that the Factory Reset operation can be completed entirely.
- Connecting your headset to your computer after you have completed a factory reset is the best way to detect whether or not the problem has been resolved.
If the offered solution does not solve the problem, go on to the next available option.
Turn off Air Link
You risk encountering issues like this when switching from a wireless Oculus Air Link connection to a standard cable Oculus Link connection. To resolve the issue, access the Quest 2 game’s settings and pick the Experimental option from the menu that appears. You can disable Air Link from that screen if you so desire.
Disable USB Power Settings
Following these instructions, you can disable the power-saving options connected to the USB power setting.
- Open Device manager by searching it in the task bar.
- Right-click the USB Input Device after you’ve double-clicked the Human Interface Device, and then select Properties from the menu that displays. This will configure the Human Interface Device’s properties.
- Ensure that the power-saving options are not chosen in the “Power Management” section.
Many consumers are afflicted by the problem that the Oculus Quest 2 headgear cannot connect to a computer. This problem was reported by several consumers when attempting to connect the headset to their PCs. It is possible to resolve the issue that prevents your Oculus Quest 2 headset from connecting to your computer quickly and with no effort.
We have high expectations that after reading the entire post and carefully following the steps, you will be able to resolve the issue where your Oculus Quest 2 headset cannot connect to your computer.
FAQ
How do I get Quest 2 to show on my computer?
You can cast your Quest to a personal computer after logging onto the Quest website, at which point it will be ready to be streamed to other users. Check sure the Quest is connected to the same network. Then, in the little menu tray, press the share button again, selecting the “Cast” option. The Quest should appear in your browser when you’ve finished those steps.
How do I connect Quest 2 to my PC with a link cable?
Directly from the machine: You can download the program for your computer by clicking the Download Software button below. Make a connection using both the cable and the air. On your computer, launch the application that runs on your desktop. Using the headphones, you can start the call.