
If you are trying to enter the boot menu but facing the keyboard not working in Bios problem, then you are in the right place. By following this guide, you will be able to solve this problem without any sweat.

There are a variety of causes that can cause the keyboard to stop working in the BIOS setup. For example, there might be some keyboard drivers that have not been initialized or recognized in the computer, problems with the USB ports that have not been initialized, keyboard drivers that are not supported by the BIOS, or a malfunctioning USB port.
However, in this post, we have shown some of the best possible ways to fix this keyboard not working in the BIOS setup problem. So, keep reading this post until the end to learn more about the remedies in depth.
Reasons Why Keyboard Not Working in BIOS Setup
There might be so many reasons why your keyboard is not working in the BIOS setup mode. But before we get into that, there are some things you need to know, which is how a computer’s boot system runs. If you can grasp the concept, then it will be easier for you to know the solutions properly.
First, you must grasp how a computer’s boot system runs before I can respond to your question.
When you turn on your pc, the control initially passes to the motherboard’s BIOS system. Following that, it examines the boot sequence and attempts to boot from each device one by one in a sequential manner.
The first device to boot with a legitimate bootloader and operating system is the winner. That means it will load first.
However, now let’s see why the keyboard stops working in the BIOS. There are a variety of causes that could be causing your keyboard to stop working on the boot menu.

Some of these issues include some keyboard drivers that have not been initialized or recognized in the computer, problems with the USB ports that have not been initialized, keyboard drivers that are not supported by the BIOS, or a malfunctioning USB port.
Fortunately, those issues can be resolved rather quickly and within a moment. All you have to do is to be patient and go through the process step by step that we have shown below.
But, keep in mind that a malfunctioning motherboard can occasionally be the source of the problem. In that situation, you will have to get the motherboard replaced.
Ways to Fix Keyboard Not Working in BIOS Problem
You can easily solve the Keyboard Not Working in BIOS problem without any difficulties. As the issue sounds, the solutions are also pretty straightforward. If your keyboard is not working in the Bios, then the most likely reason is that the keyboard has been deactivated in BIOS.
Meanwhile, to correct this, you will have to enter the BIOS and go through a slew of settings. But to do that, you are going to need a different keyboard that is compatible with BIOS. Isn’t it funny how ironic it all is?
To browse thru the BIOS, you can make use of ancient times PS/2 keyboards with the universal driver. Usually, motherboards come with these keyboards pre-installed, so there shouldn’t be any problems with them.
However, if you don’t already have one of those PS2 keyboards, you can use the keyboard that you have. To do that, there are a few USB ports available on your motherboard that can be used for this purpose. Try connecting the keyboard to the USB 2.0 ports and see if its works.
If it doesn’t, then follow the below steps to fix the issue.
1. Enable USB Support
On some motherboards, when you update your BIOS or newly bought a motherboard, the USB Support option may get turned off by default. Also, possibly, the inbuilt peripherals/default devices are not activated in the BIOS configuration settings. As a result, you must turn it on to access your keyboard.
To enable the USB support option, follow the below steps carefully. But keep in mind that, as we will now be doing things in the BIOS, always concentrate on what you are doing. Because if you do something, turn something on or off, then it may cause another problem.
Here’s how to enable the USB port on BIOS:
- Enter the BIOS menu. Restart your computer and keep pressing the BIOS button according to your motherboard. If you are using an MSI motherboard, then you have to press Del
- After entering the BIOS, click on the Settings
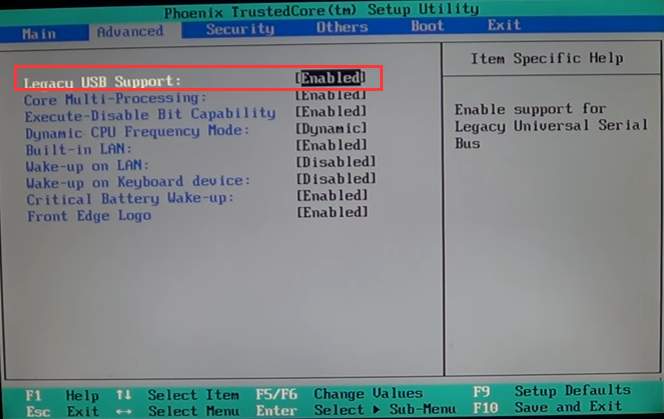
- Click Advanced and navigate to the legacy USB support
- Now click on Disable and Enable
- Press F10 to save changes.
Now disconnect the current keyboard and plug in your keyboard to check if it works or not. If it doesn’t, then don’t panic. Follow the below methods to solve the issue.
2. Disable USB 3.0 on Boot
USB 3.0 is sometimes utilized during the boot process on recent motherboards. Some keyboards become inoperable as a result of this feature. So, to solve this problem, you will have to disable this feature.
To disable USB 3.0 on Boot, follow the steps below:
- Go to the BIOS setting just like the previous method.
- Now click on Settings and hit on the Advanced
- Press on the USB Single Port Control
- Look for USB 3.0 and click the Disabled option from the drop-down menu.
- Just like the previous method, press F10 on your keyboard to save the changes.
Now plug in your main keyboard and check if it works or not.
3. Disable Fast Boot
Fast boot is a feature that is available on practically every motherboard. It forces USB devices to start after the operating system has booted rather than before the BIOS has booted.
So, as stated previously, the operating system is loaded just after BIOS. As a result, if USB devices are loaded after the operating system, they will not be accessible in BIOS. And thus, you will face this Keyboard Not Working In BIOS problem.
So, the only way to fix this issue is to disable the fast boot option. The detailed steps to disable fast boot are given below.
- Like the previous step, go to the BIOS settings by pressing the Bios button on your keyboard.
- Click on Settings and go to the Boot
- Now locate the Fast Boot option and choose Disabled from the drop-down menu.
- Likewise, press F10 on your keyboard to save the changes.
Now, restart your computer and see if it works or not. If it doesn’t, then follow the below methods.
4. Clear CMOS on Your Motherboard
The main purpose of the CMOS battery is to keep all the Windows and Bios settings intake. So, when you clear the CMOS, the BIOS will be restored to its default settings. Sometimes, there might be some settings that you have changed mistakenly and forgotten. Also, resetting the BIOS will solve the issue.
So, follow the below steps to clear the BIOS setting and restore it to its factory default settings.
The first step is to turn your computer off and disconnect the power cable from the wall outlet.
Now, take your computer’s chassis and remove the side panel carefully to navigate the motherboard. Locate the CMOS battery, which is located on the motherboard. If you don’t know what a CMOS battery is, it is a compact circular battery that is frequently found around the central processing unit (CPU). If you are having trouble locating the battery, then you can take a look at the manual book of your motherboard.
Now, gently remove the CMOS battery from the motherboard. It should be a rather basic process. However, keep in mind not to contact any other portions of the motherboard, as this might result in an ESD event.
After removing the battery, wait for around 2-5 minutes and press the power button for about 30 – 40 seconds and then put the battery back. And check to see that it is correctly installed.
Now, turn the computer on and check to see if everything works or not. The keyboard should now work perfectly. If it works, put back the side panel as it was, and you are set to go.
Frequently Asked Questions
Can I enter the BIOS setting without a keyboard?
Unfortunately, as you will need to press the BIOS button on your keyboard to enter BIOS, you can’t enter the BIOS setting without a keyboard.
Can I use a wireless keyboard to enter BIOS?
If your wireless keyboard uses an RF transmitter to connect, then you may enter. But if it uses Bluetooth to connect, then it will not work.
Conclusion
When you enter the BIOS and see that your keyboard is not working, then it might be frustrating. So, in this post, we gathered all the possible ways to fix this keyboard not working in the BIOS problem. We hope this guide has helped you fix your problem.