
Is HyperX Cloud Alpha Mic Not Working? Well, it’s a common problem faced by most users. And this post will help you solve this problem easily.
HyperX Cloud Alpha makes use of a unique Dual Chamber Drivers design to decrease distortion and noise. Having the bass and mids and highs separated allows for better tuning and a more enjoyable listening experience.
When combined with a more oversized headband and more flexible leatherette, HyperX’s Cloud Alpha headset provides award-winning comfort for gamers worldwide.
 In addition to the durable, detachable braided cable that players have requested, Cloud Alpha includes a durable, aluminum chassis that can withstand daily usage. It has been verified by both Discord and TeamSpeak, so you can be confident that you’ll have excellent team communication with it.
Cloud Alpha evolution’s strong sound will be available to players on various platforms, including PC, PS4, Xbox One, and other devices with a 3.5mm audio connection, thanks to the game’s cross-platform compatibility and usage of an in-line audio control system. Compared to Cloud II, HyperX Cloud Alpha offers several new and exciting capabilities while maintaining a balanced, dynamic, and clean sound. Don’t be concerned if you are experiencing difficulties with the HyperX Cloud Alpha microphone.
However, there appears to be a large number of people suffering the same problem, which can simply be resolved if you follow the guide below.
Why Is HyperX Cloud Alpha Mic Not Working
The HyperX Cloud Alpha is an excellent microphone for any gaming platform available; however, it is possible that your microphone could cease operating due to external or internal difficulties. Problems with your device, wiring, or software utility are all possibilities. These are the possible causes of your HyperX Cloud Alpha not functioning correctly.
- Mistake with the mute button.
- Out of date audio drivers.
- Permissions for audio have not been updated.
How To Fix The HyperX Cloud Alpha Headset
The HyperX Cloud Alpha headset can malfunction due to many issues, and their fixes are not so hard to apply. In this article, we have gathered some possible fixes for the problems you might be facing with your HyperX Cloud Alpha headset; follow these steps below to resolve any issues with the microphone.
1. Fix Microphone Connections
If you are using the HyperX Cloud Alpha, make sure you thoroughly and firmly insert the detachable cable plug to receive full communication from the device (you need to push it into the headset). Make sure to leave the microphone unmuted and put the volume up as high as it will go. This is the final version of the fix that the vast majority of users will see. If you are running HyperX Cloud Alpha on Xbox One, you must purchase an adapter for your console. Using the buttons on the adapter, you may change the volume of the sound and microphone after ensuring that the Mute button is not on. After that, go to Settings and ensure that the microphone is switched on under the Audio section.
2. Troubleshoot The HyperX Cloud Alpha Headset
Whenever you are experiencing hardware issues, you may always utilize the troubleshooter that is included with Windows to address the problem. This will assist you in the future while dealing with minor problems.
- The Sound Settings may be accessed through the context menu when you right-click the Speaker button located on the lower right side of the screen. To do so, pick Open Sound Settings from the context menu.
- Having selected the appropriate input device (HyperX Cloud Alpha) from the Input drop-down box, click Troubleshoot to begin the process of diagnosing the problem.
Also, read how you can fix Corsair Void mic not working.
3. Update Audio Drivers
A faulty or out-of-date audio driver for the HyperX Cloud Alpha microphone will result in many instances in which the microphone will not operate. When you update the audio driver for your gaming headset to the most recent version, you can be assured that it will continue to operate at optimum performance.
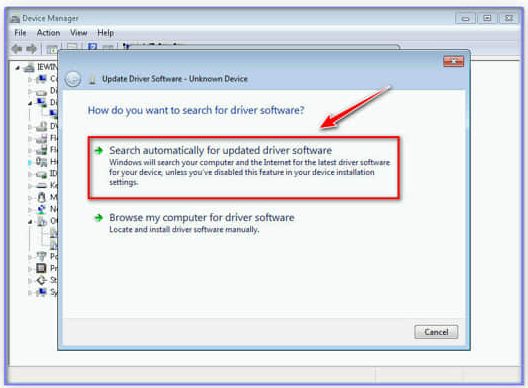
This step can be completed either manually or automatically by installing the most recent version of the audio driver. It is recommended to complete the task manually.
The most recent driver for your sound card drivers (such as Realtek or NVIDIA) downloads the most recent driver compatible with your Windows version and then follows the on-screen instructions to install the driver piece by piece until it is fully functional.
If you do not have the necessary time, patience, or computer skills to manually update your audio driver software, Driver Easy can help you. When you use Driver Easy, it will detect your system and choose the most appropriate driver for your headset as well as your Windows version, after which it will download and install the drivers in the following manner:
- Driver Easy is a software program that can be downloaded and installed on a computer or laptop.
- Using Driver Easy, navigate to the Scan Now option in its menu bar and click on it to begin scanning your machine. A check of your computer’s drivers will be performed after that by Driver Easy to determine whether any of the drivers are corrupted.
- You may update your sound card driver by selecting it and clicking the Update button next to it. The most recent version of the sound card driver will be downloaded and installed on your computer in seconds. Following that, you will be able to proceed with installing the driver (you can do this with the FREE version).
- Alternatives include selecting Update All, which will cause your system to seek for and download the most recent versions of any driver software and device drivers that are missing or out of date, as well as installing them. The Pro edition of the software, which includes full technical assistance and a 30-day money-back guarantee, is only available to those who purchase it.) I you choose Update All, you will be requested to upgrade to the most recent version of your operating system.
- The adjustments will not be fully effective until your machine has been rebooted.
4. Set The HyperX Cloud Alpha As Default Microphone
Windows should be able to identify your microphone as soon as your headphone is plugged in, and it should automatically set your microphone as the default input device for your computer. However, there will be times when you will need to expressly designate it as the default device, such as when you install a new operating system.
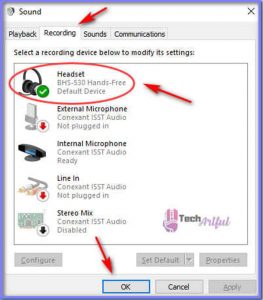
- By right-clicking on the sound icon in the lower-right corner of your desktop and selecting Sounds from the context menu, you may customize your desktop sound.
- Make sure that your Headset Microphone is chosen as the default device on the Recording tab by selecting it from the Device drop-down box on the right side of the screen. If you already have a default headphone, choose one from the drop-down menu and click Set Default.
- Check to ensure that your headphone’s name is shown correctly and that it emits strong signals as well, if necessary. Your headset will appear as anything other than your headphone if the microphone settings for your headset are incorrect, and you should reconnect your headset.
- The Properties menu will appear when you right-click Headset Microphone and pick Properties from the opening context menu. If both the display name and the signal are standard, you may go to the next step.
- When you’re on the Levels tab, move the volume slider to the left until it reaches the highest value you want (100).
- To save the changes, click OK on the first window and then OK on the second and final windows to complete the process.
- Check to determine if your HyperX Cloud Alpha is still working by doing a check on it. If this is not the case, you may want to double-check your game settings to make sure they are not interfering with the operation of your HyperX microphone.
5. Allow Access To The HyperX Cloud Alpha Headset
It’s possible that the HyperX Cloud Alpha mic is not working because the microphone settings on your PC are incorrectly configured. If you are experiencing this problem, check your microphone privacy settings and ensure that the app you are using has permission to access your microphone.
- To bring up the Search box on your keyboard, press the Windows logo key on your keyboard and then type the microphone into it.
- From the drop-down option that opens, select Microphone Privacy Settings from the list that displays.
- To allow other applications to use your microphone under the Allow Apps To Access Your Microphone tab, make sure the toggle next to Allow Apps To Access Your Microphone is set to On by clicking on it.
- You can select which programs may use your microphone by scrolling down the page. Make sure that you have it configured for all of the applications that you want.
- Test your microphone to make sure it’s set up correctly for the program you’re now using.
Even though the HyperX Cloud Alpha is well-known and well-regarded, its ability to perform has been limited for quite some time by a microphone issue with the device. Several users have expressed dissatisfaction with their inability to connect in-game or through other applications.
We tried gathering the procedures that must be followed for your microphone to function correctly. You should contact customer service or a repair shop if you have tried everything and are still experiencing problems. We sincerely hope you took away something valuable from it. We wish you the best of luck in your gaming adventures.
FAQ
How to enable HyperX Cloud Alpha microphone?
In the taskbar, right-click on the Start button and then pick Settings from the drop-down menu that appears. When the Settings app has been launched, navigate to Privacy > Microphone in the menu bar. The Change button is located under the Allow access to the microphone on this device section of the dialog box. Click on it to make a change. Check to ensure that the toggle switch is turned on, which will allow you to get access.
Why isn’t my HyperX microphone functioning correctly?
Likely, your HyperX Cloud microphone is not functioning because it has been disabled or is not configured as the default device on your computer. Follow these steps to re-enable it and make it the default device.