Are your advanced BIOS settings hidden in your HP laptop? If you face several problems with your computer and need to access the Advanced settings of the BIOS and you can’t find it, things will get irritating for real.
Here, you’ll get to know how to easily access advanced BIOS settings in an HP laptop or computer.
But, you may wonder, what are the reasons to access advanced BIOS settings? Well, to enable/disable the SATA controller, Onboard LAN Boot ROM, and other components, you require HP’s Advanced BIOS. It’s also possible that the main video adapter has to be changed. And thus, access to Advanced BIOS settings is desirable for a variety of reasons.
Hence, now let’s move on to the main topic, where we will learn how to access advanced BIOS settings easily.
What Are Advanced BIOS Settings In HP
The Unified Extensible Firmware Interface (UEFI), a component independent of the operating system, contains the Basic Input/Output System (BIOS) settings. Its main job is to boot the operating system upon starting and identify which input and output devices are plugged into the computer. The BIOS offers both simple and advanced settings that may be changed in a plethora of ways.
What makes advanced BIOS settings necessary, then?
To configure your CPU, chipset, peripheral devices, boot preferences, ACPI management, PnP/PCI options, integrated LAN, SATA controllers, and other complex BIOS settings, you’ll need to use the advanced settings in the BIOS.
An overview of the Advanced BIOS settings is shown below:
- Boot Features: The safe boot, Legacy and UEFI boot modes, boot device management, boot order, and more.
- Integrated Peripherals: It is used to control (activate/inactivate) onboard peripherals.
- Power Management: For power control purposes, it serves as the master switch.
- PnP/PCI Configuration: Configuration and management of PCI cards and plug-and-play (PnP) devices may be done using this tool.
- System Health Monitor: Your system’s temperature, speed of the fan, chassis temperature, voltage, and other parameters are automatically detected by this function.
- IDE/SATA Configuration: For RAID, Intel SATA, or IDE connections, it is utilized to configure and install drives.
- Password: Passwords for the BIOS can be created, modified, or turned on or off. You may limit who has access to the BIOS setup using this.
- USB Configuration: Controls the onboard USB ports (by enabling or disabling them).
To prevent customers from making modifications, some companies lock or conceal the Advanced Settings in their devices. You should still simply give it a go if you understand what you’re after and how to make the adjustments.
How to Access Advanced BIOS Settings in HP?
Every time you power up the laptop, you don’t have to view or bother with the BIOS settings. You could, however, ought to access certain settings in unforeseen situations.
Modern computers need you to hit a certain button on the keyboard when they boot up to access the BIOS settings. F1, F2, F10, F12, Esc, or Delete are the keys in virtually all situations. Frequently, when you switch on the laptop, this specific information is provided.
The process for accessing the BIOS settings has changed significantly since Microsoft Windows 10, which introduced the unified extensible firmware interface (UEFI) and quick boot settings.
Whatever! The procedure for entering advanced BIOS settings in HP is shown below each step by step:
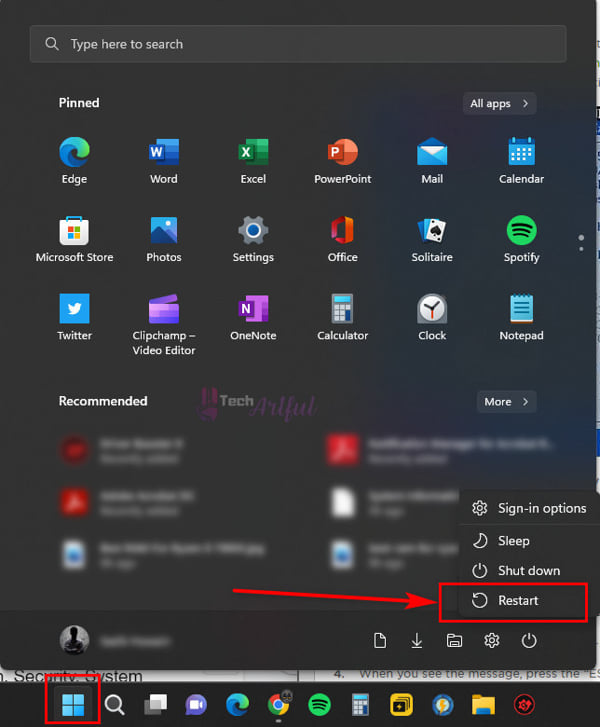
- Step 1: Restart your computer: Quit what you’re doing right now. Allow some time for it to be saved before restarting your computer.
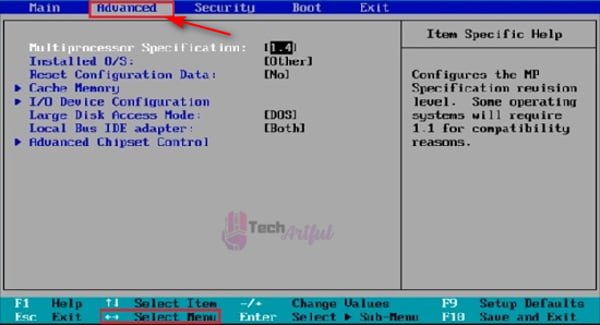
- Step 2: Enter the BIOS Settings: To enter the BIOS settings panel, continually press the F10 key when your computer boots up. Main, Advanced, Power, Boot, and Exit are among the tabs that you will notice.
- Step 3: Get To The Advanced Tab: You may access the Advanced options tab by using the arrow keys. Note that using your keyboard instead of your mouse or touchpad will allow you to access the BIOS settings panel.
You may not see the advanced settings tab on certain HP models, including the HP ProBook and HP Pavilion; rather, you’ll find Main, Security, System setup, and Exit. This indicates that the advanced options tab is hidden, so there is no need to be concerned. In such a situation, follow these steps:
- Step 4: Restart your computer again: Restart or shut down your computer once more time. Press F9 throughout the startup process this time.
- Step 5: Press CTRL + F10 key: The Boot Manager will launch as a result of pressing the CTRL + F10 key. The Boot Settings Menu is located in the Boot Manager.
- Step 6: Click F10 to Navigate to the Advanced Settings Tab: Press F10 to launch the BIOS Setup Utility after the Boot Manager screen has shown. The Advanced BIOS Settings tab will now be visible.
In this way, if you follow these steps, your HP Pavilion, HP ProBook, and other models’ BIOS will unlock to reveal the Advanced tab. Changes may be made to SATA setup, USB setup, Chipset settings, Debug options, and a ton of other things.
Way to Restore Default BIOS Settings in HP
Knowing how to return to default settings is crucial even if you wish to change your computer’s BIOS settings to improve speed is crucial. If you make modifications that result in a problem with your computer, you must restore the default BIOS settings.
You can reset HP’s BIOS settings by following these steps:
- Restart your laptop and when it starts booting up, keep pressing the F10 button on your keyboard to go to the BIOS menu.
- The arrow keys should be used to get to Restore Defaults underneath the Main tab.
- To choose, hit Enter.
- Press Enter to confirm your choice in the dialogue box that will display.
- Exit after saving modifications.
Conclusion
Even while you may not want to access the advanced BIOS settings nearly every day, doing so can still significantly impact how well your computer performs. Because it poses a security risk, several manufacturers lock or conceal this button from the BIOS control window.
Here, we have shown how to access advanced BIOS settings in an HP laptop pretty easily. But you should still use caution to protect your computer by being knowledgeable about what you are performing.


