Modern technology has introduced lots of new valuable functions and established a new ideal, in which we want things to function flawlessly at all times. Consequently, if something as fundamental as a shared folder on a computer unexpectedly stops functioning, we become quite upset.
However, if you are also experiencing Windows can’t access network drive on Windows 11, then don’t worry. Luckily, resolving the problem of not being able to enter a shared folder is a simple matter.
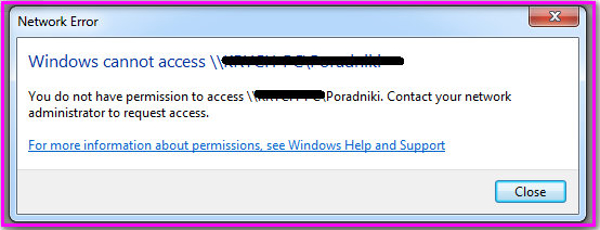
If you get a Network Error message from Windows 11, the OS will inform you to verify the shared folder’s name for misspellings.
In most cases, correcting the name fixes the issue. But if it doesn’t apply in your case, then follow this guide. Because in this article, we are going to fix Windows can’t access network drive on Windows 11 problem.
Why Can’t Windows Access Network Drive
When a shared folder does not function properly, there might be a variety of reasons for this to occur. It is possible that the network has been incorrectly set up, maybe the folders settings have been incorrectly specified, or that the shared folder name has been misspelled.
Also, in certain circumstances, the user account that is responsible for the folder might have given improper permissions that the Windows can’t access the network drive on Windows 11.
Hence, whatever the reason might be, we are going to fix all of these and solve your problem with ease. But first and foremost, it is advised that you speak with the person who has administrative access to the shared folder before proceeding with the remedies that we have described in this tutorial.
Maybe there has been an error that has prevented users from getting access to your shared folder, such as forgetting to activate some permissions on the folder in settings.
If, on the other hand, you are the one who has authority over the shared folder, you will need to modify and give the network sharing access to the users to make that connection more convenient.
It is not possible to access and utilize the network drive or folder if the network issue is not resolved immediately. Consequently, you must resolve the problem to let others access and use the network drive or folder on your computer with Windows 11.
When you encounter a network problem with Windows 11, don’t become frightened. To resolve this issue, you must re-configure your internet sharing settings and allow them to access the drive or folder in concern.
But if you don’t know how you can reconfigure and allow people to access the network drive, then don’t worry. Because this tutorial will walk you through the many easy steps that you may use to fix Windows can’t access network drive on Windows 11 problem that you are experiencing.
How to Fix Windows Can’t Access Network Drive On Windows 11
In the following, we described all the procedures to do to resolve this problem on Windows 11 latest build version.
Here are the steps to Fix Windows Can’t Access Network Drive On Windows 11:
1. Re-Configure The Network Sharing Permissions
Most likely, you may encounter a network error when you attempt to access a shared folder if the administrator has still didn’t listed you on the shared folder’s Share With list.
However, modifying the network sharing permission might be the solution to resolve this issue, allowing you to share a drive or folder fast and simply in the future. If you want to do this, you will have to modify the Advanced Sharing options.
To re-configure the network sharing permissions, follow the below steps:
- Open my computer and select the folder or the drive that you want to share with others.
- Press the Alt+Enter button on your computer or right-click on the folder or drive to go to Properties.
- Click on the Sharing tab On the Properties window.
- Below the Advanced Sharing section, click on the Advanced Sharing
- Now, to share this folder or drive it with others, click on the Share this folder checkbox which is located at the top left corner.
- Give it a name on the Share Name
- Now, to configure the permission settings, click on the Permission option under the comments section.
- Select Everyone from the Group or user names section.
- On the Permission for Everyone section, Allow all of the options by ticking them.
- Now click on the Apply button and then press OK.
- Close all of the windows by clicking on the Apply and OK
You have now successfully re-configured and modified the permissions for your network sharing. After doing all these steps correctly, you will now see the Shared text displayed beneath the Share name that you provided. Additionally, you will see a share button next to your chosen disk icon.
However, keep in mind that the computer or the system on which the shared folder is turned on must be turned on and connected to the internet. If it is in sleep mode or has been switched off, then the shared folders will not be reachable from this system or computer.
While Windows is running, you will only be able to see or browse shared files or folders.
Just your home network, in which the systems and users are trustworthy and in which you have total control, is secure for sharing your files or disk. To share anything on your corporate network or somewhere else, you must first grant extra permission to those who need it.
2. Allow Security Permissions
It’s also possible that you are experiencing this Windows can’t access network drive on Windows 11 problem because you may not have the appropriate security permissions. Another cause for encountering this difficulty or error is due to insufficient security permissions. If you do not have the appropriate security permissions, you will find that Windows is unable to connect a drive or folder.
To share a drive or file with a trusted network, once you have reconfigured your network sharing rights, you must first give your security permissions.
So, follow the steps outlined below to allow security permissions and enable access to the shared folder:-
- Open my computer and select the folder or the drive that you want to share with others.
- Press the Alt+Enter button on your computer or right-click on the folder or drive to go to Properties.
- Click on the Security tab On the Properties window.
- Hit on the Edit option, which is located under the groups or username section.
- Now the Permissions window will appear. Click on the Add
- Click on the Advanced button from the Select Users or Groups pop-up window.
- Select Find Now
- Now, scroll down on the search result and navigate to the Everyone
- Choose Everyone and hit on the Ok
- Now to close the Select Users or Groups pop-up window, click on the Ok button. In the Security panel, underneath the list of group or user names, you will find Everyone.
- Choose Everyone and allow Permissions for Everyone by ticking all the check-boxes underneath the Allow section.
- To keep the changes, click on the Apply
- Hit Ok to close the Permissions window.
- Now, hit on the Apply button and then Ok on the Security window to save changes.
You should now be able to successfully configure your grant security permission and share your file or folders with the other users who are connected to your network.
The right way for connecting a directory or file with the other devices on your network is to first modify the network sharing permissions and then give your security authorization. This should do the trick if you are facing this problem.
3. Disable Password Protected Sharing
To share, view, or transmit files from some other desktop on the same network to your computer, you must first get a password from that machine’s network administrator. The password-controlled sharing might well be turned off to resolve this Windows can’t access network drive on Windows 11 issue.
If you are sure that the sharing is password-protected, follow the procedures outlined below to remove the password from the sharing:
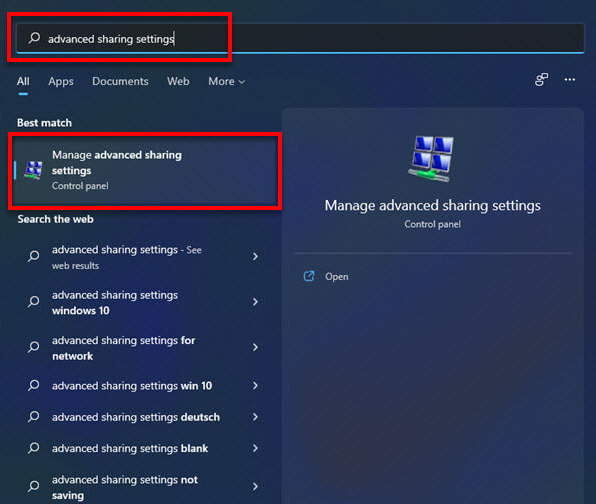
- Open the Start menu and type advanced sharing settings, and hit the enter button on your keyboard, or
- Click Windows Key + R to open the Run command and type exe/name Microsoft.NetworkAndSharingCenter /page Advanced and click the enter button to open the Advanced Sharing settings.
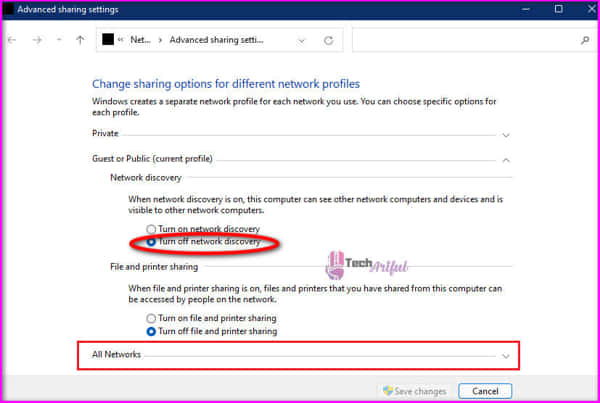
- Now click on the All network option to expand the drop-down menu.
- Toggle off the Password protected sharing option to turn off password protection.
Congo, you have now successfully turned off the password protection from the sharing. Once you have done that, close all the windows and restart your computer to take effect.
But keep in mind that do not ever do this step if you are in an untrusted network. Using password-protected sharing to send files or join the local network is the most secure means of doing so. If you disable the password protection on your device, it becomes risky to use. Anyone may have access to your shared files if you make them available to the public.
Now check if the issue persists or not. If it still bothers you, then follow the below methods.
4. Turn On File And Printer Settings
Enabling the file and printer sharing settings is the last procedure that we can use. You may be seeing the Windows can’t access network drive on Windows 11 issue since your networking profile stops you from accessing files and printers with others. This problem might easily be fixed by allowing file and printer sharing on your computer.
To Turn On File And Printer Settings, follow the procedures below:
- Open the Start menu and type advanced sharing settings, and hit the enter button on your keyboard, or
- Click Windows Key + R to open the Run command and type exe /name Microsoft.NetworkAndSharingCenter /page Advanced and click the enter button to open the Advanced Sharing settings.
- Now, under the Public Sharing option, turn on the File and printer sharing
Once you are done turning on the option, close all the windows and restart your computer to take the effects. After restarting the computer, this Windows can’t access network drive on Windows 11 should be fixed.
Frequently Asked Questions
Why am I unable to access a shared folder on my computer?
This issue is most likely caused by a network connection problem between both the PC and the folder in question. Furthermore, if you do not have the appropriate permissions to view the files, you may have this problem as well.
What should I do if I am unable to access a shared folder?
Several actions and troubleshooting approaches have already been covered in this post to resolve the problem of not being able to access a shared folder on the network. In this guide, you will learn how to access a shared folder quickly and efficiently by following the procedures outlined.
Conclusion
When a user attempts to share a network drive or folder on their Windows 11 PC, they may see an unexpected error message. Consequently, Windows 11 can not reach the network drive or folder as a result of this restriction.
An incorrectly set up network between your Windows PC and the disk sharing options might be the source of the problem. Aside from that, the user account on that shared network computer may lack insufficient sharing permissions or has an invalid username and password combination. And thus, this problem occurs.
So, in this guide, we went through all these possibilities and tried to fix Windows that can’t access network drive on Windows 11 issue. We hope that your problem is now fixed.


