In this post, you’ll get to know about how to fix Razer Nari Mic Not Working on your gaming PC easily.
When it comes to creating a sense of immersion in a game, the Because sound is critical. It makes use of your understanding of hearing to build the ambiance and mood of the game, resulting in a lifelike experience that allows you to embody your game character completely.
This Razer Nari headset with THX Spatial Audio conforms to this principle and offers you 360-degree positional sound, allowing you to have more spatial awareness in your gaming environment. Also included are ergonomic design features, which combine to make the Razer Nari one of the most comfortable gaming laptops for regular usage.
When it comes to listening to one’s favorite music, watching a movie, playing a game, or doing anything else that requires sound capabilities, the usage of headsets has risen to become one of the most essential parts of human existence.
While Razer headphones are top-rated in this circumstance, several instances of the Razer Nari mic not working have been reported by gamers in recent weeks. Players are therefore worried about how to repair the microphone issue with their Razer Nari headset. If you’ve been wondering about the same problem, don’t worry; we’ve compiled all you need to know in one convenient place.
Why Is Razer Nari Mic Not Working
When it comes to why your Razer Nari microphone is not working, there are several possibilities. This might be due to a setting on your device that blocks a particular app from accessing your microphone, or it could be due to dirt accumulating in the microphone. The hardware may have been damaged as well, which is another possibility. Here are the possible reasons behind your Razer Nari mic not working –
- Outdated software.
- Muted mic.
- Different default microphone.
- No access to the microphone.
- Outdated Audio drivers.
How To Fix Razer Nari Mic Not Working
Due to the fact that the Razer Nari Headset’s microphone is not functioning correctly, or because your friends are unable to hear you, probably, the problem does not lie with the microphone but rather with the headset’s settings or with the device’s software drivers. You can experiment with some of the solutions provided below.
- Check microphone connection.
- Uninstall Razer software.
- Troubleshoot the microphone.
- Allow microphone access.
- Set Razer Nari as the default microphone.
- Update audio drivers.
- Check hardware.
1. Check Microphone Connections
First and foremost, check to see sure your microphone is turned on and working correctly before proceeding. Unusually, there is another button on the headset’s left earcup, just beneath the volume dial and to the right of the volume dial.
You will be muted until you press this button. If you do not press this button, a red light will illuminate on the microphone to indicate that it is muted until you do. You will be unable to use the microphone unless and until you hit this button.
Consequently, the microphone button must be held down entirely until the red light on the microphone turns off completely. When this occurs, the microphone is unmuted, and the dialogue returns to where it was before it became muted. Also, read how you can fix HyperX Cloud 2 mic not working.
2. Uninstall Razer Software
You need to understand is that software upgrades might have severe flaws at times, resulting in a range of problems such as the microphone not working. Consequently, to address the Razer microphone issue, follow the steps outlined above to resolve the problem as quickly as possible.
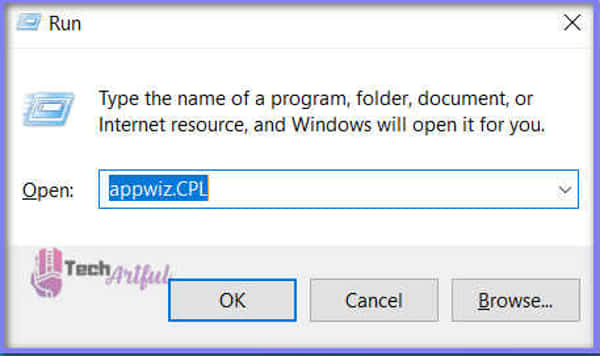
- In the dialogue window that opens after pressing the Windows + R keys together, type appwiz.CPL into the search box.
- In this folder, you will see a list of all of the applications that have been installed on your computer.
- Afterward, right-click on all of the Razer software and pick Uninstall from the drop-down option that will appear.
- Whether the Razer Nari mic is still not working after you have finished uninstalling all of the apps, restart your computer and check to see if the problem has been fixed.
3. Troubleshoot The Microphone.
If none of the methods listed above successfully resolved your Razer headset mic, not working problem, don’t give up. It’s conceivable that the built-in Windows diagnostics tool will be able to find a reasonable solution to your problem.
- To begin, hit the Windows logo key on your keyboard simultaneously as the R key.
- The Run box should be filled up with the appropriate control.
- Then select View from large icons the drop-down menu in the top right corner of the screen.
- Troubleshooting may be accessed using the Troubleshooting drop-down menu selection.
- Select Troubleshoot audio recording from the drop-down menu under the Hardware and Sound section of the window.
- When the troubleshooter box appears, click Next to continue with the troubleshooting procedure.
- You will be requested to select one of your devices, and you’ll need to click Next to begin the installation process on that device.
- Identify any issues and address them as soon as possible.
4. Allow Microphone Access
Most likely, the wrong privacy settings on your Razer Nari headset are to blame for the inability of your Razer headset microphone to function correctly. Please follow the instructions below to provide access to your Razer Nari microphone.
- To access the Microphone privacy settings, start typing microphone privacy into the Windows Search box and pick Microphone privacy settings from the drop-down list.
- By verifying that both the microphone and camera settings on your smartphone are enabled in the device’s settings menu, you may allow programs to access your microphone and camera.
- To ensure that each application you desire to provide permission to use your microphone has microphone access enabled, scroll to the bottom of the page and click on the microphone access checkbox.
5. Set Razer Nari As Default Microphone
A common reason why the microphone on your Razer Nari headset is not working is that it hasn’t been configured as the default recording device on your computer, which is the most likely source of the problem. The following is the method to be followed:
- When you right-click the sound icon in your notification area, a context menu will appear, from which you may choose Sounds from the drop-down menu.
- The Recording tab provides a list of all audio recording devices that are currently attached to your computer, as well as any that are not connected at all. As a first step, make sure that your Razer headset is set as the default device in your computer’s settings before continuing (and the default communication device).
- It is feasible to determine whether or not the level indicator is providing audio output by speaking loudly at the level indicator. As a result, the Properties option may be accessible from the context menu of your Razer headset if this is the situation.
- To complete the procedure, choose the Levels tab and then drag the volume slider to the appropriate position on the screen.
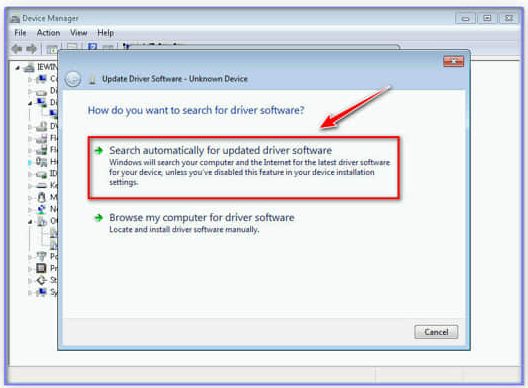
6. Update Audio Drivers
The majority of the time, when you connect your Razer headset to your computer, the necessary audio drivers are downloaded and installed immediately. It is possible, however, that it will fail to function as intended in some cases.
Therefore, upgrading all audio drivers is always an easy solution: simply run the following command:
You have the option of manually or automatically updating your driver. Installation by manual means is time-consuming and complex, as it needs looking for the correct driver version for your sound card and Razer headset, which might take several hours and is not recommended. Except if you have extensive technical expertise and experience, we do not suggest it.
The process of automatically updating your driver, on the other hand, is pretty straightforward. Once Driver Easy has been installed and launched on your computer, it will automatically locate and install the latest drivers for all of the devices connected to your computer that require them, saving you valuable time and effort. The following is an example of how to make use of it:
- Driver Easy is available for download and installation on a computer or laptop.
- Run Driver Easy and select the Scan Now option from the menu bar to start scanning your computer. Driver Easy will check your computer for incompatible drivers and notify you if any are found.
- If you have a Razer Nari headset, you may update it by selecting the Update icon from the drop-down menu beneath the device.
- Also available in the bottom right of the screen is the Update All option, which will cause your computer to automatically update any outdated or missing drivers it may have come into contact with.
7. Check Hardware Damage
Attempting every option and failing to resolve the problem implies that there is a problem with the computer’s or headset’s hardware. You have the option of either purchasing a new product or attempting to pinpoint the issues. An issue with your computer’s ports, as well as the connections on your Razer Nari microphone, might be caused by a breakdown in the hardware.
Before using the jack, make sure that it is in good working order by checking the state of the jack. Additionally, if desired, you may remove the USB port and replace it with a connection that includes audio connections instead.
The Razer Nari is a great gaming headset, and with the solutions we’ve provided, minor issues with this headset may be fixed fast and efficiently. The solutions described above address several issues and encompass a range of possible remedies. All of the typical problems connected with the Razer Nari microphone not working have been covered previously on this page.
Unfortunately, if none of these fixes work, you will need to inspect your hardware components and get professional technical support. Additionally, you may test a different device to determine whether the issue is with the Razer Nari audio or something else.
FAQ
How can I fix the Razer headset mic on my PlayStation 4?
Answer: Unplug your PS4 controller from your headset, then pull the mic boom straight out of the headset and re-plug it in. Then, connect your PS4 controller to your headset.


