
Compared to internal cameras, external cameras, such as Logitech webcams, provide objectively superior video quality and a greater variety of features and functionality. In some cases, you may experience difficulties, such as when the built-in Microphone (which may be your C920 camera) stops working unexpectedly.
Instead of spending even more money on yet another expensive camera, there are several things you can do to regain control of your voice without spending any additional funds at all.
To explain this, there are two primary categories of explanations: hardware and software. As an example, in contrast to anything malfunctioning within Windows, a camera is a real-world physical device.
Depending on the circumstances, the issue could stem from the device itself or from your computer’s inability to recognize how to connect to it. The vast majority of Windows webcam issues are caused by third-party software. Because either Windows 11 does not recognize that a camera has been connected or the software you are using (such as a browser or video program) does not have the appropriate permissions set, access to the camera is denied.
Reasons behind Logitech c920 Mic Not Working
If your Microphone isn’t working correctly with your Windows computer, there are a variety of possible causes. The following are some of the most common reasons for user complaints that we were able to identify based on a variety of different sources of information.
- A problem with your Microphone appears to be the source of the problem. If there is a problem with the hardware, the first thing that comes to mind is that it needs to be repaired. It’s possible that your equipment is malfunctioning or has been damaged, which would explain the problem you’re experiencing.
- Unfortunately, there’s a problem with your port at the moment. It’s possible that something happened to the audio port you’re using, which would be similar to having hardware issues with the Microphone itself. If this is the case, you can try different ports or look for a different one to use instead.
- You have corrupted or out-of-date audio drivers on your computer. All systems rely on drivers, which are critical components of the system. If you do not maintain the proper operation of your audio drivers, problems will inevitably arise.
- The microphone device has been turned off for the time being. You or someone else may have turned off your Microphone, or a program may have interfered with your Microphone’s configuration settings. Because your Microphone has been deactivated, you will likely be unable to use it.
- The Microphone on your computer has been deactivated for your protection. Sometimes it is difficult to tell if your Microphone is muted because the situation is so dark. This may irritate, giving the impression that there is a more severe problem.
- This is because the Microphone on your computer is not being recognized by the program you are currently running. Some programs, such as Skype or Discord, may require you to make additional configuration changes before they can make use of your mic.
How to Fix Logitech c920 Microphone Not Working
Microphone issue is a common problem since the beginning of webcams. but most of the time it’s a lot easier to fix than to think of the problem. After testing a lot of methods I have found a few of them to fix this issue completely. Now, let’s fix your c920 webcam too.
Here are the steps to fix Logitech c920 Microphone not working:
Update your webcam driver
The built-in Microphone will not function properly if you are using a camera driver that has been corrupted or is out of date. It is possible that as a result of this, you will be unable to utilize your smartphone fully and that you will be missing out on a new feature that is required for the Microphone to function correctly.
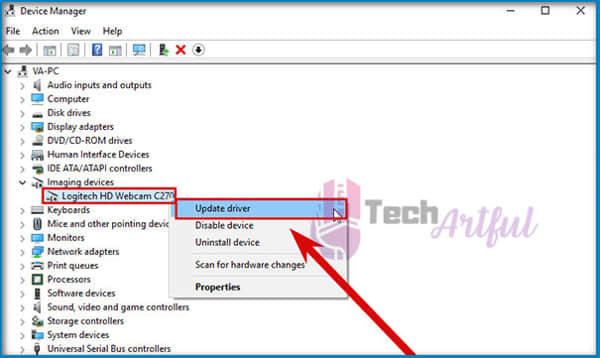
It is necessary to upgrade your camera driver to resolve the issue you are experiencing.
The most recent driver is available for download and installation on the support page for your convenience. On the other hand, Driver Easy is a program that can be used to update your drivers.
When you run this utility, it will automatically find the most up-to-date drivers for your system and download them to your computer. It will uninstall any outdated drivers.
How to keep your drivers up to date with Driver Easy: Using Driver Easy, follow these steps:
- Driver Easy is available for download and installation.
- Start Driver Easy and click on the Scan Now button to scan your computer for outdated drivers and software. If any out-of-date drivers are discovered, Driver Easy will notify you that they have been found.
- Select Update All from the drop-down menu to have your system automatically download and install the most recent version of all of the drivers that are either missing or out of date on your system.
- To use this feature, you must have the Pro version, which includes comprehensive support and a 30-day money-back guarantee.) When you click on the Update All button, you will be presented with the option to upgrade your operating system. If upgrading to the Pro version is not an option for you, you can still use the FREE version of the driver update program when updating your drivers. To do so, download each one and manually install them one at a time.) The Driver Easy Pro edition has access to a wealth of technical support resources. If you have any questions or require assistance, you can contact the Driver Easy support team by emailing help@drivereasy.com.
After updating your drivers, restart your computer and perform a mic test to determine whether or not the problem has been resolved. Otherwise, you can try the remedies listed below to see if they work.
Allow access to your webcam’s built-in Microphone
If you use Windows, you can control whether or not your system and applications are allowed to access the Microphone. If you have disabled access for whatever reason, you should double-check your settings and re-allow access.

You can accomplish this by following the steps outlined below:
- To bring up the Run dialog box, press the Windows logo key and the R key at the same time on your keyboard.
- The drop-down menu for privacy can be found here.
- Select Microphone from the left-hand navigation pane. Using the Change button, verify that Microphone access for this device is enabled for this device.
- In the Allow applications to access your microphone section, ensure that the Allow applications to access your microphone option are turned on.
- As soon as you’ve granted the microphone permission to access your applications, you’ll be able to customize the settings for each one separately. To complete the process, navigate to the Choose which Microsoft applications may access your microphone page and toggle on the applications you wish to use. Check that the Allow desktop programs to access your microphone option is turned on for desktop applications before you begin using the program.
After completing all of these steps, test your webcam microphone to make sure it’s working correctly before proceeding. If the problem persists, try the next solution on the list below.
Manually check for hardware issues
Identifying whether or not you are experiencing a hardware problem should be your first order of business. Listed below are some practical actions you can take to ensure that no physical component involved in this issue is harmed due to the process.
After removing your Microphone from its port, give it 30 seconds before re-inserting it into the same port again. Check to see that you’re connecting the Microphone to the correct port – most microphone ports have a pink ring around them to indicate that they are in operation. It is possible to use the same Microphone on two different devices simultaneously.
A separate computer can help you determine whether or not you have a software problem by checking to see if your Microphone works appropriately. It’s also possible that if it doesn’t work on a different computer, it’s because your Microphone isn’t working correctly.
Make sure Windows can pick up any sound from your Microphone by running the following test: If your Microphone does not function properly in a specific application, you may need to check the settings for that particular application.
- An overview of how to test microphone audio on Windows is provided in the following section:
- To access the Control panel, open the Start menu and then select Control Panel from the right-side menu on the left-hand side of the screen.
- Check the Category view mode option in your browser’s settings to ensure it’s turned on.
- To manage audio devices, select Manage audio devices from the drop-down menu after selecting Hardware and Sound from the top-level navigation bar.
Make your way to the Recording page and begin speaking into your Microphone to start the recording. If the green bars adjacent to your Microphone rise and fall in response to your speech, Windows can pick up audio from the device you are using.
Install all Windows updates
Windows updates keep Microsoft Windows and numerous other Microsoft products up to date. It is common for them to include feature enhancements and security updates, which help protect Windows from viruses and other harmful attacks that could otherwise cause your applications to stop functioning correctly.
So before proceeding with the options listed below, make sure you have downloaded and installed the most recent Windows updates available on your computer. The following is an example of how you might go about it:
- By typing check for updates into the Search box, you will be able to locate it. To see if there have been any changes to the results, select Check for updates from the drop-down menu.
- Select the Check for updates tab to see if there have been any updates. This program will automatically begin downloading and installing any updates that may be available. Afterward, wait for it to complete its task, and you should be given the option to restart your computer.
If your Microphone is no longer functional after you’ve completed the installation of the most recent Windows updates, you should contact Microsoft Support. If that doesn’t work, move on to the next solution listed below.
Make sure your mic isn’t disabled
It’s possible that you won’t realize that your Microphone has been accidentally turned off until after the fact. To determine whether or not this is the case, follow the steps below:
- To access the Speaker icon, located in the lower-right corner of your computer screen, select it with the right-click menu. Then, choose Open Sound Preferences from the list from the drop-down menu.
- Examine the input section of the configuration window to ensure that your device is listed there. Then, from the drop-down menu, select Device Properties from the list.
- Disable should not be selected, so make sure that the box next to it is unchecked.
Attempt to speak something after you’ve verified that the Microphone is enabled to determine whether it has returned to its previous state of functionality. Continue with the following solution, listed below, if the Microphone is still not working correctly.
To use the built-in Microphone, you may need to select the audio device from which you are recording, depending on whether you are using an external camera or not. When your computer is operating normally, it is assumed that your Mic is connected.
Windows will automatically identify and configure it as the default input device for your computer. However, there are some instances in which it simply fails to do so, and you must manually configure it. For example:
- To access the Speaker icon, located in the lower-right corner of your computer screen, select it with the right-click menu. Then, choose Open Sound Preferences from the list from the drop-down menu.
- Then, in the section titled Related Settings, click the drop-down menu that says Sound Control Panel and select that option.
- From the drop-down menu, select the Recording tab to begin recording. Select your Microphone and then click Set Default > OK to complete it to finish the process.
Perform a mic test to determine whether or not the procedure was successful after you’ve made the necessary corrections. You will need to replace your Microphone after you have checked the input sensitivity of your Microphone to ensure that it is neither too low nor too high, as this could result in complications later on.
The following is an example of how you might go about it:
- Properties can be accessed by right-clicking the Microphone in the Sound window (as shown in the preceding image) and selecting it from the context menu.
- From the drop-down menu, select the Levels option to proceed. Then, using the volume slider, adjust the volume to your preference. Additionally, you must perform a microphone test at the same time that you complete this step.
Otherwise, if nothing else works and your Microphone continues to malfunction, you’re having trouble hearing yourself think about having your computer repaired rather than purchasing a new one. It’s possible that there is a problem at the system level, which would explain this.
You will be able to determine whether or not there are any corrupted system files on your computer and pinpoint the source of your problem without having to scratch your head in confusion.
We also provide Restoro, a legitimate repair program that automatically detects and fixes a wide range of errors in the Windows operating system without causing data loss. Restoro is a program that can be downloaded and installed. When you first launch Restoro, it will perform a complimentary scan of your computer.
When the Scan is finished, you’ll be presented with a comprehensive overview of your system and any issues it may be experiencing. Start the repair procedure by clicking the Start Repair button, and then sit back and wait for Restoro to take care of the situation.
FAQ
Does Logitech Webcam C920 have a microphone?
Two microphones, one on either side of the camera, capture more realistic sound from a broader range of angles, ensuring that your voice is natural and clear during conference calls and other meetings.
Why is my Logitech C920 mic not working?
Turn off allow apps access to your microphone and microphone access for your device in the settings/system/sound/microphone privacy settings (under related settings) by going to settings/system/sound/microphone privacy settings (under associated settings). Go to the device manager and uninstall the C920 device under audio input & output from the list of installed widgets.