
Imagine you are in a meeting on Microsoft Teams, but you are not able to share your computer’s screen with the other coworkers. You may wonder why can’t I share my screen on Microsoft Teams. As a fellow MS Teams user, I know how frustrating that experience would be.
Sharing your screen is one of the features in Microsoft Teams that is used the vast majority of the time. When you are taking part in a video conference, you will often be required to show the other attendees what is on your screen so that you may present your point more effectively.
Because of this, the fact that Microsoft Teams does not allow users to share their screens is rather a significant problem in the modern world of work-from-home jobs.
There is no need for you to get too concerned if you are also facing the same problem.
Because, after doing some homework, I came here with this article where you will find many working methods which will solve your screen not being able to share on Microsoft Teams meeting problem.
So, keep reading this post until the end to know more in detail.
Why Can’t I Share My Screen On Microsoft Teams?
There are so many reasons why you may not share your screen on Microsoft Teams while in a meeting. Check to see whether you are granted permission to share the screen if you are experiencing issues with screen sharing not functioning.
Several businesses restrict screen sharing to just their most senior staff. To successfully share your screen with others, it is essential that you have access to a high-speed internet connection and that you reduce the resolution of your screen.

Microsoft Teams is a great corporate collaboration tool, but it is let down by a bug that prevents users from sharing their screens. Because MS Teams is still in its early stages of development, several users, even you and I, have just lately come into the screen-sharing problem.
This situation is brought on by several different problems, some of which are software-related and others hardware-related. I have done the necessary investigation and compiled a list of them all, along with brief explanations to assist you in comprehending these.
Therefore, the following are some of the causes that may be producing problems with screen sharing in the Microsoft Teams app:
Screen Sharing Is Restricted
Check to see whether you have all the appropriate permissions to share your screen inside the Microsoft Teams app if you are unable to do so.
Different businesses have different sets of policies and procedures governing the use of the Microsoft Teams app. Some companies let their workers share their displays, while others prohibit this capability to prevent the disruptions that might result from workers accidentally sharing their screens.
Therefore, the best course of action would be for you to get in touch with the MS team admin at your employer and inquire about the guidelines and policies that govern the MS team.
Internet Connection is Slow/Unstable
An unstable or slow internet connection is always a great problem that may result is rising a lot of difficulties in your daily life. If you have the authorization to share your screen in the Microsoft Teams app but are still unable to do so, you should double-test your broadband connection.

There are situations when the issue is inside your internet access itself and not elsewhere else. To display real-time actions on your screen, screen sharing in any program needs a substantial amount of data to be sent over the web.
There is no exception to this rule with MS Teams. To be able to show your team what’s on your screen, you need to have access to a high-speed internet connection. If you do not utilize a reliable internet connection, however, you will be presented with a blank screen in front of them.
RAM Is Low
The problem with screen sharing in the Microsoft Teams application is frequently caused by a problem with the management of RAM. Using programs of this kind on a computer that does not have a sufficient amount of RAM configured will be difficult for you to perform.
For Microsoft Teams to successfully perform its background operations and allow you to share the screen without any interruptions, your computer’s RAM will need to be cleared of a reasonable amount of memory.
You won’t be able to share the screen, among other problems, if there isn’t enough RAM on your computer or if you’re trying to multitask with several resource-intensive programs at the same time.
Unnecessary Cache Files
Cache files that aren’t needed are just another potential explanation for why you are unable to share your screen using the Microsoft Teams app.
Cache files are created by an application to store data temporarily to facilitate the app’s background activities and ensure their seamless operation. If you leave your computer on for an extended period, though, those files will accumulate and may begin to interfere with one another.
When anything like this takes place, the activities running in the background of MS Teams are unable to function as they ought to. For the screen-sharing service to function properly, these programs have to be able to execute without any problems.
Display Resolution Is Very High
We have mentioned this to you previously, but for screen sharing to function well, a connection to the internet that is both stable and fast is required.
However, if the screen resolution is high, such as 4k, then all of the material that appears on your screen will begin to stream in that quality. This will place a significant amount of strain on both your personal computer and your network router.
If this is the case, regardless if you do have access to the highest internet connection, your personal computer will behave like an ancient and rusted railroad motor, and it will be difficult for it to complete tasks.
Microsoft Teams App Is Backdated
A further cause for your difficulties in sharing your screen is that the version of the Microsoft Teams software that you are using is out of date. Software that has not been kept up to date won’t have the most recent algorithms, improvements, or functionality as its more modern counterparts will. Because of this, you may encounter a variety of issues as long as you continue to use obsolete software.
If you haven’t updated the Microsoft Teams app in quite a while, you could have trouble sharing your screen with the other participants in a Microsoft Teams conference.
Third-Party Browser
Lastly, it is indeed possible that you won’t be able to share your screen when you’re using an application or browser that isn’t the official Microsoft Teams client. This might be a problem when you’re using a third-party browser. The functionality of Microsoft Teams, including screen sharing, is incompatible with browsers that were not developed by Microsoft.
Combining network connectivity with a browser results in an additional level of complexity that isn’t essential. If you access Microsoft Teams using a web browser, you won’t have access to a number of the program’s features that are available on other platforms. The ability to share your screen may be what’s lacking in this case.
Now that we know the reasons behind this problem, it’s time to learn how to solve it. Below we have given some of the best possible methods which will help you learn how to solve the unable to share computer screens on the MS Teams problem.
How to Fix Can’t Share My Screen on Microsoft Teams Problem.
Now that we’ve gotten that out of the way let us just move on to the next step, which is troubleshooting the problems that are preventing you from sharing your screen in the Microsoft Teams application.
The following is a list of the procedures you need to do to resolve difficulties with screen sharing on Microsoft Teams:
1. Ask For Permission To Share Screen
If you do not have the authorization to share your screen, ask the administration of your MS Teams account and request permission to share your screen. You can read through the policy regarding Microsoft Teams at your place of employment to determine whether or not you are permitted to apply for authorization.
The following procedure should be followed during a meeting to provide everyone access to share their screen:
- While in a meeting, click on the three-dot option on top of the screen and click on Meeting Option.
- On the option Who can bypass the lobby, choose Everyone.
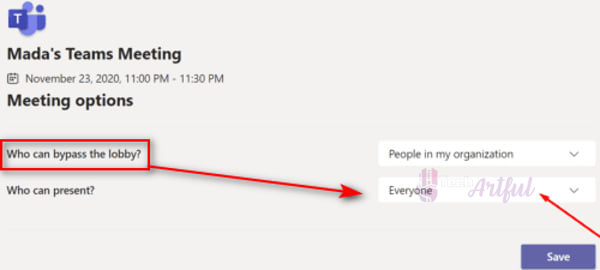
Once you select Everyone, all of the users will now be able to share their screens.
2. Migrate To A Stable High-speed Internet Connection
After you have been granted the required authorization, you will require access to a high-speed internet connection to guarantee that the screen-sharing session will go off without a hitch for both you and your colleagues.
The process of sharing your screen in a conference hosted by Microsoft Teams is similar to streaming video games. Both of these need activities to be streamed on the screen in real time. Therefore, the best thing to do is get in touch with either your internet service provider or the administrator of your network and request their assistance in resolving the troubles you are having with your internet access.
They will assist you in repairing both the speed and the reliability of your internet connection, after which you will be able to share the screen in Microsoft Teams without experiencing any problems.
3. End Task Unnecessary Background Apps
If your RAM is low, it’s wise to close unnecessary background apps. Because of the considerable amount of RAM that is being used up by the programs that are running in the background on your computer, there is very little memory available for the Microsoft Teams app.
In addition, the Microsoft Teams software will not function correctly if there is insufficient RAM available. The Microsoft Teams app does not work properly if you choose to share the screen when it is in that position.
Before you use the Microsoft Teams application, please ensure that you have completed the following steps to close any background applications:
- Press CTRL + Shift + Esc buttons on your keyboard and select the unnecessary app that is not needed.
- After selecting the app, click the End Task
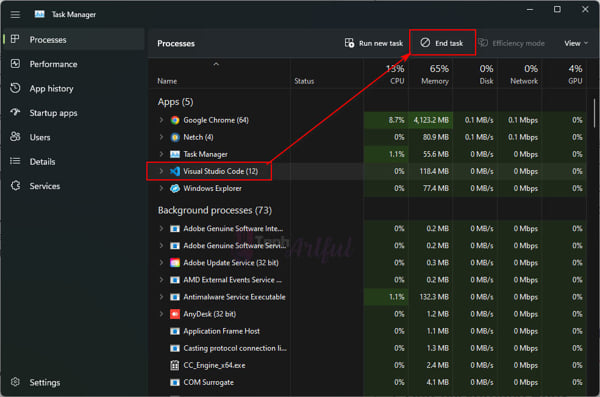
In this way, you can quickly close an unnecessary app using Task Manager.
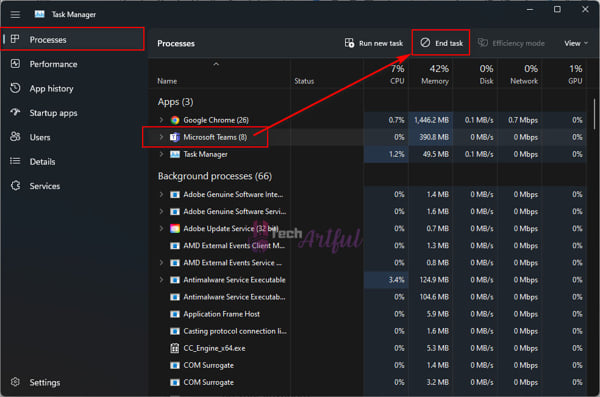
4. Delete Cache Files
Delete any cache files that were produced by the MS Teams application during the previous session that was located in your system folder. Because the cache files are incompatible with one another, utilizing some capabilities of the MS Teams app, such as screen-sharing, will not be possible.
In addition to this, it will need a large quantity of storage space on your hard drive. Therefore, to erase the cache files associated with MS Teams from your personal computer, follow the procedures below:
- Click the right mouse button on the Taskbar.
- Select Task Manager from the menu.
- Search the Microsoft Teams process, and then click on it.
- Click on the End Task button on the upper sanction if you are a Windows 11 insider preview user, or you can find the End Task button in the below right side corner.
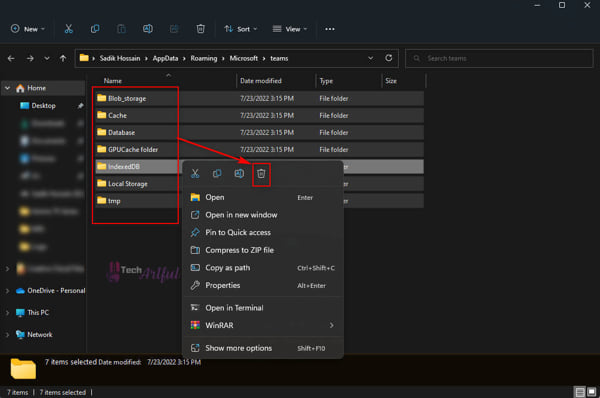
- To launch the Run application, press the Win + R key simultaneously on your keyboard.
- In the box, type %appdata%\Microsoft\teams, and then click the Enter key on your keyboard.
- Delete the folders that have the following names: application cache, blob_storage, Cache, databases, GPUcache, IndexedDB, Local Storage, and tmp.
5. Lower Display Resolution
During a screen-sharing session, a high display resolution will need a greater amount of resources to be performed from your computer.
For the sake of screen-sharing, a higher-resolution display produces a great deal more data than a lower-resolution screen does, and your computer will have a difficult time exchanging the vast quantity of data that is produced with the MS Teams server.
Reduce the resolution of your screen if you would like to be able to show what’s on your screen during a meeting hosted by Microsoft Teams without any problems.
Bringing down your screen resolution may be done in the following steps:
- Go to Settings by clicking on the Windows Start button on the Taskbar, or click the Win + I button on your keyboard.
- Navigate to System > Display > Display Resolution.
- Now choose the lower resolution from your current resolution.
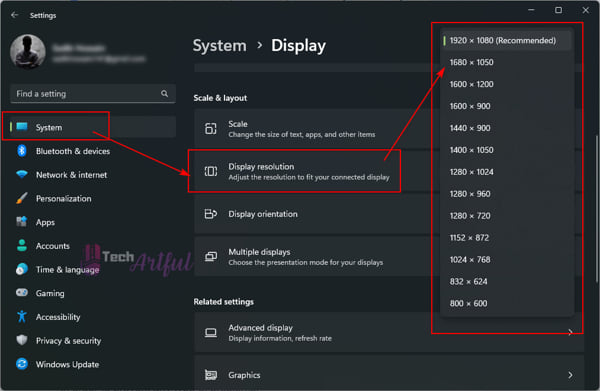
After that, reboot your system, and you are good to go.
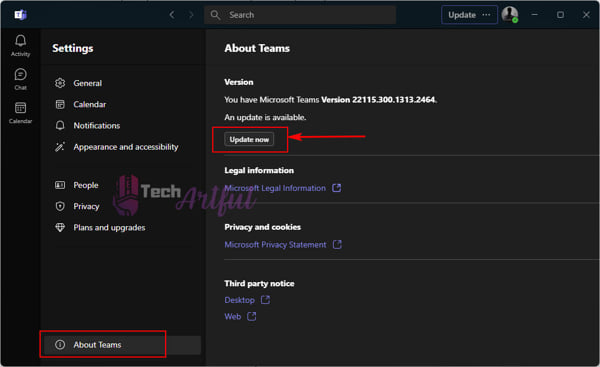
6. Update the Microsoft Teams Software
At least in the case of computer software, there is no guarantee that an older version will be superior. When compared to more recent versions, older software is more likely to include errors and to be lacking in some functionality. Therefore, it is important to upgrade the Microsoft Teams app to prevent any type of problems.
The following is a rundown of the steps necessary to upgrade the Microsoft Teams app:
- Launch the Microsoft Teams application.
- Simply go to Settings and More
- Go to the About Teams option and choose the option to Check for updates.
Conclusion
Not being able to share your computer screen with others might be quite frustrating while you are explaining something. So, after doing some research, we came here with this article where you will find the solutions to the unable to share computer screens on the MS Teams problem pretty easily.