Have you noticed that your Chrome consumes a significant amount of your computer’s CPU processing power but don’t know why?
This tutorial will walk you through the steps necessary to minimize the amount of processing power that Chrome requires, as well as explain why is Chrome using so much CPU and the most frequent factors that contribute to excessive CPU consumption.
The majority of Windows 10 users still want to use Google Chrome instead of Edge. It’s unpleasant, but Chrome may occasionally use excessive amounts of CPU and RAM for no apparent reason. As much as 40% to 50% of your CPU’s processing power might be used by Google Chrome while it is running.
The browser has much more background processes than any other internet browser.
Your computer pauses for a few seconds while you’re surfing the Internet, then restarts properly and freezes once again. This happens repeatedly. You’ll see that Google Chrome is taking a significant portion of your CPU when you use Task Manager.
Why is Chrome using so much of the CPU? There are many probable reasons for Chrome’s CPU-intensive behavior, but there are also several fixes.
In this guide, we will share some of the best ways to fix chrome using excessive CPU usage issues. So, stick with this article until the end to know the remedies.
Reason Why Is Chrome Using So Much CPU Power
Even while Google Chrome is among the most resource-intensive browsers, it is not very likely to be the only cause of a significant amount of damage. Rather, it is often a mix of circumstances that reflect how you use the browser.
It is not a simple task to determine what is causing Chrome to utilize an excessive amount of both the computer’s processor and RAM.
There are several possible explanations for why Chrome utilizes a significant amount of CPU; this is not a subject that can be reduced to a single cause. There is strong agreement that Google Chrome is one of the browsers that places the most strain on a computer’s processing power.
In most cases, the cause of your CPU issues is not Chrome itself; rather, the issue is more likely connected to the way you use Chrome. I’ll demonstrate that this is the case in the following way:
The following is a summary of some of the most common factors that contribute to the high use of both CPU and RAM:
- There are too many programs active at the same time. For example, browser extensions are little software programs that extend the capabilities of your browser.
- There are much too many tabs active in the browser at the same time. The constant use might eventually exhaust either your CPU, also known as the central processing unit or your RAM. Additionally, the battery’s life will be drastically shortened, and your monthly power cost will go up as a result.
- Streaming high-definition videos, such as those found on YouTube, Periscope, and other similar platforms, will often need a significant amount of relative CPU and GPU power unless you have a very powerful system.
- Exploring websites that include a large number of animated elements.
- Viewing sites that include a lot of advertisements.
- Exploring websites that start playing movies automatically when you visit them (what a drag, honestly!).
Although Chrome’s flexibility is one of the browser’s finest characteristics, it’s also one of the browser’s weakest because adding additional extensions and applications is precisely what causes a browser to become less responsive.
However, as you can see from the list to the top, excessive CPU utilization may be caused by a number of other factors in addition to browser extensions; these are all aspects that we will discuss.
However, there is a treatment available, so please don’t be concerned about it. If you use Google Chrome in a methodical manner and stay away from websites that contain excessive baggage, the browser’s speed may reach lightning-fast levels. Here are some pointers to get you going in the right direction.
How To Fix High CPU and Memory Usage on Google Chrome
There are so many fixes that you can take in order to fix this issue. By following the below methods, you can easily fix Chrome using so many CPU and RAM usage problems.
1. Close Unnecessary Chrome Tabs
There is no question that tabs in web browsers make our life simpler by allowing us to easily stay on top of all of the websites that we need. The issue is that we often forget to shut out-of-date tabs in a timely manner, which results in those tabs being open and using a large amount of the resources available on your computer.
The most obvious reason why Chrome uses up so much of your computer’s processing power is that you have too many tabs open at once. And the easiest way to solve this problem is to just close the tabs that you don’t need.
Make it a habit to routinely go through your Chrome tabs and close the ones that have served their role. Discard the tabs that are no longer necessary.
To shut a tab in Google Chrome, just click the X button that is located on the tab or use the shortcut CTRL + F4 on your keyboard while staying on the tab that is now active.
You may also swiftly shut all tabs except for the current one by right-clicking on the tab in question and choosing either Close Other Tabs or Close Tabs to the Right from the context menu that appears.
2. Disable Unnecessary Extensions
According to some resources, extensions for Chrome might cause Chrome to utilize a significant percentage of the system’s resources. This can include using 100 percent of the CPU, RAM, or disk. It’s possible that the high CPU consumption in Chrome is due to the extensions you’ve loaded for the browser, especially if you’ve installed a lot of them.
The huge ecosystem of extensions that can be added to Google Chrome is one of the browser’s most recognizable features. These extensions may do anything from preventing advertisements to organizing your passwords.
Each extension, on the other hand, is not just a supplementary function; rather, it has the potential to become a complete piece of software with its own set of features and capabilities.
As a result, it is possible for it to use the same amount of processing power, random access memory, and battery life as other applications. All of this would be handled by Google Chrome, which is one of the reasons why it is often believed that Chrome consumes a lot of resources.
You must think about uninstalling or disabling any extensions that aren’t absolutely necessary so that you may relieve some of the load that your Computer is under.
While uninstalled extensions would fully vanish, you would still be able to reinstall them at any time; disabled extensions would continue to get updates and may be reactivated at any moment (for example, a virtual private network), while deleted extensions would not receive any updates.
Therefore, we advise turning them off one at a time or removing them altogether. Then you need to restart Chrome and check to see whether the issue with Chrome’s excessive CPU consumption has been resolved.
The following steps need to be taken to manage Chrome extensions:
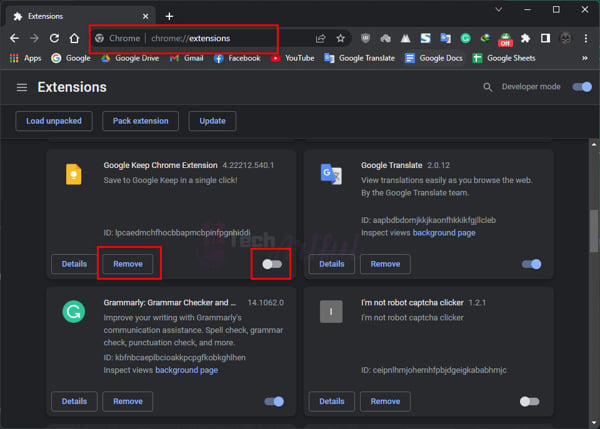
- In the address box of your browser, type chrome://extensions, and then hit the Enter key to enter the Chrome extension manager. This is the location where Chrome extensions are saved.
- To deactivate extensions, turn off the toggles next to each one.
- Or, you can remove them by clicking on the Remove button in the Extensions section.
3. Disable Prefetch Resources and Hardware Acceleration
The Prefetch function stores cached versions of websites automatically, allowing Chrome to potentially load them more quickly the next time you go to such pages. The graphics processing unit (GPU) of your computer is used via hardware acceleration in the process of running graphics-intensive operations.
It’s possible that these two additions will make Chrome run faster, but it’s also possible that they won’t. Turn off both of them and check to see whether Chrome is still using an excessive amount of your computer’s processing power and memory.
- Open Chrome and click on the three-dot menu, and hit
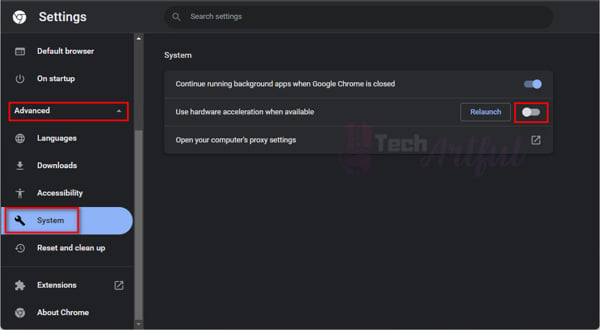
- Click on Advanced > System on the left sidebar.
- Toggle off the option that says Use hardware acceleration when available.
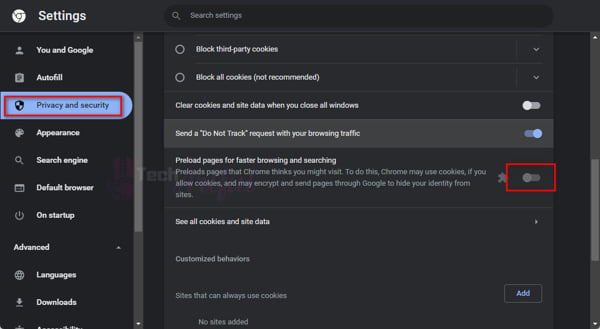
- Now hit on Privacy and Security in the left sidebar.
- Toggle off the option that says Preload pages for faster browsing and searching.
Now Chrome should be restarted, and you should check to see whether the high CPU and memory issues still exist after the restart.
4. Keep Google Chrome Up-To-Date
Chrome receives frequent updates from Google, which include the addition of new features as well as enhancements and the correction of bugs. Perform a search for available updates, download and install the most recent version of Chrome, then restart the browser to see whether the problem persists.
If the allegation that Google Chrome has a problem with rapidly depleting batteries is true, the truth is that you are not the only one who has noticed this issue. The Chrome development team at Google releases new versions of the browser on a regular basis, along with security patches, bug fixes, and other updates. Because of this, it is able to resolve the problem simply by ensuring that Chrome is always up to date.
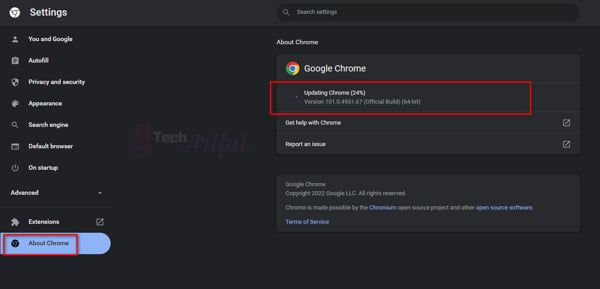
To determine the version of Google Chrome you’re using and whether or not there’s a more recent version available, follow these steps:
After clicking on More options (the three dots), go to Help, and then choose About Google Chrome from the menu that appears. Make sure that there are no new updates available, and then wait for your computer to download the most recent version of Chrome.
Once finished updating Chrome, restart the browser and check to see if the problem still persists or not. If you see that your Chrome is still consuming much more CPU and RAM usage, then follow the below solutions to solve the problem.
5. Reset or Reinstall Chrome
Reinstalling Chrome is another option to consider if none of the above have been successful for you.
You may continue to customize Chrome indefinitely as long as you follow the advice given above, as well as any other suggestions you find helpful.
At some point, it is possible that it will become complicated to determine what worked and what did not, and you may find that you have arrived at a position where you do not feel very good about yourself.
No need to worry, all you have to do is restore your Chrome settings to their original state.
To do that, follow the steps below:
- Open Chrome and go to the Settings by clicking on the three-dot menu in the top right corner.
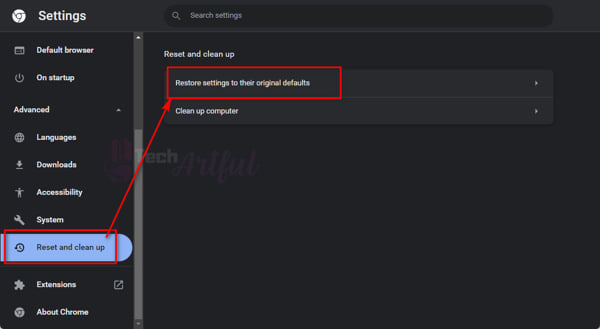
- Now click on the Advanced option on the left sidebar and click on the Reset and clean up option at the bottom.
- Click the option saying Restore settings to their original defaults and hit Reset settings.
Now the problem should be gone. If not, reinstalling the browser should be done if the issue is not resolved.
-
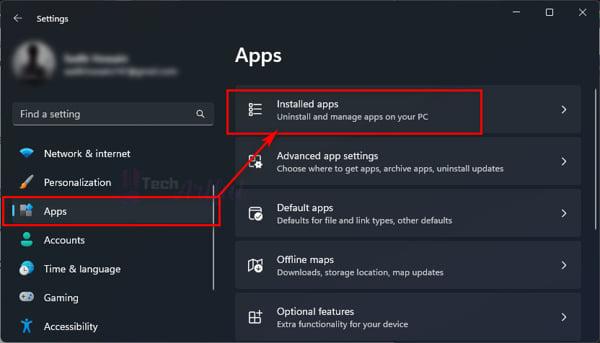
- Click on the Start menu to open your Windows Settings, and click on the Apps menu on the left sidebar.
- Click on Installed Apps and look for the Chrome
- Press on the three-dot menu beside the Chrome app and click on Uninstall.
Now, uninstall it as usual.
After finishing all of the steps involved in the uninstallation process, download the latest version of the Chrome Software on your computer and install it.
Once done, restart your computer, and the problem will be gone for good.
6. Clear Up Chrome Data
If none of the other easy solutions has helped, it’s time to look into some more hard options for fixing the problem.
There is a possibility that the browser’s cookies, history, cache, or other data are using up too many of your computer’s resources, particularly those associated with your CPU. If that is the case, you must delete all of the browsing data.
The functionality of Chrome might be altered at times by your browser’s cache as well as any extensions you have installed. Clear the cache, turn off any extensions you have installed, and give this fix a short go to see if it fixes the issue.
It is not necessary for you to delete any of the passwords or any other sign-in data that the browser has kept for you since doing so is not expected to have any kind of effect on the speed at which the browser operates.
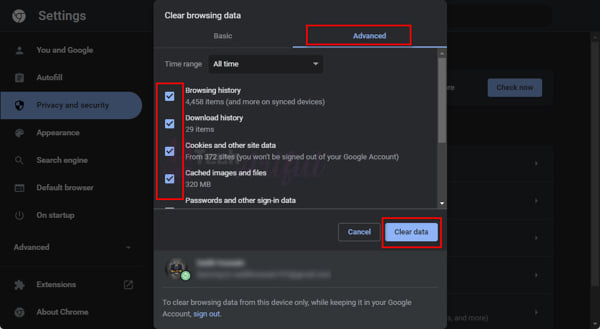
The following is a breakdown of the steps necessary to clear Chrome’s cache and cookies:
- Open Chrome and click on the three-dot menu located in the top right corner.
- Navigate to More tools > Clear browsing data.
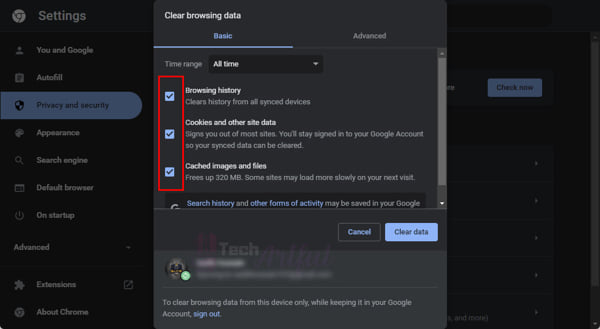
- On the Basic tab, change the time range to All Time, and then choose each of the checkboxes below.
- Make sure that the Time range is set to All-time in the Advanced tab. Choose the categories of data that you no longer need. Check to see that Cookies and other site data, cached pictures and files, and so on are chosen.
- Clear the data by clicking the Clear Data.
7. Switch To A Different Browser
Alternately, if nothing seems to be working, you might try using a different web browser for the time being.
If none of the above solutions are successful, this can be an indication that the problem is not with the browser but rather with the computer itself.
Changing to a different web browser is something we suggest you do to check that Google Chrome is not the cause of the problem. It is highly recommended that you experiment with Mozilla Firefox since, of all the software available, it is the one that is most comparable to Chrome.
It is highly recommended that you download and install Firefox. As soon as you are comfortable with the browser, try opening a number of tabs at once, watching movies, and doing other things to judge how well it will work. If there is no throttling of the CPU, but it is still being used at a high level, then it is clear that Chrome is the source of the problem.
If this is the case, the best course of action could be to entirely switch to Firefox, or you might give Chromium, a more lightweight version of Chrome, a go instead.
Conclusion
If Google Chrome uses too much CPU and memory on your Windows 11 computer, things might get frustrating.
So, compiled a list of solutions and reasons why is Chrome using so much CPU and RAM in your computer. We hope this article has helped you understand the reason and solve your problem.

