
If your AirPods are lighting white but not connecting, try the following. When your AirPods flash white, it indicates that they are in pairing mode or attempting to connect to a nearby device. That’s why it’s perplexing when your AirPods flash white yet doesn’t join. Other than the AirPods’ flashing status light, there are no other indicators of the issue.
As a result, you must address the problem on your own. Apple AirPods have been one of the most popular wireless earbud alternatives among those who favor the company’s products since the end of 2016. It took a few years for them to become what is probably Apple’s most popular accessory to pair with its devices. These earbuds are considered the company’s entry-level product in this category, and they are followed by Pro and Max varieties.
Despite this, the regular AirPods come with a microphone, accelerometers, optical sensors, a wireless charging case, a long battery life, and MagSafe charging. The AirPods use a variety of illumination colors to alert users to various situations. Lights will intermittently flash at regular intervals. Some customers are mystified as to why their AirPods’ lights periodically flash white.
We’ll go into what this may mean in our article below. Don’t be alarmed! If your AirPods are flashing white but not pairing, here’s a one-stop shop for all possible solutions. Continue to read!
What Do Flashing White Lights Mean on AirPods
On your AirPod headphones, you may see a variety of light colors, one of which is white. This light may occasionally flash. Simply put, the presence of blinking white lights signifies that the attachment is ready to connect to your chosen device.
The AirPods are actively searching for a suitable device to connect with by taking up Bluetooth radio waves in their surrounding area, as shown by a flashing white light on the headphone’s display. To stop the flashing and alter the color of the lights, you will need a device that is compatible with the lights. Using Bluetooth standards, you will be able to link AirPods with devices like an iPhone.
The great majority of iOS-powered Apple goods produced in recent years should support the pairing. For the device to recognize the headphones or earbuds you are using, you must enable Bluetooth capabilities in the device’s settings. Please be patient and wait a few seconds to check whether everything matched well and the lights changed. There may be instances where this is not the case, and we will cover more such examples in the following sections of this essay.
Why Are My AirPods Flashing White but Not Connecting
The white light on your AirPods should only shine for a few seconds before attempting to connect to any nearby compatible devices. If they continue to flash white for an extended period of time, there may be an issue with how the pairing procedure is being performed. There are a variety of potential remedies to explore depending on the nature of the problem you are facing.
Because the solutions you try may change depending on the condition of the Apple device you want to connect to the earphones, we’ll split things down based on the type of Apple device you wish to connect to the earbuds.
In the next section, we’ll go through how to fix AirPods that flash white but won’t connect to an iOS smartphone. Before proceeding, you should give the device you’re attempting to connect to a once-over by turning Bluetooth off and then back on. It is conceivable that this will reset the connection between the two devices you are attempting to connect.
Bluetooth is a superior wireless technology, yet, radio waves may become confused from time to time. It’s conceivable that reconnecting and giving it another attempt will solve the problem. Before re-enabling Bluetooth, you must first ensure that the earphones are still in pairing mode.
How Do You Fix White Flashing AirPods That Won’t Connect
If restarting Bluetooth does not resolve the issue, you will need to decide what extra measures to take, which may change depending on your device. To begin, consider the many causes for why AirPods cannot connect to portable devices. Apple’s iPhones, iPads, and iPods would be included, with the iPod Touch being a particularly noteworthy subtype of the latter.
Charge the AirPods
If your AirPods’ battery life runs out, they may be unable to maintain a connection with your iPhone. As a workaround, please ensure that your AirPods are fully charged before using them. For your convenience, the status light on the shell of your AirPods may glow in two more colors. If the indicator light is green, either the case or the AirPods housed within it have achieved their maximum charging capacity. Amber indicates that either the case or the AirPods themselves must be charged.

To charge your AirPods, you must first do the following:
- Place your AirPods in the case that comes with them after confirming that they are correctly positioned in the charging ports.
- Place your AirPods in their original carrying case.
- Reattach the lid. Your AirPods should power down and begin charging themselves on their own. Furthermore, the status indicator on the casing will flash an amber color.
- Replace the cover on it.
- Place your wireless case in the center of your MagSafe charger, with the status light facing up if it has one. If the light does not turn amber, the case will very probably need to be charged. Connect the case to a power supply using a Lightning-to-USB adapter.
- Connect the case to a power supply using a Lightning-to-USB adapter.
If just one of your AirPods is charging, visit our page to learn what to do if the other AirPod isn’t charging.
Clean the AirPods and the Case
If grime or filth is present on either the AirPods or the case, the connection between the connections and the case might be impeded, resulting in pairing issues. This is due to the casing’s inability to recognize when AirPods are placed inside of it.
To ensure that there is no physical blockage causing your AirPods to glow white, you should clean them as follows:
- Soak a cloth in a 70% isopropyl alcohol solution.
- Clean your AirPods and case using this towel, being careful not to get it on the speaker grill or any apertures in the case.
- Using a microfiber cloth, clean the AirPods and the case.
- Wipe the charging connectors and the speaker grill situated within the housing with rubbing alcohol using a Q-tip (where you place your AirPods).
Toggle the Bluetooth Off and On
Turning Bluetooth on and off can be used to restart the pairing process on your device. The actions below will force your AirPods to restart the pairing process, which may resolve whatever issue is preventing them from connecting. To enable Bluetooth on an iPhone, perform the following steps:
- Launch the device’s settings menu and then pick the Bluetooth option.
- Bluetooth
- Choose Bluetooth from the menu to disable Bluetooth and then press the Bluetooth switch. Tapping repeatedly will refill power.
- To choose Bluetooth, flip the switch.
You should complete the following if you use Android:
- Go to Settings > Connections to manage your connections.
- Connections
- By touching the switch, you may disable and then restart Bluetooth.
- To choose Bluetooth, flip the switch.
Connect AirPods Individually
Several consumers have claimed that pairing their AirPods one at a time solved the problem. You must do the following to do this:
- Insert a single AirPod inside the carrying case.
- Remove the extra pair of AirPods.
- Bring the case in close proximity to your smartphone after opening the lid. Your phone should be able to connect to your AirPods.
- The procedure of carefully attaching each AirPod.
- Remove the AirPod that is connected to the casing and replace it with another AirPod. Continue with the second step.
Update Your AirPods
It’s likely that your issue is due to one of the issues or malfunctions resolved in subsequent versions of AirPods. Furthermore, enhancements to AirPods guarantee that the headphones are compatible with the most recent iPhone models.
To determine whether or whether your AirPods require an upgrade, you should:
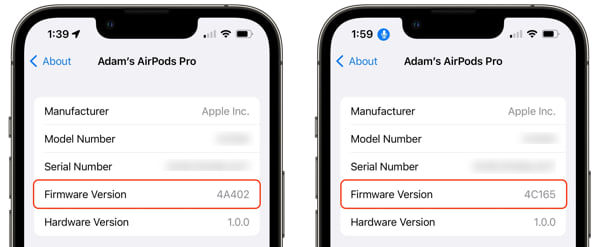
- Open the Bluetooth settings menu on the presently connected device.
- Access to the information
- Tap the information sign under the list of associated devices to receive additional information about your AirPods. The symbol will display firmware version information.
As of the time this article was created, the most recent firmware version for AirPods was 4E71. We recommend reading the page we wrote on the issue to understand how to upgrade the firmware on your AirPods.
Restart Your Device
The system will be entirely wiped clean when you restart your mobile device. Your AirPods may be having connectivity troubles, and this technique may be able to resolve many of the faults and bugs that are causing those problems. To restart your device, you must first:
- Continue to press and hold the power button on the smartphone until the power settings menu appears.
- If you have an iPhone X, 11, 12, or 13, you must press both the volume and power buttons at the same time.
- Volume and power button controls have been improved.
- Select the Resume process option. On Android, this option is displayed as a button; on an iPhone, it is shown as a regular slider.
- The button for resetting
- Once the device has completed rebooting, sign in as usual.
- Go to Settings > Bluetooth and check for the list of linked devices there. Fingers crossed, your AirPods will arrive shortly!
Keep Devices’ Software Updated
Updating your other gadgets, like AirPods, will enhance their performance. The usefulness and efficacy of your devices and the stability of your connections are all maintained by keeping their software up to date (such as Bluetooth). The following steps must be done in order to update your devices:
Android
- Click the Settings option to view the device’s settings.
- Settings
- Select System Updates from the options shown in descending order.
- The program has been revised.
- Select the Check for Updates option from the menu that appears.
- Purchase and then install
- The files can be downloaded in their modified form if an update is available. Following that, the update will be applied automatically.
- The program has been revised.
iOS
- Go to General > Configuration.
- Under General, select the Update Software option.
- System Improvement
- This page will inform you what version of iOS is presently installed on your device and whether or not an update is available.
- To begin the update installation, select the option from this page.
macOS
- Select System Preferences from the Apple menu to view the system preferences.
- Choices Select Available Software Upgrades from the System.
- The program has been revised.
If an updated version is available, use the Upgrade Now option to upgrade your Mac.
The update is now available.
Reset Your Network
After doing a network reset, your device will lose any prior Bluetooth or WiFi connections. Furthermore, it compels your iPhone and AirPods to reconnect and eliminates any interference from other wireless networks that may have been present. Keep in mind that doing so will also delete your existing WiFi network connection, requiring you to log in again.
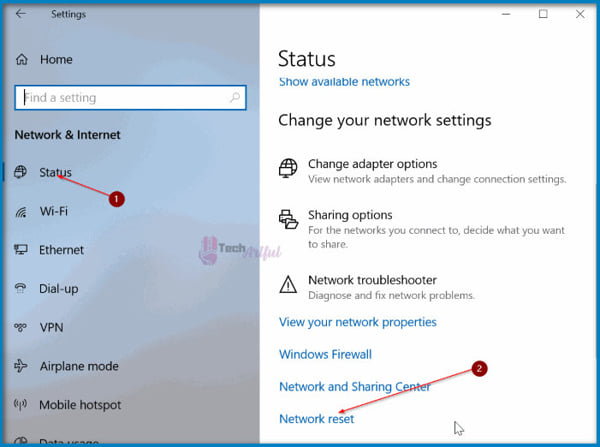
To reset your network, you will need to do the following:
Android
- On the linked device, go to the Settings menu.
- Settings
- You were looking for “reset network settings,” which you can find here.
- Reset your network settings.
- Then click the Reset Settings button.
- Android Network Settings Reset
iOS
- Go to General > Configuration.
- General From the drop-down box, select Reset, then Reset Network Settings.
- Reset your network settings.
macOS
On a Mac, the entire network cannot be reset, which is a very unfortunate restriction. Regardless, you are able to:
- Select System Preferences from the Apple menu to view the system preferences.
- Macintosh computer System Preferences
- Select the link to connect to the network.
- Choose one of your connected devices (including WiFi and other devices) from the list. Select a device and then click the minus symbol to remove it from the list (-).
- minus sign
- Click Yes on the resulting pop-up, then repeat for each of the other boxes until they are all unchecked.
- Select the “Yes” option, followed by the “Apply” option.
- Click the button to apply the filter.
Reset, Reconnect, and Fix Your Devices
Many various types of issues can be addressed by resetting all malfunctioning devices to their factory settings and then reconnecting them. As a result, any problems with your AirPods will be resolved, as the software on each device will need to be entirely rebooted.
- How to Perform an AirPods Hard Reset
- Both the iPad and the iPhone will be reset.
- How to Perform an Android Device Hard Reset
How do AirPods reset
If you want to avoid the difficulty of restoring lost data, make sure you complete this step before you reset your device. To restore your AirPods to their factory settings, you must first:
- Replace the AirPods in their case, then close and secure the cover. There must be at least a thirty-second pause.
- Close and latch the lid after placing the AirPods back in their case.
- While in your device’s Bluetooth settings, click the information icon next to your AirPods in the list of connected devices.
- Tap the information icon beside your AirPods.
- A menu will then appear, which may be extended. Select “Forget This Device” and then confirm your selection. As a result of this action, your AirPods will be deleted from all devices linked to your Apple account.
- Forget about the Device.
- After opening the charging case cover, press and hold the setup button on the back of the smartphone for around fifteen seconds, the amber light will ultimately go white.
- The setup button
- The lid should be left open, and the case should be placed adjacent to the device. At this time, your AirPods should hopefully be linked. If not, you should continue reading.
- Connect the switch.
Please see this page for more detailed instructions on how to reset your AirPods. If your AirPods are refusing to reset, try each of the six troubleshooting techniques indicated below.
Resetting iPad and iPhone
To restore an iPad or iPhone to factory settings, you must first:
- Go to General > Configuration.
- General
- Select “Transfer or Reset iPhone/iPad” from the drop-down menu.
- Transferring or Resetting an iPhone
- Then, after entering your password, select the “Erase All Content and Settings” option.
- Remove all the Content and Configurations.
When you restore your iPhone or iPad to factory settings, all data on those devices is erased. However, you may back up your mobile device by following these steps on your smartphone or tablet. You may be able to retrieve the old settings and data of your device after performing a factory reset by utilizing this Backup.
How to Perform a Factory Reset on Android
These are the steps to take in order to reset an Android phone:
- Go to the Settings menu and select Backup and restore.
- Reset
- The device will be reset once you press ‘Reset to factory settings and then ‘Reset Device.’
- A factory reset of the data
- From the menu, choose “Erase Everything.”
- Delete everything
When you reset your phone, all data that was previously saved on it is erased. If you wish to help, please follow these guidelines. Using this Backup, you will be able to restore both your data and your settings.
Check to See If Your AirPods Are Genuine
If none of the aforementioned alternatives work, it is possible that the AirPods in issue are counterfeit. In most situations, knockoff AirPods are of clearly lesser quality than genuine ones, making them more prone to problems, malfunctions, and even simple breakage. Checking the serial number of the AirPods in question is an easy way to determine whether or not they are genuine. Here are different techniques for determining the serial number of your AirPods:
- If you have an Apple device, you may access your Bluetooth settings by tapping the “More Info” button in the list of associated devices. This will provide you with further information about the linked devices. The item’s identifying number may be found there.
- The following items are included with your AirPods case: The number may be found on the bottom of the lid of your AirPods or AirPods Pro headphones’ original case.
- Your AirPods Max purchase includes the following features: The serial number for AirPods Max may be found beneath the left ear cushion rather than on the casing.
- The Container in Its Original State If you still have your original AirPods packaging, the serial number may be found on the rear of the case, immediately above the barcode.
If the AirPods are genuine, a website will appear revealing the earbuds’ features and attributes. Once you’ve located the serial number, go to the Apple Coverage Check page. Enter your serial number here.
Within the iOS 16 upgrade, Apple also introduced a simple AirPods compatibility test. Check out the piece we just wrote on the subject for more information and advice on how to recognize fake AirPods!
Contact the Apple Service Center
If, after attempting the techniques outlined above, your AirPods remain recalcitrant, your next best choice is to contact an Apple Service Center. At that location, skilled technicians will inspect your AirPods and repair or replace them as needed.
Customers with AppleCare+ are entitled to this service at no cost. If you are unsure whether or not to get AppleCare+, we recommend that you read our post on the service.
You may assist Apple workers in getting through the process faster by giving them a list of the various troubleshooting actions you’ve previously completed in the past. With this knowledge, they will be able to remove the most prevalent sources of the problem. You may even forward this post to them if you wish!
Furthermore, before visiting the service center, it is advised that you check for and record the serial number of the product in the issue. You will need to supply this number when sending in your AirPods for repair; thus, having it on hand will expedite the procedure. We hope you’ve already reinserted your AirPods and are now listening to music again. You now understand what to do if this situation arises again!
FAQ
Why are my AirPods popping up but not connecting?
If you’re experiencing problems connecting your AirPods, make sure they’re fully charged. You should also check to verify if the device to which you are connected supports Bluetooth and is running the most recent version. If it doesn’t work, you may try resetting the AirPods to reconnect them.
How do I stop my AirPods from flashing white?
A flashing white light will show on the AirPods when they are ready to be linked with an Apple device. If the case does not light up when you insert your AirPods inside, the case’s battery has been drained and must be recharged. You may need to restart the AirPods in order to terminate the connection and then try again.